Adorable Crochet Rocking Horse Pattern: A Step-by-Step Amigurumi Tutorial
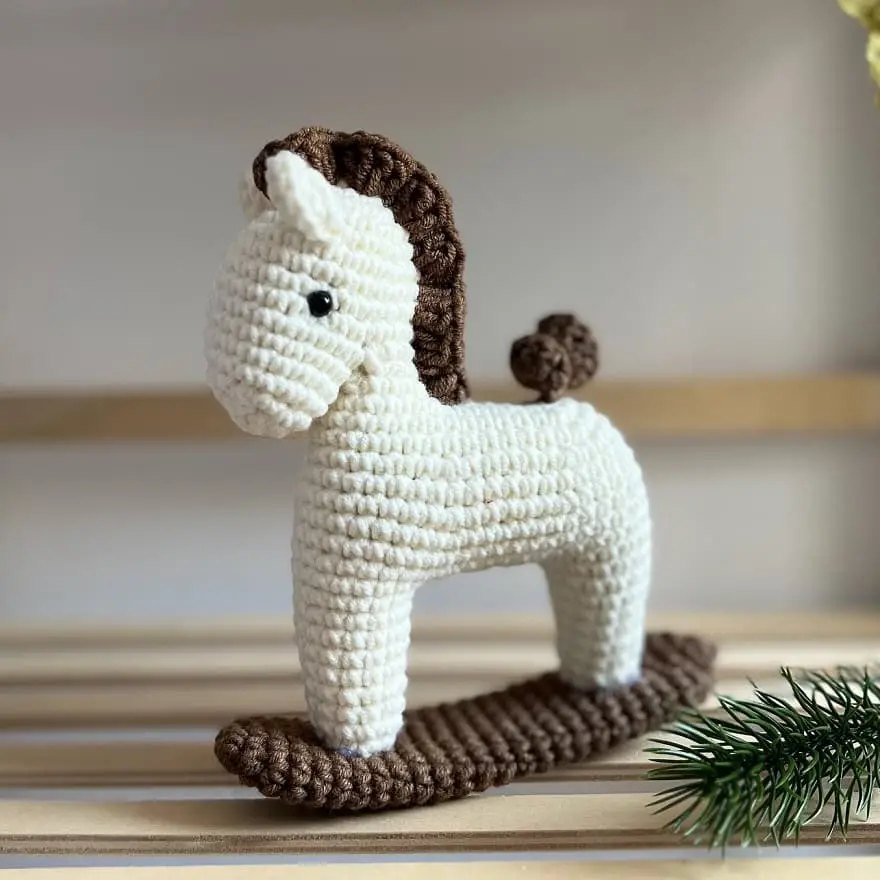
Looking for a charming project to add to your crochet collection? This crochet rocking horse amigurumi is the perfect blend of nostalgia and cuteness. Whether you are looking to create a unique handmade gift for a nursery, a whimsical addition to a child’s toy chest, or even a festive Christmas ornament, this pattern is a wonderful choice.
One of the best parts about this design is that the head, body, and legs are worked primarily in one piece. This means you can spend less time sewing and more time enjoying the process of creating. The finished horse stands approximately 5.5 inches tall, making it a perfect “pocket-sized” companion or a dainty tree decoration.
This tutorial is written with beginners in mind. We will guide you through every round, ensuring you have a professional-looking result. Let’s gather our supplies and get started!
Materials & Abbreviations
To achieve the look and size seen in the sample, we recommend using a cotton blend yarn. This provides the necessary stitch definition and durability for a toy.
Materials Needed
- Yarn: DK weight cotton blend yarn (approximately 50g/175 yards). You will need a primary color for the horse and a contrasting color for the rocker, mane, and tail.
- Crochet Hook: 2.0 mm hook.
- Eyes: 5 mm safety eyes.
- Stuffing: High-quality fiberfill.
- Tools: Tapestry needle, scissors.
Abbreviations (US Terms)
- R: Round/Row
- mc: Magic circle
- ch: Chain
- st: Stitch
- sl st: Slip stitch
- sc: Single crochet
- dc: Double crochet
- inc: Increase (work 2 sc in the next stitch)
- dec: Decrease (single crochet 2 stitches together)
- F.o.: Fasten off
- (12): The number in parentheses indicates the total stitch count at the end of the round.
- (…)*6: Repeat the instructions inside the parentheses the specified number of times.
Step-by-Step Instructions
The Head
We begin with the head, working in continuous rounds. Do not join the rounds with a slip stitch unless specified.
R 1: 6 sc in mc (6)
R 2: (inc)*6 (12)
R 3: (1 sc, inc)*6 (18)
R 4: 18 sc
R 5: (2 sc, inc)*6 (24)
R 6: 24 sc
R 7: 7 sc, inc, 16 sc (25)
R 8-9: 25 sc (2 rows)
R 10: 7 sc, dec, 8 sc, chain 4 (20)
Important Transition: Skip the next 8 sc and begin crocheting Round 11 directly into the remaining stitches and the chain.
R 11: 20 sc (Work 16 sc across the head and 4 sc into the 4 chain stitches)
R 12: 7 sc, dec, 8 sc, dec, 1 sc (18)
Eye Placement: Before continuing, insert your 5 mm safety eyes between R 8 and R 9. Place them approximately 10 stitches apart for a cute, wide-eyed look.
R 13: 18 sc
R 14: (1 sc, dec)*6 (12)
R 15: (dec)*6 (6)
Fasten off and weave in the end. Stuff the head firmly with fiberfill.
The Neck
Now we will create the connection between the head and the body. Attach your yarn to the left side of R 10.
R 1: 12 sc (Work 8 sc on the neck area and 4 sc into the 4 chain stitches created earlier) (12)
R 2: 3 sc, inc, 6 sc, inc, 1 sc (14)
The Back and Body
Continuing from the neck, we will now shape the torso of the horse.
R 1: 5 sc, ch 7, work an increase in the 2nd chain from hook, 14 sc (28)
R 2: 10 sc, (inc, 1 sc)*2, 14 sc (30)
R 3: 10 sc, (inc, 1 sc)*3, 14 sc (33)
R 4: 10 sc, (2 sc, inc)*3, 14 sc (36)
R 5: 5 sc, inc, 5 sc, inc, 10 sc, inc, 5 sc, inc, 5 sc, inc, 1 sc (41)
R 6: 41 sc
R 7: 5 sc, inc, 7 sc, inc, 10 sc, inc, 7 sc, inc, 8 sc (45)
R 8-11: 45 sc (4 rows)
The Front Leg
We will now work the first leg directly from the body.
R 1: 8 sc, skip 30 sc, 8 sc (16)
R 2: 16 sc
R 3: (6 sc, dec)*2 (14)
R 4-5: 14 sc (2 rows)
R 6: (5 sc, dec)*2 (12)
R 7-8: 12 sc (2 rows)
R 9: (2 sc, dec)*3 (9)
R 10: (1 sc, dec)*3 (6)
Fasten off. From the end of the front leg, count 7 sc and attach your yarn to the 8th loop. Leave a long tail of yarn; you will use this later to sew the gap between the legs.
The Hind Leg
Now we shape the rear leg to mirror the front.
R 1-2: 15 sc (2 rows)
R 3: 6 sc, dec, 5 sc, dec (13)
R 4-5: 13 sc (2 rows)
R 6: 5 sc, dec, 4 sc, dec (11)
R 7-8: 11 sc (2 rows)
R 9: (2 sc, dec)*2, 3 sc (9)
R 10: (1 sc, dec)*3 (6)
Fasten off. Use your tapestry needle to sew up the hole between the two legs, ensuring the stuffing does not peek through.
Ears, Mane, and Tail
These small details bring the horse to life! Use your contrasting color for these parts.
Ears (Make 2)
R 1: 6 sc in mc (6)
R 2: (inc)*6 (12)
Fasten off, leaving a long tail for sewing. Fold the ear in half and sew it to the head between R 4 and R 5. The ears should be spaced 6 stitches apart.
Mane
Chain 20.
R 1: Starting from the 3rd chain from the hook, work (3 dc in one st, 2 dc in one st)*9 (45)
Fasten off, leaving a long tail. Sew the mane along the crest of the horse’s neck and head.
Tail
Chain 10.
R 1: Starting from the 3rd chain from the hook, work (2 dc in one st)*8 (16)
Fasten off, leaving a long tail. Sew the tail to the rear of the body.
The Rocker Base
Finally, we create the curved base that allows the horse to “rock.”
R 1: 6 sc in mc (6)
R 2: (inc)*6 (12)
R 3: (2 sc, inc)*4 (16)
R 4-24: 16 sc (21 rows)
R 25: (2 sc, dec)*4 (12)
R 26: (dec)*6 (6)
Fasten off.
Finishing
To complete your project, attach the rocker base to the bottom of the legs. You can sew this in place using a tapestry needle for a seamless look, or for added stability (especially if this is a toy for a child), you may use a small amount of fabric glue or a glue gun to secure the base to the legs.
If you wish to use the horse as a Christmas ornament, simply attach a small loop of yarn or a piece of ribbon to the top of the head.
Tips for Success
- Tension is Key: When working with amigurumi, try to keep your stitches tight. This prevents the fiberfill from showing through the gaps in the crochet work.
- The Magic Circle: If you struggle with the magic circle, you can substitute it by chaining 2 and working the first round of stitches into the first chain.
- Stuffing: Stuff your piece as you go. It is much harder to get the head or legs firm once the body is already attached. Use a chopstick or a crochet hook to push stuffing into tight corners.
- Yarn Choice: While a cotton blend is recommended, you can use acrylic yarn for a softer feel, though the horse may be slightly larger depending on the yarn weight.