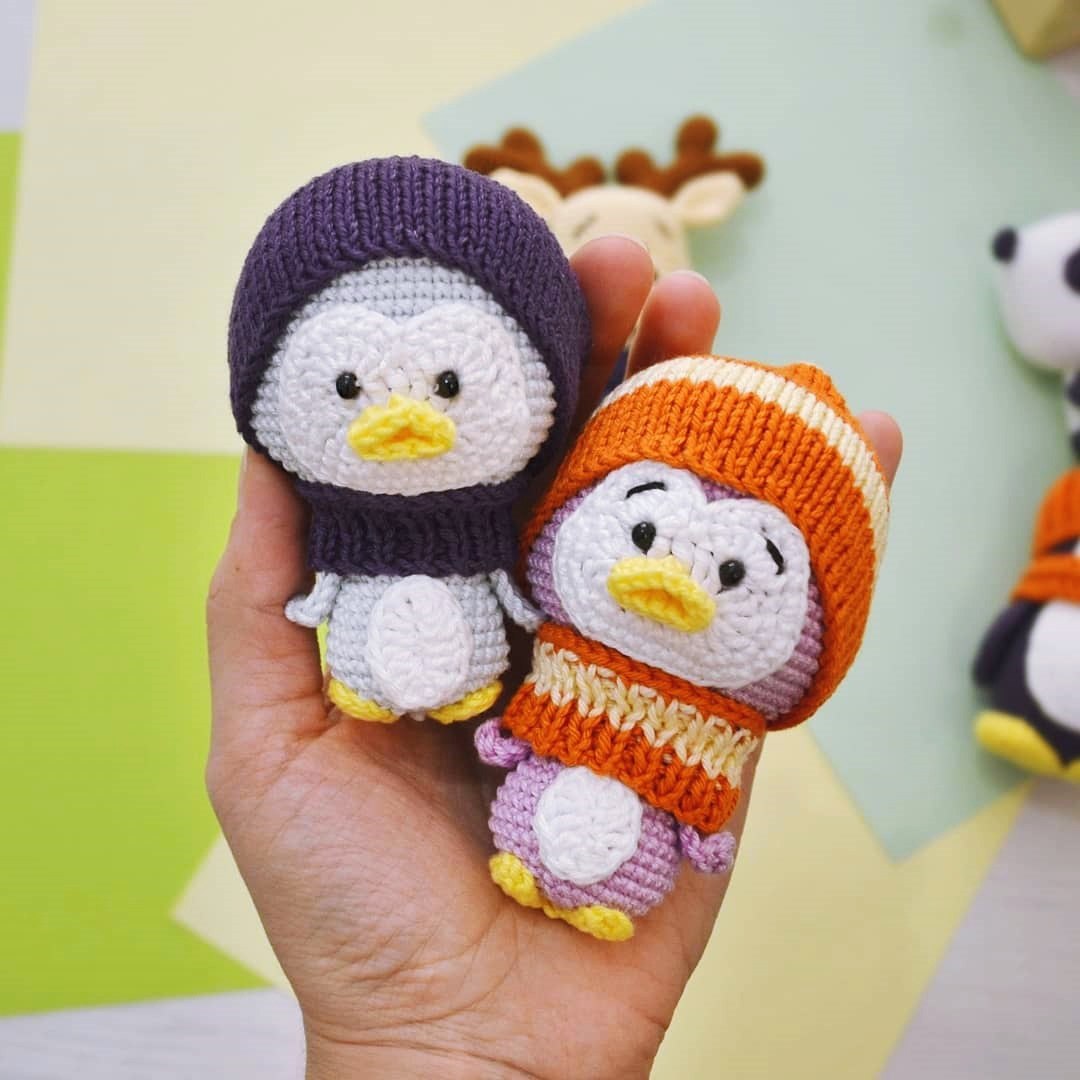
Adorable Winter Penguin Amigurumi Crochet Pattern
There is nothing quite as cozy as a little crochet companion to brighten up the winter months. This adorable winter penguin amigurumi is the perfect project for anyone looking to create a sweet, squishy gift or a cute addition to their own plushie collection. With its rounded body and tiny accessories, this penguin is designed to be huggable and charming.
Whether you are a seasoned amigurumi artist or a beginner looking for a rewarding project, this step-by-step tutorial will guide you through the process. We will be using standard US crochet terms and imperial measurements to ensure everything is easy to follow. Let’s grab our hooks and some yarn and get started!
Materials & Abbreviations
Before we dive into the stitches, make sure you have all your supplies ready. Using the right hook size is key to ensuring your stuffing doesn’t peek through the stitches.
Materials Needed
- Yarn: Medium weight (Size 4) yarn in Grey, White, Yellow, and your choice of color for the hat and scarf (e.g., Purple or Orange).
- Crochet Hook: 3.25mm (D) or 3.5mm (E) hook.
- Safety Eyes: Two 6mm black safety eyes or black beads.
- Stuffing: High-quality polyester fiberfill.
- Tools: Tapestry needle, sewing thread, and dressmaker pins for positioning.
Abbreviations (US Terms)
- MR: Magic Ring
- Ch: Chain
- Sc: Single crochet
- Inc: Increase (two single crochet in the same stitch)
- Dec: Decrease (invisible decrease recommended)
- Hdc: Half double crochet
- St: Stitch
- BLO: Back loop only
Step-by-Step Instructions
This penguin is worked in continuous rounds (spirals). I recommend using a stitch marker in the first stitch of each round to keep track of your progress.
The Body and Head
The body and head are worked as one continuous piece from the top down. Start with your main body color (Grey or Purple).
- Round 1: 6 sc in MR (6)
- Round 2: Inc in each st around (12)
- Round 3: (1 sc, inc) x 6 (18)
- Round 4: (2 sc, inc) x 6 (24)
- Round 5: (3 sc, inc) x 6 (30)
- Round 6: (4 sc, inc) x 6 (36)
- Round 7: (5 sc, inc) x 6 (42)
- Round 8: (13 sc, inc) x 3 (45)
- Round 9: (14 sc, inc) x 3 (48)
- Round 10: (15 sc, inc) x 3 (51)
- Rounds 11-16: Sc in each st around (51)
- Round 17: (16 sc, inc) x 3 (54)
- Round 18: Sc in each st around (54)
- Round 19: (17 sc, inc) x 3 (57)
- Rounds 20-21: Sc in each st around (57)
- Round 22: (17 sc, dec) x 3 (54)
- Round 23: (7 sc, dec) x 6 (48)
- Round 24: (6 sc, dec) x 6 (42)
- Round 25: (5 sc, dec) x 6 (36)
- Round 26: (4 sc, dec) x 6 (30)
- Round 27: (3 sc, dec) x 6 (24)
- Round 28: (6 sc, dec) x 3 (21)
- Rounds 29-31: Sc in each st around (21)
- Round 32: (6 sc, inc) x 3 (24)
- Rounds 33-34: Sc in each st around (24)
- Round 35: (7 sc, inc) x 3 (27)
- Round 36: (8 sc, inc) x 3 (30)
- Round 37: Sc in each st around (30)
- Round 38: (9 sc, inc) x 3 (33)
- Rounds 39-40: Sc in each st around (33)
- Round 41: (9 sc, dec) x 3 (30)
- Round 42: (3 sc, dec) x 6 (24)
- Round 43: (2 sc, dec) x 6 (18)
- Round 44: (1 sc, dec) x 6 (12)
Fasten off and weave in the ends. Stuff the head and body firmly with fiberfill.
Face and Belly Patches
Use white yarn for these details. Both are worked as small ovals.
The Face Patch
- Round 1: Ch 8. Starting in the 2nd ch from hook, sc in 7 ch. Turn, work along the opposite side of the chain: inc in the last st, sc in next 6 st, inc in the first ch. (18)
- Round 2: (Inc, 4 sc) x 3, (Inc, 5 sc) x 1.
- Round 3: Sc around, increasing at the two ends of the oval to maintain the shape.
Fasten off, leaving a long tail for sewing.
The Belly Patch
- Round 1: Ch 5. Starting in the 2nd ch from hook, sc in 4 ch. Turn, work along opposite side: inc in last st, sc in next 3 st, inc in first ch. (10)
- Round 2: Inc in ends, sc along sides.
Fasten off, leaving a long tail for sewing.
The Beak, Wings, and Feet
These are the small details that give the penguin its personality!
The Beak
- Round 1: Ch 10, join with a sl st to form a ring.
- Round 2: Work 10 sc into the ring.
Fasten off and leave a tail for sewing.
The Wings (Make 2)
- Row 1: Ch 8.
- Row 2: Sc in 6 sts starting from the 2nd ch from hook.
Knot the ends together securely. These are simple flat pieces that will be sewn to the sides.
The Feet (Make 2)
- Round 1: Ch 6, join to form a ring.
- Round 2: Inc in each st around (12).
Fasten off and leave a tail for sewing.
Finishing & Assembly
Assembly is where your penguin truly comes to life. To ensure everything is symmetrical, use dressmaker pins to hold the pieces in place before sewing them permanently.
Step-by-Step Assembly
- Position the Face: Pin the white face patch to the front of the head. Sew it securely using a tapestry needle.
- Add the Eyes: Insert the safety eyes (or sew the beads) through the face patch and into the head. Position them roughly in the center of the white patch for a cute, wide-eyed look.
- The Beak: Pin the yellow beak just below the eyes. When sewing, pinch the beak slightly to give it a more natural, 3D shape.
- The Belly: Pin the white belly patch to the lower half of the body and sew it in place.
- Wings and Feet: Sew the wings to the sides of the body at the “waist” and the feet to the bottom base of the body.
Winter Accessories
To give your penguin its winter look, you can add a hat and scarf. While the original look is a knit style, we can easily achieve this with crochet!
The Winter Hat
Use your chosen accent color (e.g., Purple). To get a “knit” look, we will work in the back loop only (BLO).
- Round 1: Ch 50 (or a number that fits snugly around your penguin’s head). Join to form a circle.
- Rounds 2-10: Sc in BLO of each stitch around.
- Round 11: (Sc 5, dec) around to close the top of the hat.
- Round 12: (Sc 3, dec) around until the hole is closed.
The Cozy Scarf
- Row 1: Ch 15.
- Row 2: Sc in BLO of each stitch across. Ch 1, turn.
- Row 3: Sc in BLO of each stitch across.
Repeat Row 3 until the scarf is long enough to wrap around the penguin’s neck. Fasten off and weave in ends.
Tips for Success
- Tension: Keep your stitches tight! If you see gaps where the stuffing is coming through, try dropping down a hook size (e.g., from 3.5mm to 3.25mm).
- Invisible Decrease: For the cleanest look, use the invisible decrease method (insert hook into front loops of the next two stitches) rather than a standard sc2tog.
- Customization: Feel free to change the colors! You can make a “Summer Penguin” by removing the hat and scarf or a “Holiday Penguin” using red and green yarn.
- Stuffing: Stuff the head slightly more than the body to give it that classic, cute amigurumi proportions.