Adorable Crochet Otter Pattern: Step-by-Step Amigurumi Tutorial
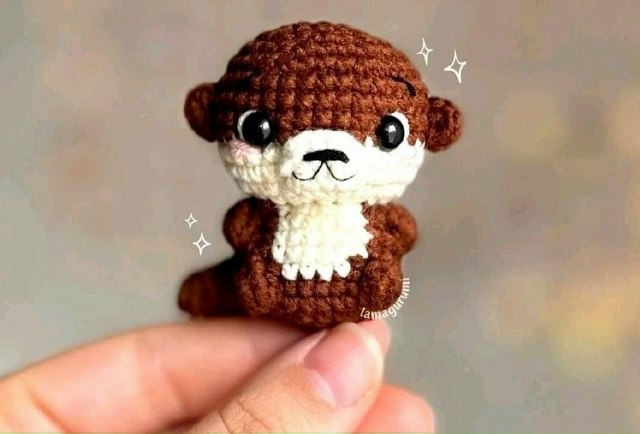
Looking for your next cute crochet project? This adorable crochet otter is the perfect companion for anyone who loves amigurumi. With its round body, tiny ears, and sweet expression, this little guy is a wonderful project for beginners and experienced crocheters alike. Whether you are making a gift for a friend or adding to your own collection of plushies, this otter is sure to bring a smile to anyone’s face.
In this tutorial, we will walk you through the process of creating your own miniature otter. We have broken the pattern down into easy-to-follow steps, ensuring you have all the guidance needed to achieve a professional-looking result. Let’s grab our hooks and yarn and get started!
Materials & Abbreviations
To make this otter, you will need a few basic supplies. We recommend using a plush yarn for a cuddlier feel, but a standard medium-weight acrylic yarn works great too.
Materials Needed
- Yarn: Medium weight (4) or Plush yarn in Dark Brown, White, and small amounts of Pink and Black for detailing. (Approximately 100-150 yards of brown).
- Crochet Hook: A size appropriate for your yarn (usually a 3.0mm or 3.5mm for amigurumi to keep stitches tight).
- Safety Eyes: 8mm or 10mm black safety eyes.
- Stuffing: Polyester fiberfill.
- Tapestry Needle: For sewing parts together and embroidering details.
- Scissors: For trimming yarn.
- Stitch Marker: Highly recommended for keeping track of your rounds.
Abbreviations (US Terms)
- MR: Magic Ring
- sc: Single Crochet
- inc: Increase (2 sc in one stitch)
- dec: Decrease (sc 2 together)
- ch: Chain
- sl st: Slip Stitch
- tr: Treble Crochet
- FLO: Front Loop Only
- st: Stitch
Step-by-Step Instructions
The Ears (Make 2)
The ears are quick and simple. We will work these in brown yarn.
Round 1: 6 sc in MR. (6 sts)
Fasten off, leaving a short tail for sewing.
The Tail
The tail is worked in brown yarn and is joined to the body later.
Round 1: 6 sc in MR. (6 sts)
Round 2: 6 sc. (6 sts)
Round 3: (1 sc, inc) repeat 3 times. (9 sts)
Rounds 4-5: 9 sc for 2 rounds. (9 sts)
Round 6: (2 sc, inc) repeat 3 times. (12 sts)
Round 7: 12 sc. Stuff the tail lightly. (12 sts)
Round 8: 6 dec. (6 sts)
Fasten off, leaving a long tail for sewing to the body.
The Nose
We will use white yarn for the nose area.
Foundation: Chain 4. Starting in the second chain from the hook:
Round 1: (inc, 1 sc, inc) repeat 2 times. (10 sts)
Round 2: sl st, ch, 10 sc. (10 sts)
Fasten off, leaving a tail for sewing.
The Head and Body
The head and body are worked as one continuous piece. Start with brown yarn.
Creating the Head
Round 1: 6 sc in MR. (6 sts)
Round 2: 6 inc. (12 sts)
Round 3: (1 sc, inc) repeat 6 times. (18 sts)
Round 4: (2 sc, inc) repeat 6 times. (24 sts)
Round 5: 9 sc, 3 tr in the next stitch (creating a cheek bump), 6 sc, 3 tr in the next stitch, 7 sc. (22+2 sts)
Round 6: 9 sc, 1 sc in the 3rd loop of the treble, 1 sc, 4 sc, 1 sc, 1 sc in the 3rd loop of the treble, 7 sc. (24 sts)
Round 7: 2 sc joined together with the tail, 8 sc, switch to white yarn: 6 sc, switch back to brown: 8 sc. (24 sts)
Round 8: 7 sc, 3 tr in the next stitch, 2 sc, 6 sc (white), 2 sc (brown), 3 tr in the next stitch, 5 sc. (22+2 sts)
Round 9: 7 sc, 1 sc in the 3rd loop of the treble, 2 sc, 6 sc (white), 2 sc (brown), 1 sc in the 3rd loop of the treble, 5 sc. (24 sts)
Round 10: (1 sc, dec) repeat 3 times, 1 sc, (dec, 1 sc) repeat 2 times, dec, (1 sc, dec) repeat 2 times. (16 sts)
Creating the Body
Round 11: Working in FLO: (1 sc, inc) repeat 8 times. (24 sts)
Round 12: (1 sc, inc) repeat 12 times. (36 sts)
Rounds 13-14: 36 sc for 2 rounds. (36 sts)
Rounds 15-18: 36 sc for 4 rounds. (36 sts)
Eye Placement: Place your safety eyes between rounds 15 and 16. Position them between stitches 15-16 and 23-24 for a cute, wide-set look.
Round 19: (4 sc, dec) repeat 6 times. (30 sts)
Round 20: (3 sc, dec) repeat 6 times. (24 sts)
Round 21: (2 sc, dec) repeat 6 times. (18 sts)
Round 22: (1 sc, dec) repeat 6 times. (12 sts)
Round 23: 6 dec. (6 sts)
Fasten off and weave in the ends.
Finishing
Now it is time to bring your otter to life! This is where the personality comes in.
Assembly
- Ears: Sew the ears to the top of the head between rounds 3 and 6.
- Nose: Sew the white nose piece to the center of the face, just below the eyes.
- Tail: Ensure the tail is securely attached to the back of the body (if not already joined during Round 7).
Embroidering Details
- Eyes: Use white yarn to stitch small highlights or a thin circle around the safety eyes to make them look shiny.
- Cheeks: Use pink yarn to stitch two small horizontal lines just below the eyes for a blushing effect.
- Eyebrows: Use black yarn. To get a fine line, split the yarn ply and use only a single strand to stitch small, curved eyebrows.
- Mouth: Use black yarn to stitch a small “Y” shape or a tiny smile onto the nose piece.
Tips for Success
To ensure your otter looks as professional as possible, keep these tips in mind:
The Magic Ring
If you struggle with the magic ring, you can chain 2 and work your first round of stitches into the first chain. However, the magic ring is the best way to ensure there is no hole at the top of the head.
Invisible Decreases
To avoid bumps in your work, use the “invisible decrease” method. Instead of a standard decrease, insert your hook into the front loop of the first stitch and then the front loop of the second stitch, completing the sc. This creates a much smoother surface.
Stuffing Your Otter
Stuff the head and body firmly, but be careful not to overstuff the neck area, as this can make the head tilt awkwardly. Use your tapestry needle to push stuffing into the nose and ears for a rounded shape.
Tension Control
Since amigurumi involves stuffing, your tension should be tight. If you see holes where the stuffing is peeking through, try dropping down a hook size.