Easy Amigurumi Rooster Crochet Pattern: A Step-by-Step Tutorial
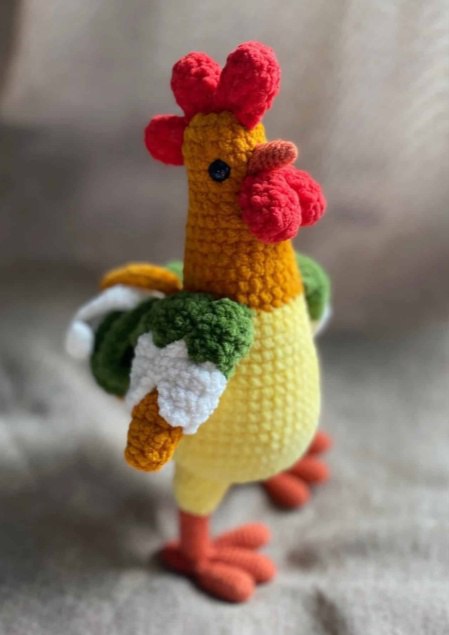
Looking to add a farmhouse touch to your crochet collection? This adorable amigurumi rooster is the perfect project for anyone from a motivated beginner to an experienced maker. With its bright colors and quirky personality, this little bird makes a wonderful gift, a cute nursery decoration, or a fun companion for your desk.
In this tutorial, we will walk you through the process of creating your own crochet rooster using US crochet terms. We have broken the pattern down into manageable sections, so you can take your time and ensure every stitch is just right. Let’s get hooking!
Materials & Abbreviations
Before we dive into the stitches, make sure you have all your supplies ready. To achieve the look in the photos, you will need a variety of colors to capture the rooster’s vibrant plumage.
Materials Needed
- Yarn: Medium weight (Worsted) yarn in the following colors:
- Yellow (for the main body and upper legs)
- Orange (for the neck, beak, and lower legs)
- Red (for the comb and wattles)
- Green, White, and Orange (small amounts for the wing and tail feathers)
- Crochet Hook: 3.25mm or 3.5mm (depending on your tension to ensure the stuffing doesn’t show through)
- Safety Eyes: 8mm or 10mm black safety eyes
- Stuffing: Polyester fiberfill (Polyfill)
- Tools: Yarn needle, stitch markers, and scissors
Abbreviations (US Terms)
- MR: Magic Ring
- ch: Chain
- sc: Single crochet
- inc: Increase (2 sc in one stitch)
- dec: Decrease (sc 2 stitches together)
- st: Stitch
- sl st: Slip stitch
Step-by-Step Instructions
The Body and Head
The body is worked in a continuous spiral. Do not join rounds with a slip stitch unless specified. Start with Yellow yarn.
Round 1: 6 sc into MR (6)
Round 2: inc in each st around (12)
Round 3: (1 sc, inc) * 6 (18)
Round 4: (2 sc, inc) * 6 (24)
Round 5: (3 sc, inc) * 6 (30)
Round 6: (4 sc, inc) * 6 (36)
Round 7: (5 sc, inc) * 6 (42)
Round 8: (6 sc, inc) * 6 (48)
Round 9: inc in next 6 sts, then sc in the remaining 42 sts (54)
Round 10: sc in each st around (54)
Round 11: sc in next 12 sts, (5 sc, dec) * 6 (48)
Rounds 12-16: sc in each st around (48) — 5 rounds total
Round 17: dec 6 times, sc in remaining 36 sts (42)
Round 18: dec 3 times, sc in remaining 36 sts (39)
Round 19: dec 2 times, sc in next 33 sts, dec 1 time (36)
Round 20: (4 sc, dec) * 6 (30)
Stop here to stuff the body firmly with fiberfill.
Color Change: Switch to Orange yarn.
Rounds 21-26: sc in each st around (30) — 6 rounds total
Round 27: (3 sc, dec) * 6 (24)
Rounds 28-30: sc in each st around (24) — 3 rounds total
Round 31: (2 sc, dec) * 6 (18)
Rounds 32-37: sc in each st around (18) — 6 rounds total
Stuff the neck and head firmly.
Round 38: (1 sc, dec) * 6 (12)
Round 39: dec 6 times. Fasten off and weave in the end.
Eyes: Place the safety eyes between rounds 35 and 36, leaving 5 stitches of space between them.
The Comb and Wattles
You will need to make 5 of these pieces in Red yarn (one for the top comb and four for the wattles/ear-pieces).
Round 1: 7 sc into MR (7)
Rounds 2-5: sc in each st around (7) — 4 rounds total
Round 6: Working through both loops, sc in next 3 sts. Fasten off, leaving a long tail for sewing.
The Beak
Using Orange yarn:
Round 1: 4 sc into MR (4)
Round 2: sc in each st around (4)
Round 3: (1 sc, inc) * 2 (6)
Round 4: sc in each st around (6)
Round 5: (2 sc, inc) * 2 (8)
Round 6: sc in each st around (8)
Round 7: (1 sc, inc) * 4 (12)
Round 8: (1 sc, inc) * 6 (18)
Round 9: sc in each st around (18). Fasten off, leaving a tail for sewing.
The Wings
You will create 4 small wing pieces. To make a full wing, you will sew two pieces together. Make 12 in Green, 8 in White, and 4 in Orange.
Row 1: ch 5
Row 2: Starting in the 2nd ch from hook, sc in each ch across (4)
Rows 3-4: sc in each st across (4)
Row 5: dec 2 times (2)
Row 6: dec 1 time (1). Fasten off.
Assemble the wings by sewing the colors in layers (Green, then White, then Orange) to create a feathered look. Repeat for the second wing.
The Tail
Make 12 tail feathers: 4 in Green, 4 in Orange, and 4 in White.
Row 1: ch 20
Row 2: Starting in the 2nd ch from hook, sc in each ch across (19). Fasten off.
The Legs and Feet
The Leg: Use Orange yarn.
Round 1: 6 sc into MR (6)
Round 2: inc in each st around (12)
Rounds 3-12: sc in each st around (12)
Color Change: Switch to Yellow yarn.
Round 13: (1 sc, inc) * 6 (18)
Round 14: sc in each st around (18). Fasten off and stuff firmly.
The Toes: Make 3 toes using Orange yarn.
Round 1: 6 sc into MR (6)
Round 2: inc in each st around (12)
Rounds 3-10: sc in each st around (12) — 8 rounds total. Stuff firmly.
Round 11: dec 6 times (6). Fasten off.
Assembling the Foot:
Round 12: Attach orange yarn to the base of the leg. Sc 3 sts along the first toe, 3 sts along the second toe, 6 sts along the third (middle) toe, 3 sts back along the second toe, and 3 sts back along the first toe (18).
Round 13: (1 sc, dec) * 6 (12)
Rounds 14-20: sc in each st around (12) — 7 rounds total. Stuff firmly.
Round 21: dec 6 times. Fasten off and weave in ends.
Finishing
Now it is time to bring your rooster to life! Use your yarn needle and a matching color of yarn for each part.
- Beak: Sew the beak to the center of the face, just below the eyes.
- Comb & Wattles: Sew the largest red piece to the top of the head and the smaller pieces to the sides of the face/neck area.
- Wings: Attach the completed wing assemblies to the sides of the body.
- Tail: Sew the tail feathers to the back of the body in a fan shape. Hide the ends of the yarn inside the stuffing.
- Legs: Sew the legs firmly to the bottom of the body, ensuring the rooster can balance.
Tips for Success
- Tension: Keep your stitches tight! This prevents the white polyester stuffing from peeking through the gaps in your work.
- Stitch Markers: Since this pattern is worked in spirals, use a stitch marker in the first stitch of every round so you don’t lose your place.
- Customization: Feel free to change the colors! You can make a blue Andalusian rooster or a brown hen by simply swapping the yarn colors.
- Invisible Decrease: For a cleaner look, use the “invisible decrease” method (front loops only) when shaping the body and head.