Free Sea Turtle Crochet Pattern: Cute Amigurumi Turtle Tutorial
Introduction
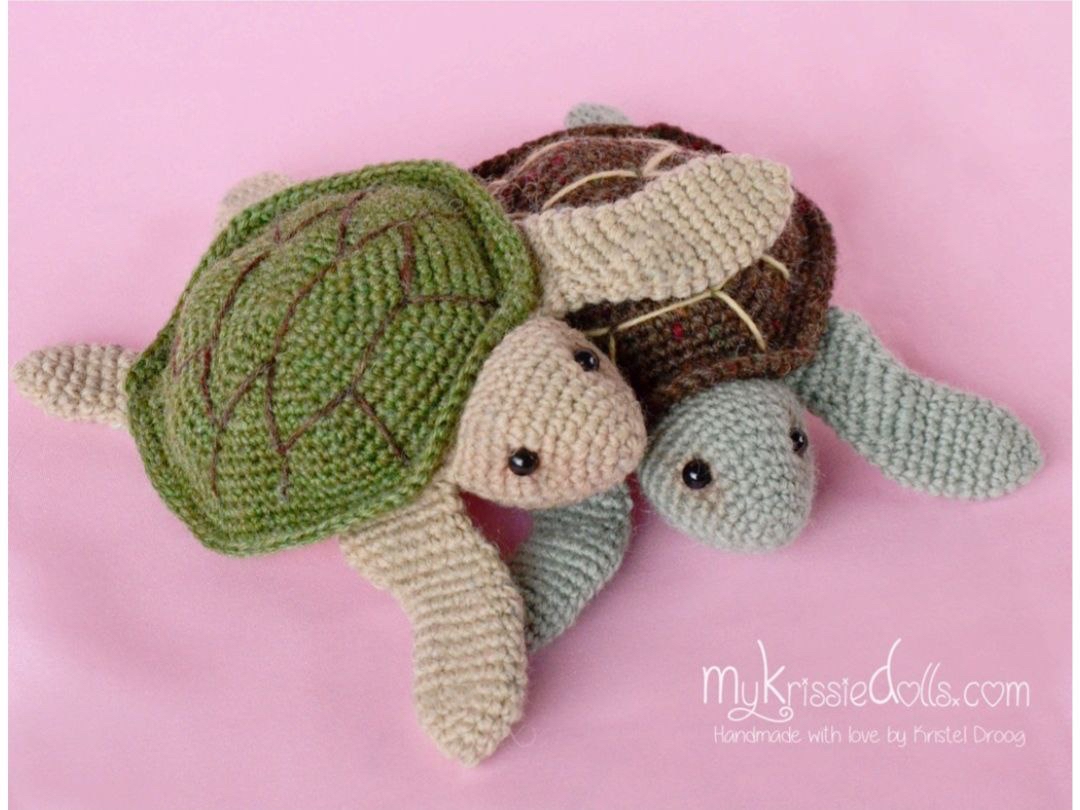
Bring a touch of marine life charm into your home with this adorable, free sea turtle crochet pattern! Whether you love ocean creatures or are looking for your next fun amigurumi project, this tiny sea turtle is a joy to stitch. Featuring gently curved flippers, a textured rimmed shell, and sweet embroidered carapace details, this sea turtle makes a wonderful gift, key chain charm, or nursery decoration.
Working up at roughly 4.75 to 5 inches long when using fine sock-weight yarn, this turtle is wonderfully portable. If you prefer a larger plushie, you can easily scale up by using worsted weight yarn and a larger hook size. This tutorial uses standard US crochet terms and simple stitches, making it perfect for confident beginners and intermediate crocheters alike. Grab your favorite yarn and let’s get started!
Materials & Abbreviations
Supplies Needed
- Yarn: Super Fine / Fingering / Sock Weight Yarn (Category 1) in four colors:
- Color A (Shell): Forest Green or Dark Brown (approx. 50–60 yards)
- Color B (Head & Flippers): Light Tan or Sage Green (approx. 40–50 yards)
- Color C (Underbelly): Ivory or Off-White (approx. 30–40 yards)
- Color D (Shell Accent): Cream or Light Yellow (approx. 5 yards)
- Crochet Hook: US Size C-2 (2.5 mm)
- Safety Eyes: One pair of 6 mm black safety eyes
- Stuffing: Polyester fiberfill stuffing
- Notions: Tapestry needle, scissors, stitch marker, and 16 craft pins (for marking shell embroidery)
Project Gauge & Finished Size
- Finished Size: Approximately 4.75 to 5 inches (12 cm) from nose to rear flippers.
- Gauge: Not critical for this project, but stitches should be tight enough to prevent fiberfill from showing through.
Abbreviations (US Terms)
- ch: chain
- sc: single crochet
- inc: single crochet increase (work 2 single crochets in the same stitch)
- dec: single crochet decrease (single crochet 2 stitches together)
- MR: magic ring (magic circle)
- st(s): stitch(es)
- Rnd(s): round(s)
- […] x N: repeat the instructions inside brackets N times
Step-by-Step Instructions
Head
Work in continuous rounds using Color B (Light Tan or Sage Green). Do not join rounds unless specified.
- Rnd 1: 6 sc in MR (6)
- Rnd 2: [inc] in each st around (12)
- Rnd 3: sc in each st around (12)
- Rnd 4: [sc 1, inc] x 6 (18)
- Rnd 5: sc in each st around (18)
- Rnd 6: [sc 2, inc] x 6 (24)
- Rnd 7: [sc 3, inc] x 6 (30)
- Rnds 8–12: sc in each st around (30) (5 rounds total)
Safety Eye Placement: Insert the 6 mm safety eyes between Rounds 7 and 8, spaced approximately 8 stitches apart.
- Rnd 13: [sc 3, dec] x 6 (24)
- Rnd 14: sc in each st around (24)
- Rnd 15: [sc 2, dec] x 6 (18)
- Rnd 16: sc in each st around (18)
Stuff the head firmly with fiberfill. Flatten the opening and work 9 single crochets through both opposite sides to close the neck edge (or sew closed). Fasten off, leaving a 12-inch tail for sewing.
Top Shell
Work in continuous rounds using Color A (Forest Green or Dark Brown).
- Rnd 1: 6 sc in MR (6)
- Rnd 2: [inc] in each st around (12)
- Rnd 3: [sc 1, inc] x 6 (18)
- Rnd 4: [sc 2, inc] x 6 (24)
- Rnd 5: [sc 3, inc] x 6 (30)
- Rnd 6: [sc 4, inc] x 6 (36)
- Rnd 7: [sc 5, inc] x 6 (42)
- Rnd 8: [sc 6, inc] x 6 (48)
- Rnd 9: [sc 7, inc] x 6 (54)
- Rnd 10: [sc 8, inc] x 6 (60)
- Rnd 11: sc in each st around (60)
- Rnd 12: [sc 9, inc] x 6 (66)
- Rnd 13: [sc 10, inc] x 6 (72)
- Rnd 14: sc in each st around (72)
- Rnd 15: [sc 11, inc] x 6 (78)
- Rnd 16: [sc 12, inc] x 6 (84)
- Rnd 17: sc in each st around (84)
Fasten off and weave in the end. This yarn end will not be used for assembly.
Underbelly
Work in continuous rounds using Color C (Ivory).
- Rnd 1: 6 sc in MR (6)
- Rnd 2: [inc] in each st around (12)
- Rnd 3: [sc 1, inc] x 6 (18)
- Rnd 4: [sc 2, inc] x 6 (24)
- Rnd 5: [sc 3, inc] x 6 (30)
- Rnd 6: [sc 4, inc] x 6 (36)
- Rnd 7: [sc 5, inc] x 6 (42)
- Rnd 8: [sc 6, inc] x 6 (48)
- Rnd 9: [sc 7, inc] x 6 (54)
- Rnd 10: [sc 8, inc] x 6 (60)
- Rnd 11: [sc 9, inc] x 6 (66)
- Rnd 12: [sc 10, inc] x 6 (72)
- Rnd 13: [sc 11, inc] x 6 (78)
Fasten off, leaving a long tail (approx. 20 inches) for sewing the body together.
Front Flippers (Make 2)
Work in continuous rounds using Color B (Light Tan or Sage Green). Flippers are not stuffed.
- Rnd 1: 6 sc in MR (6)
- Rnd 2: [sc 1, inc] x 3 (9)
- Rnd 3: [sc 2, inc] x 3 (12)
- Rnd 4: [sc 3, inc] x 3 (15)
- Rnds 5–10: sc in each st around (15) (6 rounds total)
- Rnd 11: [inc] x 3, sc 4, [dec] x 2, sc 4 (16)
- Rnds 12–16: [inc] x 2, sc 5, [dec] x 2, sc 5 (16) (5 rounds total)
- Rnd 17: sc in each st around (16)
- Rnd 18: sc 5, skip remaining 11 sts
Pinch the opening flat and crochet or sew 8 single crochets across the top edge to close. Fasten off, leaving a tail for attachment.
Rear Flippers (Make 2)
Work in continuous rounds using Color B (Light Tan or Sage Green). Flippers are not stuffed.
- Rnd 1: 6 sc in MR (6)
- Rnd 2: [sc 1, inc] x 3 (9)
- Rnd 3: [sc 2, inc] x 3 (12)
- Rnds 4–5: sc in each st around (12) (2 rounds total)
- Rnds 6–9: [inc] x 2, sc 3, [dec] x 2, sc 3 (12) (4 rounds total)
- Rnd 10: sc 4, skip remaining 8 sts
Pinch the opening flat and crochet or sew 6 single crochets across the top edge to close. Fasten off, leaving a long tail for attachment.
Finishing & Assembly
1. Joining Shell and Underbelly
Place the underbelly and the top shell with their wrong sides facing each other. Thread a tapestry needle with the long tail from the underbelly. Sew the edge of the underbelly (78 stitches) to Round 15 of the top shell stitch by stitch. By sewing to Round 15, Rounds 16 and 17 of the shell will flare outward slightly, creating a realistic shell rim!
2. Attaching the Head & Stuffing
When you are about halfway through joining the underbelly and shell, place the neck edge of the head inside the front opening. Sew the bottom of the neck securely to the underbelly edge. Continue sewing the underbelly to the shell, stopping when a small opening remains. Stuff the main body firmly with fiberfill, then stitch the remaining opening closed. Use the leftover yarn tail from the head to stitch the upper part of the neck to the top shell so the head sits upright.
3. Attaching the Flippers
Sew the two front flippers underneath the rim of the top shell, placing one on each side right next to the head. Attach the two rear flippers underneath the rim near the back of the shell, angling them slightly outward.
4. Embroidering the Shell Details
To create the classic geometric turtle shell markings:
- Place 16 craft pins into the top shell as guide points in a hexagonal layout.
- Thread your tapestry needle with Color D (Cream or Light Yellow).
- Embroider straight lines between the pins, stitching a central hexagon surrounded by outer geometric scute panels.
- Remove the pins, knot your thread securely, and weave the ends inside the shell.
Tips for Success
- Eye Depth Trick: For extra personality, thread a needle with yarn matching the head. Pass it from eye to eye inside the head, pulling lightly to sink the safety eyes slightly inward before knotting off.
- Seamless Sewing: Use small whipstitches when connecting the underbelly to Round 15 of the shell so your stitches stay hidden under the shell edge.
- Yarn Options: You can easily make a larger cuddly turtle using Worsted Weight (Category 4) yarn and a US G-6 (4.0 mm) hook. Just remember to upgrade to 9 mm or 10 mm safety eyes!