Plush Baby Alien Crochet Pattern: Free Amigurumi Step-by-Step Tutorial
Introduction
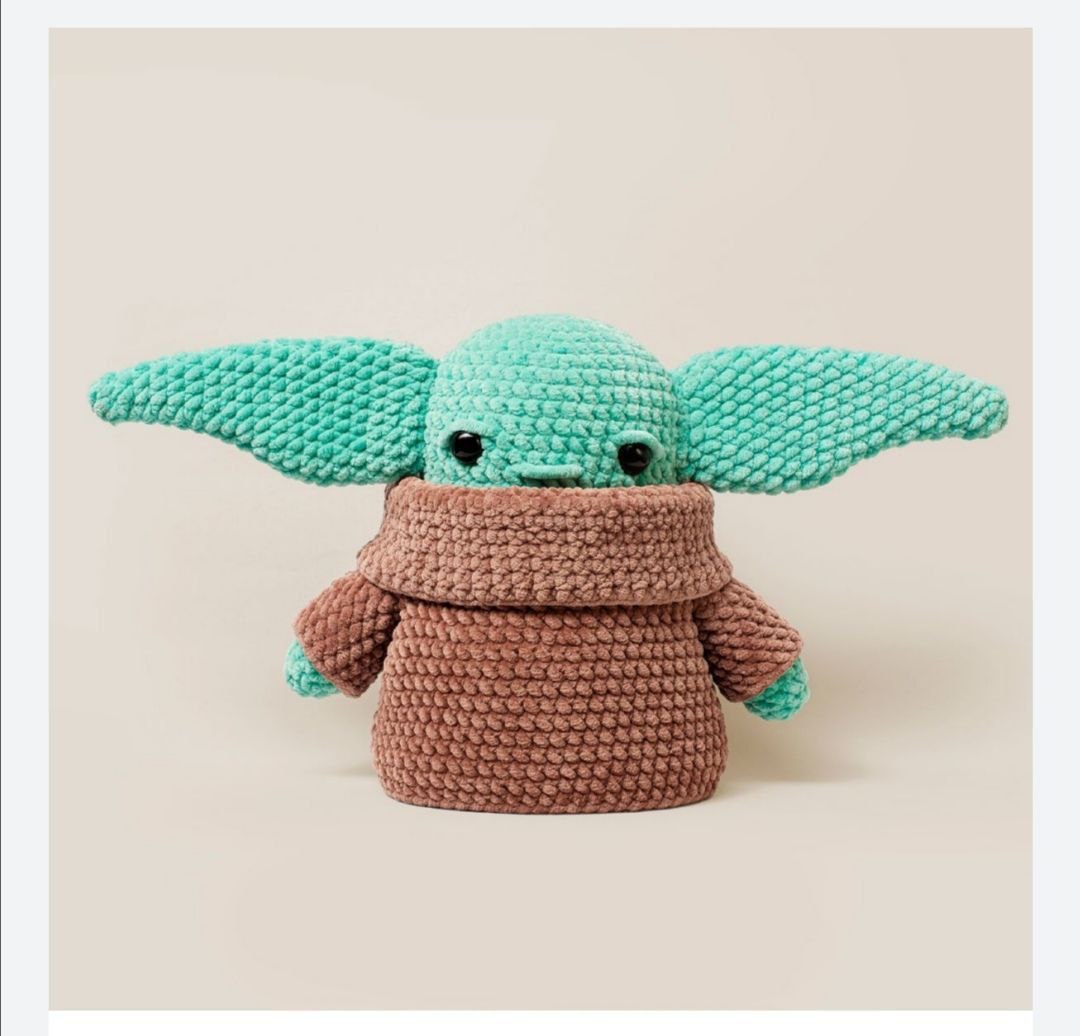
If you love adorable sci-fi creatures and cozy plushies, this plush baby alien crochet pattern is the perfect project for your hook! Featuring oversized ears, a soft oversized robe, and an irresistible extra-terrestrial charm, this cute amigurumi character brings joy to kids and adult collectors alike.
Standing at approximately 8.25 inches tall when worked with bulky chenille yarn, this cuddly figure is worked seamlessly from the top of the head straight down through the body. The arms, long iconic ears, and removable cozy coat are crocheted separately for easy assembly. Whether you are an adventurous beginner or an experienced amigurumi maker, this detailed guide will walk you through every step to create your very own galactic friend.
Materials & Abbreviations
Supplies Needed
- Yarn: Bulky weight plush chenille yarn (Category 5 or 6) in Light Green (approx. 90 yards) and Warm Brown (approx. 110 yards).
- Crochet Hook: Size US 7 / 4.5 mm (or size needed to obtain tight stitches without gaps).
- Safety Eyes: 1 pair of 15 mm black safety eyes.
- Stuffing: Polyester fiberfill stuffing.
- Tools: Stitch markers, tapestry needle, straight sewing pins, and scissors.
Crochet Terms (US)
- MR: Magic Ring (Magic Circle)
- ch: chain stitch
- sc: single crochet
- inc: single crochet increase (2 single crochets worked into the same stitch)
- dec: single crochet decrease (single crochet 2 stitches together)
- sl st: slip stitch
- st(s): stitch(es)
- Rnd(s): Round(s)
- ( … ) x N: Repeat instructions in parentheses N times
Step-by-Step Instructions
Head and Body (Worked as One Piece)
Using Light Green plush yarn. Work in continuous spiral rounds without joining. Stuff the head and body firmly with fiberfill as you progress.
- Rnd 1: 6 sc into a MR. (6 sts)
- Rnd 2: 6 inc. (12 sts)
- Rnd 3: (1 sc, inc) x 6. (18 sts)
- Rnd 4: (2 sc, inc) x 6. (24 sts)
- Rnd 5: (3 sc, inc) x 6. (30 sts)
- Rnd 6: (4 sc, inc) x 6. (36 sts)
- Rnd 7: (5 sc, inc) x 6. (42 sts)
- Rnd 8: (6 sc, inc) x 6. (48 sts)
- Rnds 9–17: 1 sc in each st around. (48 sts per round for 9 rounds)
Face Detail Assembly Note: Insert the 15 mm safety eyes between Round 13 and Round 14, spacing them approximately 10 stitches apart. Using white or light green yarn, embroider a slight diagonal stitch along the outer upper edge of each eye to add expression. Embroider a subtle horizontal line for the nose at Round 14 midway between the eyes.
- Rnds 18–32: 1 sc in each st around. (48 sts per round for 15 rounds)
- Rnd 33: (6 sc, dec) x 6. (42 sts)
- Rnd 34: (5 sc, dec) x 6. (36 sts)
- Rnd 35: (4 sc, dec) x 6. (30 sts)
- Rnd 36: (3 sc, dec) x 6. (24 sts)
- Rnd 37: (2 sc, dec) x 6. (18 sts)
- Rnd 38: (1 sc, dec) x 6. (12 sts)
- Rnd 39: 6 dec. (6 sts)
Fasten off, leaving a short tail. Weave the yarn tail through the front loops of the remaining 6 stitches, pull tight to close the bottom of the body completely, and weave in the end.
Right Ear
Using Light Green plush yarn. Do not stuff the ears.
- Rnd 1: 6 sc into a MR. (6 sts)
- Rnd 2: 1 inc, 5 sc. (7 sts)
- Rnd 3: 1 inc, 6 sc. (8 sts)
- Rnd 4: 1 inc, 7 sc. (9 sts)
- Rnd 5: 1 inc, 8 sc. (10 sts)
- Rnd 6: 1 inc, 9 sc. (11 sts)
- Rnd 7: 1 inc, 10 sc. (12 sts)
- Rnd 8: 1 inc, 11 sc. (13 sts)
- Rnd 9: 1 inc, 12 sc. (14 sts)
- Rnd 10: 1 inc, 12 sc, 1 inc. (16 sts)
- Rnd 11: 1 inc, 14 sc, 1 inc. (18 sts)
- Rnd 12: 1 inc, 16 sc, 1 inc. (20 sts)
- Rnds 13–19: 1 sc in each st around. (20 sts per round for 7 rounds)
- Rnd 20: (2 sc, dec) x 5. (15 sts)
Fasten off, leaving a long tail for sewing later. Press flattened ear flat.
Left Ear
Using Light Green plush yarn. Do not stuff.
- Rnd 1: 6 sc into a MR. (6 sts)
- Rnd 2: 5 sc, 1 inc. (7 sts)
- Rnd 3: 6 sc, 1 inc. (8 sts)
- Rnd 4: 7 sc, 1 inc. (9 sts)
- Rnd 5: 8 sc, 1 inc. (10 sts)
- Rnd 6: 9 sc, 1 inc. (11 sts)
- Rnd 7: 10 sc, 1 inc. (12 sts)
- Rnd 8: 11 sc, 1 inc. (13 sts)
- Rnd 9: 12 sc, 1 inc. (14 sts)
- Rnd 10: 1 inc, 12 sc, 1 inc. (16 sts)
- Rnd 11: 1 inc, 14 sc, 1 inc. (18 sts)
- Rnd 12: 1 inc, 16 sc, 1 inc. (20 sts)
- Rnds 13–19: 1 sc in each st around. (20 sts per round for 7 rounds)
- Rnd 20: (2 sc, dec) x 5. (15 sts)
Fasten off, leaving a long yarn tail for sewing.
Arms (Make 2)
Using Light Green plush yarn.
- Rnd 1: 6 sc into a MR. (6 sts)
- Rnd 2: 6 inc. (12 sts)
- Rnds 3–10: 1 sc in each st around. (12 sts per round for 8 rounds)
Fasten off, leaving a long tail for sewing. Stuff only the lower tip (hand region) lightly with fiberfill; leave the upper portion flat.
Robe Coat
Using Warm Brown plush yarn.
Chain 54. Taking care not to twist the chain, join to the first chain with a sl st to form a large ring. Work in continuous spiral rounds.
- Rnd 1: 1 sc in each of the 54 chains. (54 sts)
- Rnds 2–13: 1 sc in each st around. (54 sts per round for 12 rounds)
- Rnd 14 (Armholes): 9 sc, ch 10, skip 8 sts, 19 sc, ch 10, skip 8 sts, 10 sc. (58 total count including chains)
- Rnd 15: 1 sc in each st and chain across. (58 sts)
- Rnd 16: (5 sc, inc) x 9, 4 sc. (67 sts)
- Rnds 17–27: 1 sc in each st around. (67 sts per round for 11 rounds)
Fasten off and weave in loose ends.
Coat Sleeves
Attach Warm Brown plush yarn directly to the first stitch of one of the open armholes on the coat (each opening consists of 10 chain stitches and 8 skipped base stitches, making 18 stitches total around).
- Rnds 1–8: 1 sc in each of the 18 sts around. (18 sts per round for 8 rounds)
Fasten off and weave in the yarn end. Repeat the exact same sleeve instructions for the second armhole.
Finishing
Follow these steps to assemble your plush baby alien figure seamlessly:
- Attach Arms: Position the green arms symmetrically on both sides of the main body at approximately Round 20. Secure them using straight pins first, then sew them in place using a tapestry needle and the long yarn tails.
- Put On Robe: Slip the brown robe onto the body from the bottom up, feeding the arms carefully through the sleeves. Fold the top excess portion of the neck collar outward and downward over the chest area to form the signature thick cowl collar.
- Attach Ears: Pin the right and left ears flat to the sides of the head positioned between Round 10 and Round 15. Check symmetry from the front before sewing tightly into place with yarn tails.
- Final Touches: Check all connections, trim any stray threads, and fluff up the chenille stitches to give your doll a finished, snuggly appearance.
Tips
- Plush Yarn Stitch Control: Chenille yarn can obscure stitch visibility. Use stitch markers in the first stitch of every round to keep an accurate stitch count.
- Tension Adjustment: Amigurumi requires dense stitches so polyester fiberfill won’t show through. If your stitches look loose, drop down a half hook size (e.g., to a 4.0 mm / US G-6 hook).
- Safety Eye Precaution: If gifting this plushie to children under 3 years old, swap out plastic safety eyes for embroidered yarn eyes to avoid choking hazards.
- Pin Before Sewing: Always use straight pins to position ears and arms before stitching. Viewing the creature from eye level ensures even placement!