Adorable Chubby Crochet Duck Pattern: A Beginner-Friendly Amigurumi Tutorial
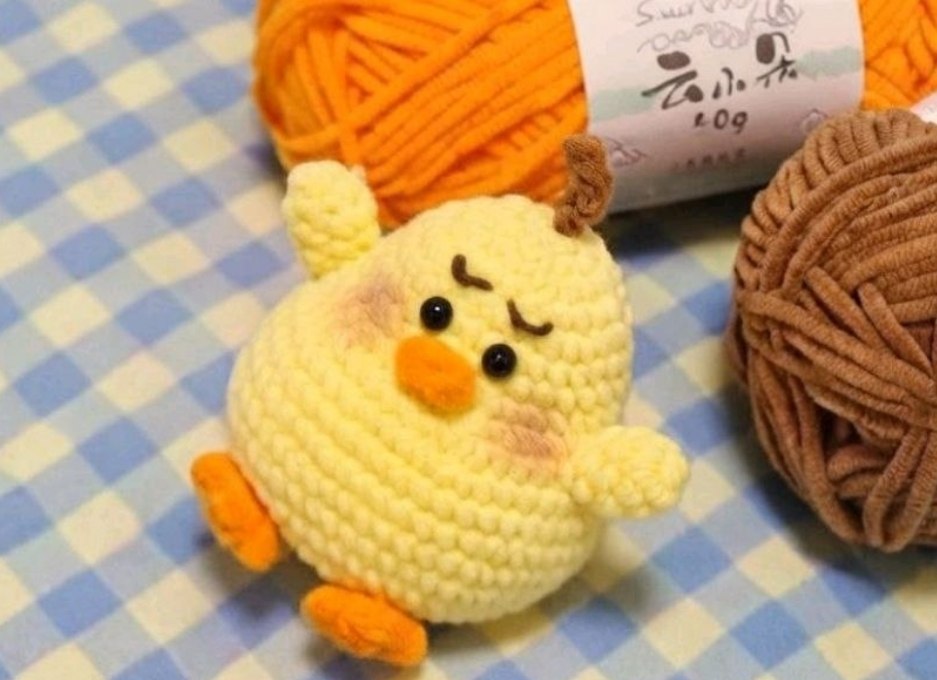
If you are looking for a project that is high on cuteness and low on stress, this chubby crochet duck is the perfect choice! This “chonky” little friend is designed with a rounded, plump shape that makes it irresistible to squeeze. Whether you are looking to make a gift for a friend, a toy for a child, or just want to add a little cheer to your own desk, this amigurumi duck is a wonderful way to practice your crochet skills.
This pattern is written specifically for those using US crochet terms and imperial measurements. Because of its simple shapes and repetitive stitches, it is an excellent project for beginners who are just getting comfortable with working in the round. Let’s dive into how to create your own little yellow companion!
Materials & Abbreviations
Before you begin, gather all your supplies. Using a slightly smaller hook than the yarn label suggests will ensure your stitches are tight, which prevents the stuffing from peeking through.
Supplies Needed
- Yarn: Medium weight (Worsted) yarn in Yellow (main body), Orange (beak and feet), and Brown (hair tuft).
- Crochet Hook: 3.25mm (D) or 3.5mm (E) hook.
- Stuffing: High-quality polyester fiberfill.
- Eyes: 6mm or 8mm black safety eyes.
- Tools: Yarn needle, scissors, and a stitch marker (highly recommended for working in spirals).
Abbreviations (US Terms)
- MR: Magic Ring
- Sc: Single crochet
- Inc: Increase (two single crochet stitches in the same stitch)
- Dec: Decrease (single crochet two stitches together)
- Ch: Chain
- Dc: Double crochet
- Sl st: Slip stitch
- St(s): Stitch(es)
Step-by-Step Instructions
This duck is worked in continuous spirals. Do not join the rounds with a slip stitch unless specifically noted. Use your stitch marker to keep track of the beginning of each round.
The Main Body (Yellow Yarn)
The body is one large piece that forms the head and the plump belly of the duck.
- Round 1: Create a MR and work 6 sc into the ring (6 sts).
- Round 2: Inc in every stitch around (12 sts).
- Round 3: (1 sc, inc) repeat 6 times (18 sts).
- Round 4: (1 sc, inc, 1 sc) repeat 6 times (24 sts).
- Round 5: (3 sc, inc) repeat 6 times (30 sts).
- Rounds 6-7: Sc in each stitch around (30 sts).
- Round 8: (2 sc, inc, 2 sc) repeat 6 times (36 sts).
- Round 9: Sc in the next 9 sts, (1 sc, inc, 1 sc) repeat 6 times, sc in the remaining 9 sts (42 sts).
- Round 10: (3 sc, inc, 3 sc) repeat 6 times (48 sts).
- Rounds 11-12: Sc in each stitch around (48 sts).
- Round 13: (7 sc, inc) repeat 6 times (54 sts).
- Rounds 14-15: Sc in each stitch around (54 sts).
- Round 16: (7 sc, dec) repeat 6 times (48 sts).
- Round 17: (3 sc, dec, 3 sc) repeat 6 times (42 sts).
- Round 18: (5 sc, dec) repeat 6 times (36 sts).
- Round 19: (2 sc, dec, 2 sc) repeat 6 times (30 sts).
- Round 20: (3 sc, dec) repeat 6 times (24 sts).
- Round 21: (1 sc, dec, 1 sc) repeat 6 times (18 sts).
- Round 22: (1 sc, dec) repeat 6 times (12 sts).
Fasten off and leave a long tail for sewing. Stuff the body firmly with fiberfill as you go, ensuring the bottom is well-supported so the duck sits upright.
The Wings (Yellow Yarn – Make 2)
These small wings add a touch of personality to the sides of the body.
- Round 1: Create a MR and work 6 sc into the ring (6 sts).
- Round 2: Sc in next 5 sts, inc in the last stitch (7 sts).
- Round 3: Sc in each stitch around (7 sts).
- Round 4: Sc in next 5 sts, dec (6 sts).
Fasten off, leaving a tail for sewing. These do not need stuffing.
The Feet (Orange Yarn – Make 2)
The feet feature a little detail to simulate webbed toes.
- Round 1: Create a MR and work 5 sc into the ring (5 sts).
- Round 2: Inc in next 3 sts, sc in remaining 2 sts (8 sts).
- Round 3: (1 dc, 1 sl st, 1 ch) repeat 3 times, then sc in the remaining 2 sts.
Fasten off, leaving a tail for sewing.
The Beak (Orange Yarn)
The beak is a simple, flat oval.
- Instructions: Create a MR and work 6 sc into the ring. Important: Do not pull the magic ring completely closed. Leave it slightly open to create a flat, oval shape rather than a perfect circle.
Fasten off and weave in the ends.
The Hair Tuft (Brown Yarn)
This tiny detail gives our duck a quirky look!
- Instructions: Chain 6. Starting from the second chain from the hook, work 4 sc, followed by 1 sl st.
Fasten off, leaving a tail for sewing.
Finishing Your Duck
Now comes the fun part: assembly! This is where your duck truly comes to life.
Adding the Face
Place your safety eyes between rounds 8 and 9 of the body, spacing them about 6 to 8 stitches apart. If you want a more “surprised” or “innocent” look, place them slightly further apart. Position the orange beak centered directly between and slightly below the eyes. Sew it securely in place.
Attaching the Limbs
- Wings: Sew the wings to the sides of the body around round 14. Position them so they slightly angle outward.
- Feet: Sew the feet to the bottom of the body, ensuring they are spaced wide enough to give the duck a stable, chubby base.
- Tuft: Sew the brown hair tuft to the very top center of the head, allowing it to stand up slightly.
Finally, use a scrap of black yarn or embroidery floss to stitch two small, curved lines above the eyes for eyebrows to give your duck its signature grumpy yet cute expression!
Pro Tips for a Perfect Duck
- Tension is Key: Amigurumi requires a tight tension so that the stuffing doesn’t show. If you see gaps, try dropping down a hook size.
- Stitch Markers: Since you are working in a spiral, it is very easy to lose your place. Always mark the first stitch of every round.
- Symmetry: When placing the eyes and beak, use pins to hold them in place first. Step back and look at your duck from a distance to make sure everything is centered before sewing.
- Customization: Feel free to change the colors! A blue duck or a pink duck is just as cute. You can also add a tiny blush to the cheeks using a pink marker or a bit of real makeup blush.