Colorful Crochet Granny Square Pattern: A Step-by-Step Tutorial
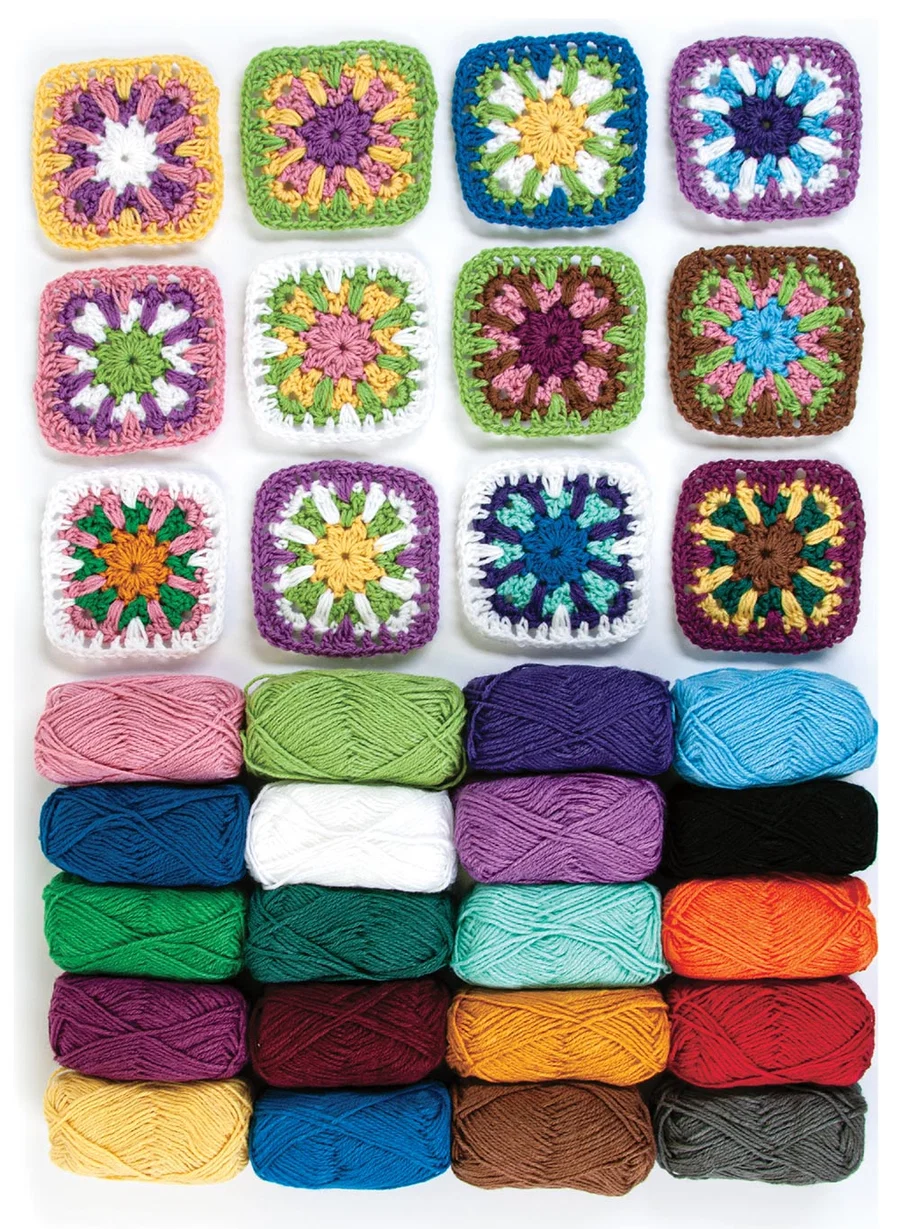
There is nothing more classic in the world of crochet than the granny square. Whether you are looking to create a cozy bohemian blanket, a trendy tote bag, or a colorful scarf, mastering a unique granny square is the perfect way to build your skills. This specific pattern puts a modern twist on the traditional square by incorporating beautiful cluster stitches that add texture and depth, making your finished piece look professional and intricate.
While this pattern is rated for intermediate crocheters, we have broken it down into easy-to-follow steps so that anyone with a basic understanding of crochet can tackle it. The result is a stunning 4-inch by 4-inch square that pops with color and dimension. Let’s dive in and start stitching!
Materials & Abbreviations
Before you begin, gather your materials. This pattern is designed to use small amounts of several different colors, making it a fantastic project for using up your scrap yarn stash.
Materials Needed
- Yarn: Worsted weight yarn in assorted colors. To follow the suggested look, you will need 4 different colors per square.
- Crochet Hook: Size 7 (4.50 mm) or a size that allows you to maintain the correct gauge.
- Notions: Yarn needle for weaving in ends and scissors.
Gauge Information
To ensure your squares are the correct size, check your gauge. Rounds 1 through 5 should measure approximately 4″ x 4″. If your square is too small, try a larger hook; if it is too large, try a smaller hook.
Abbreviations (US Terms)
- ch: chain
- sc: single crochet
- dc: double crochet
- sl st: slip stitch
- sp(s): space(s)
- st(s): stitch(es)
- rep: repeat
- tog: together
- yo: yarn over
Special Stitch Guide
This pattern uses a “Cluster” stitch, which gives the square its unique texture. Here is how to work them:
- Beg 3-dc CL (Beginning 3-dc Cluster): Chain 2. Yarn over, insert hook in the indicated stitch or space, yarn over and draw up a loop, yarn over and draw through 2 loops on the hook. Repeat the bracketed part twice more. Finally, yarn over and draw through all 3 loops on the hook.
- 3-dc CL (3-dc Cluster): Yarn over, insert hook in the indicated stitch or space, yarn over and draw up a loop, yarn over and draw through 2 loops on the hook. Repeat this process 3 times in total, then yarn over and draw through all 4 loops on the hook.
Step-by-Step Instructions
For each square, select four colors (Color 1, Color 2, Color 3, and Color 4). We recommend picking a mix of bright and neutral tones for a balanced look.
Round 1: The Center Circle
Using Color 1, start by chaining 5. Join the last chain to the first with a slip stitch to form a small ring. Now, we will create the base of the square:
- Work a Beg 3-dc CL into the ring.
- Chain 2.
- Work [3-dc CL, ch 2] seven more times into the ring.
- Slip stitch into the top of the first cluster to join.
You should now have a total of 8 clusters. Fasten off Color 1.
Round 2: Adding Volume
Join Color 2 with a slip stitch into any chain-2 space from the previous round.
- Chain 4 (this counts as your first double crochet and the first chain stitch).
- Work a dc in the same space, then chain 2.
- In the next ch-2 space, work (dc, ch 1, dc), then chain 2.
- Repeat the [(dc, ch 1, dc), ch 2] sequence 7 more times around the circle.
- Slip stitch into the 3rd chain of your starting ch-4 to join.
Fasten off Color 2.
Round 3: Shaping the Square
This round is crucial because it transforms the circle into a square. Using Color 3 (or a neutral tone), we will work in single crochet.
- Chain 1. Work a single crochet (sc) in the same double crochet used for the join.
- Work an sc in the next ch-1 space, and an sc in the next dc.
- Work 2 sc into the next ch-2 space.
- Work an sc in the next dc, chain 3, and work an sc in the next dc. (You have now made your first corner!)
- Work 2 sc in the next ch-2 space, then an sc in the next dc.
- Repeat this pattern around the square, ensuring you make a ch-3 corner every few stitches.
- Slip stitch into the first sc to join and fasten off.
Round 4: Creating Texture
Join Color 4 with a single crochet in any ch-3 corner space.
- Work 4 sc into that same corner space.
- Chain 1. Now, work a 3-dc CL directly into the 3-dc CL of Round 1 (the very center round) that is located below your current position.
- Chain 1. Skip the next 2 sc of Round 3 (this creates the “raised” look).
- Work an sc in each of the next 3 sc.
- Chain 1, work a 3-dc CL into the next 3-dc CL of Round 1, then chain 1.
- Work 5 sc into the next ch-3 corner space.
- Repeat this sequence around the entire square.
- Slip stitch into the first sc to join and fasten off.
Round 5: The Final Border
Join your final color (you can reuse Color 1 or pick a new one) with a slip stitch in the 2nd sc of any corner.
- Chain 3 (counts as first dc).
- Work (dc, ch 2, dc) in the next sc.
- Work a dc in the next sc, then a dc in the ch-1 space before the next 3-dc CL, chain 1, and a dc in the ch-1 space after that same 3-dc CL.
- Chain 1. Now, working over the stitches of Rounds 3 and 4, work a 3-dc CL into the ch-1 space of Round 2 directly below.
- Chain 1, work a dc in the ch-1 space before the next 3-dc CL, chain 1, and a dc in the ch-1 space after that same 3-dc CL.
- Chain 1, skip the first sc of the next corner, and work a dc in the next sc.
- Repeat this sequence around the square.
- Slip stitch into the first dc to join and fasten off.
Finishing Your Project
Once you have completed your final round, use your yarn needle to weave in all the loose ends. Because this pattern involves multiple color changes, you will have several tails to secure. Make sure to weave them in deeply and in different directions so they don’t pop out after washing.
Depending on your goal, you can now leave the square as a coaster or join multiple squares together. To join them, you can use a simple slip stitch join or a single crochet join for a more raised, decorative seam. If you have small remnants of yarn left over, these are perfect for the joining process!
Tips for Success
Choosing Your Colors
To get a professional-looking gradient or progression, try grouping your yarn into sets of five colors. For the first square, use colors 1-4. For the second, use 2-5. For the third, use 3, 4, 5, and 1. This creates a beautiful flow when the squares are sewn together into a larger project.
Maintaining Tension
Because the cluster stitches (3-dc CL) pull the fabric slightly, be careful not to tighten your stitches too much in Round 4 and 5. Keep your tension relaxed to ensure the square remains flat and doesn’t curl at the corners.
Project Ideas
Once you’ve mastered this 4-inch square, the possibilities are endless:
- Baby Blanket: Create approximately 50-60 squares and join them for a colorful heirloom.
- Boho Scarf: Join 6-8 squares in a long row for a trendy winter accessory.
- Pillow Covers: Create a 3×3 grid of squares for the front and back of a decorative throw pillow.