DIY Crochet Angel Wings Pattern: A Charming Tutorial for Brooches and Decor
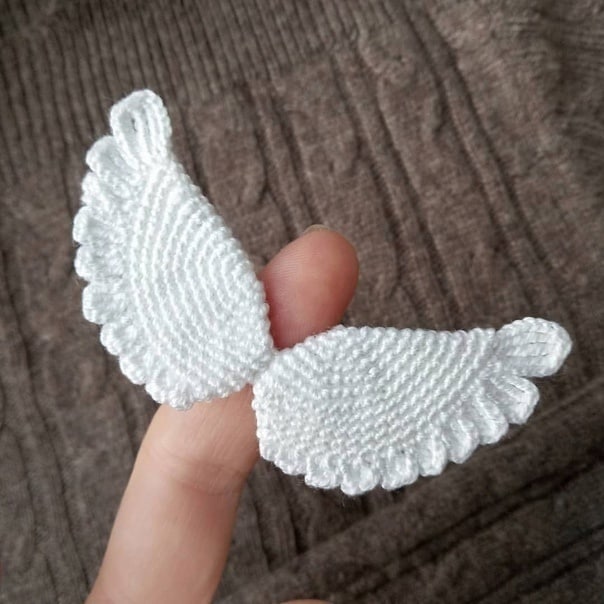
Are you looking for a way to add a touch of whimsy and magic to your crochet projects? These delicate, hand-crafted crochet wings are the perfect solution. Whether you want to create a tiny set of wings for a beloved doll, a beautiful lace-like brooch for a sweater, or even decorative elements for a baby’s nursery mobile, this pattern is incredibly versatile. These wings have a beautiful, organic shape that looks much more complex than they actually are, thanks to a special “feathered” stitch pattern along the edges.
This tutorial is designed with beginners in mind. We will walk you through the process of creating a circular base, shaping it into a tapered wing profile, and adding that stunning textured edge. By the end of this guide, you will have a professional-looking accessory that you can use in a variety of ways.
Materials & Abbreviations
To achieve the fine, lace-like detail seen in the finished wings, you will need very fine materials and a small hook. Precision is key here to ensure the “feathers” look crisp and delicate.
What You Will Need
- Yarn: A fine-weight white cotton thread or lace-weight yarn (such as a fingering weight cotton). Using a bright, clean white will make the stitch definition pop.
- Crochet Hook: A 1mm or 1.5mm crochet hook (US size B-1 or smaller).
- Tapestry Needle: A fine needle for weaving in ends and sewing the wings together.
- Sewing Thread: White sewing thread for assembly.
- Optional: A brooch pin or clasp if you intend to make jewelry.
- Iron & Steamer: Essential for “blocking” the wings to get that perfect, realistic shape.
Abbreviations (US Terms)
Please ensure you are using US crochet terminology to follow this pattern accurately:
- ch: chain
- sc: single crochet
- hdc: half double crochet
- dc: double crochet
- tr: treble crochet
- sl st: slip stitch
- inc: increase (two stitches worked into the same stitch)
- dec: decrease (two stitches worked together to create one)
Step-by-Step Instructions
You will be making two identical wing pieces. We recommend working them side-by-side or one after the other before moving on to the shaping phase.
Phase 1: Creating the Base Circles
First, we need to create two flat, circular foundations. These will serve as the “body” of your wings.
Instructions for one circle:
- Round 1: Start with a magic ring (or ch 2 and work 6 sc into the first chain). (6 stitches)
- Round 2: Work 6 inc into the ring. (12 stitches)
- Round 3: *1 sc, 1 inc;* repeat from * to * 6 times. (18 stitches)
- Round 4: *2 sc, 1 inc;* repeat from * to * 6 times. (24 stitches)
- Round 5: *3 sc, 1 inc;* repeat from * to * 6 times. (30 stitches)
- Round 6: *4 sc, 1 inc;* repeat from * to * 6 times. (36 stitches)
- Round 7: Work 36 sc in each stitch around. (36 stitches)
Repeat these steps to create a second circle. You should now have two flat, white crochet discs.
Phase 2: Shaping the Wing Profile
Now we turn those circles into wing shapes. This is the most important part of the structural process. We will be folding the circles in half and working through both layers at once. This technique creates the thickness and the tapered “point” of the wing.
Important Note: Fold each circle exactly in half. You will now be crocheting through both the front and back layers of the folded piece simultaneously. This will naturally create a shape that is wide on one side (where we add stitches) and narrow on the other (where we remove stitches).
Instructions (Work these rounds for both wings):
- Round 8: To create the wide edge, work 2 inc in the first stitch (this results in 3 sc in that one hole); work 17 sc; work 1 dec; work 16 sc. (37 stitches total)
- Round 9: 1 sc; 2 inc in the next stitch; work 17 sc; 1 dec; work 16 sc. (38 stitches total)
- Round 10: 1 sc; 2 inc in the next stitch; work 18 sc; 1 dec; work 16 sc. (39 stitches total)
- Round 11: 1 sc; 2 inc in the next stitch; work 18 sc; 1 dec; work 17 sc. (40 stitches total)
Once you have completed these rounds, you should have two pieces that look like tapered, slightly thicker half-moons. At this stage, it is highly recommended to use an iron or steamer to press your pieces. This “blocks” the crochet, helping the stitches lay flat and defining the wing shape.
Phase 3: The Feathered Decorative Edge
To give the wings their realistic “feather” texture, we will work an asymmetrical pattern along the outer, curved edge. Because the feathers on a real wing sweep in a specific direction, we will treat the left and right wings differently.
Deciding Left vs. Right: Look at your pieces. One side will be the “leading edge” (the thicker, wider part) and the other will be the “trailing edge” (the tapered part). Decide which is your left wing and which is your right wing.
The Left Wing
For the left wing, do not cut your yarn. Turn the piece so you are working along the outer edge. You will work through both the front and back layers of the folded edge. This will give you approximately 20 working stitches to work your pattern into.
The Right Wing
For the right wing, cut your yarn and hide the tail. To ensure the pattern looks consistent, secure your new yarn on the opposite side of the edge and work the same pattern sequence as the left wing.
Working the Feather Pattern
The feather pattern is a decorative sequence of varying stitch heights. You will work these into your foundation edge. While every hand-drawn pattern is slightly different, the goal is to create a “wave” of height. The sequence follows this general logic:
Start at the base and work upward in height, then back down. For example: (1 tr, 1 dc, 1 hdc, 1 sc, 1 hdc, 1 dc, 1 tr). Repeat this sequence, varying the heights slightly to create the organic, overlapping look of real feathers.
Finishing
Once you have completed the decorative edge on both wings, it is time to bring them together.
- Sewing: Using your tapestry needle and white sewing thread, sew the two wings together along the straight, folded edge. Make sure your tension is even so the wings don’t bunch up.
- Final Steaming: This is the secret to professional results! Once sewn, steam the wings one last time. Use your fingers or a crochet hook to gently pull the “feathers” outward as you steam. This will give the wings a beautiful, lifelike, swept-back appearance.
- Assembly:
- For a brooch: Carefully sew a brooch pin to the back of the wing.
- For a doll: Sew the wings directly onto the doll’s back.
- For decor: Use clear fishing line or thread to hang them from a nursery mobile.
Tips for Success
- Tension Matters: Since you are using very fine thread and a tiny hook, try to keep your tension consistent. If you crochet too tightly, the wings will become stiff; if too loosely, they may lose their shape.
- Don’t Skip the Steaming: Many beginners think steaming is optional, but for this specific pattern, it is what transforms a simple crochet piece into a realistic feather texture.
- Work in Good Light: Working with 1mm hooks and fine thread can be hard on the eyes. Ensure you have plenty of light to see your stitches clearly, especially during the shaping rounds.
- Experiment with Colors: While white is classic for angel wings, try using soft pastels for fairy wings or even metallic threads for a more magical, fantasy look!