Adorable Crochet Panda Amigurumi Pattern: Free Step-by-Step Tutorial
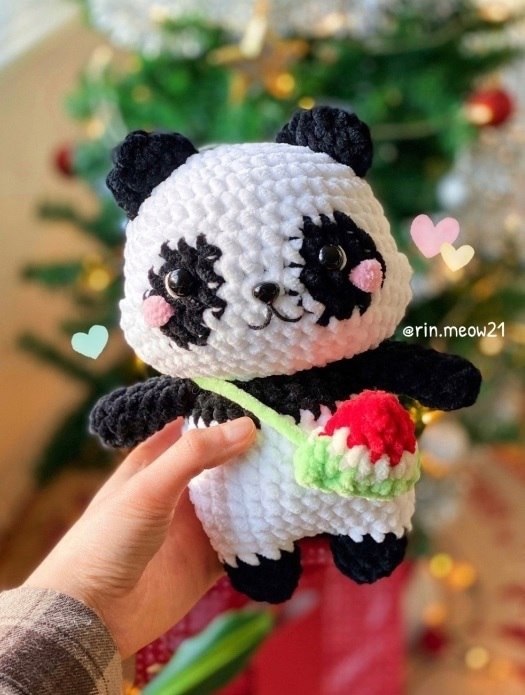
If you are looking for a project that is equal parts cozy and cute, you have come to the right place! Today, we are making a plump, squishy panda amigurumi that is perfect for beginners and experienced crocheters alike. This little panda is designed to be worked with chunky, velvet-style yarn, giving it a huggable texture that makes it an instant favorite for kids and adults.
Creating amigurumi is a wonderful way to practice your shaping and color-switching skills. This panda pattern features a few clever color changes to create those iconic black eye patches and a tiny, adorable watermelon accessory to give your panda a bit of personality. Grab your hook and some plush yarn, and let’s get started!
Materials & Abbreviations
To achieve that signature “chunky” look, we recommend using a chenille or velvet yarn. This makes the process go much faster and results in a soft, plush toy.
Materials Needed
- Yarn: Super bulky plush yarn (such as Chenille or Velvet yarn) in White, Black, Red, Green, and a small amount of Cream.
- Crochet Hook: 4.0 mm (G) hook.
- Safety Eyes: 12 mm safety eyes.
- Stuffing: High-quality polyester fiberfill.
- Extras: Stitch markers, scissors, a yarn needle, and black embroidery thread for the mouth.
- Optional: Pink embroidery thread or a small scrap of pink yarn for the cheeks.
Abbreviations (US Terms)
- MR: Magic Ring
- Ch: Chain
- Sc: Single Crochet
- Inc: Increase (2 sc in the same stitch)
- Dec: Decrease (sc 2 together)
- Hdc: Half Double Crochet
- Sl st: Slip Stitch
- BLO: Back Loop Only
- FLO: Front Loop Only
- (…) * n: Repeat the instructions inside the parentheses n times.
- [Color]: Change yarn color.
Step-by-Step Instructions
The Head
Start with White yarn. The head is worked in a continuous spiral, so using a stitch marker is highly recommended.
- Round 1: 8 sc in MR (8)
- Round 2: 8 inc (16)
- Round 3: (sc, inc) * 8 (24)
- Round 4: (3 sc, inc) * 6 (30)
- Round 5: 2 sc, inc, (4 sc, inc) * 5, 2 sc (36)
- Round 6: (5 sc, inc) * 6 (42)
- Round 7-8: sc in each stitch around (42)
- Round 9: 16 sc, [Black] 3 sc, [White] 4 sc, [Black] 3 sc, [White] 16 sc (42)
- Round 10: 15 sc, [Black] 4 sc, [White] 4 sc, [Black] 4 sc, [White] 15 sc (42)
- Round 11: 10 sc, inc, 3 hdc in one stitch, 2 sc, [Black] 5 sc, [White] 4 sc, [Black] 5 sc, [White] 2 sc, 3 hdc in one stitch, inc, 10 sc (48)
- Round 12: 18 sc, [Black] 3 sc, [White] 6 sc, [Black] 3 sc, [White] 18 sc (48)
- Round 13: 3 sc, dec, (6 sc, dec) * 5, 3 sc (42)
- Round 14: (5 sc, dec) * 6 (36)
- Round 15: 2 sc, dec, (4 sc, dec) * 5, 2 sc (30)
- Round 16: (3 sc, dec) * 6 (24)
- Round 17: sc, dec, (2 sc, dec) * 5, sc (18)
Fasten off and leave a short tail. Stuff the head firmly, making sure to add extra stuffing to the cheek areas to give the panda a round, chubby face.
The Body and Legs
We will start with the legs in Black and work our way up to the body.
The Legs
Leg 1:
- Round 1: 5 sc in MR (5)
- Round 2: 5 inc (10)
- Round 3-4: sc in each stitch around (10)
Fasten off the first leg.
Leg 2: Repeat the steps for Leg 1, but do not fasten off. At the end of Round 4, chain 3 using White yarn and join to the first leg with a slip stitch.
The Body
- Round 5: 10 sc around the first leg, 3 sc across the chain, 10 sc around the second leg, 3 sc across the chain (26)
- Round 6: (3 sc, inc) * 6, 2 sc (32)
- Round 7-12: sc in each stitch around (32)
- Round 13: 7 sc, dec, (14 sc, dec), 7 sc (30)
- Round 14: [White] sc in each stitch around (30)
- Round 15: (3 sc, dec) * 6 (24)
- Round 16: (2 sc, dec) * 6 (18)
Fasten off, leaving a long tail for sewing the body to the head. Stuff the body very firmly so the panda can sit upright.
The Ears and Arms
Both ears and arms are worked in Black.
Ears (Make 2)
- Round 1: 6 sc in MR (6)
- Round 2: 6 inc (12)
- Round 3: sc in each stitch around (12)
Fasten off, leaving a long tail. Do not stuff the ears.
Arms (Make 2)
- Round 1: 4 sc in MR (4)
- Round 2: 4 inc (8)
- Round 3-7: sc in each stitch around (8)
Fasten off, leaving a long tail. Do not stuff the arms.
The Watermelon Bag
This tiny accessory adds a touch of sweetness! Start with Red yarn.
- Round 1: 5 sc in MR (5)
- Round 2: 5 inc (10)
- Round 3: sc in each stitch around (10)
- Round 4: [Cream] (sc, inc) * 5 (15)
- Round 5: [Green] (4 sc, inc) * 3 (18)
Fasten off. Use the remaining yarn tail to sew the bottom of the bag closed. Using the Green yarn, crochet a simple chain to create a strap for the bag. You can choose to add a tiny bit of stuffing to the bag, but it is not necessary.
Finishing
Now it is time to bring your panda to life!
Face Details
Place the 12mm safety eyes between Rounds 10 and 11, approximately 6 stitches apart. To make the eyes pop, use a small piece of white embroidery thread to add a tiny “highlight” dot in the upper corner of each eye. Using pink yarn or thread, stitch small circles just below and to the side of the eyes for blushing cheeks.
Insert the safety nose between Rounds 11 and 12 in the center of the muzzle. Finally, use black embroidery thread to stitch a small “v” or a curved line for the mouth.
Assembly
- Head to Body: Sew the body to the head using the long tail left from the body.
- Ears: Sew the ears to the top of the head between Rounds 3 and 6.
- Arms: Sew the arms to the sides of the body at Round 15.
- The Bag: Attach the watermelon bag strap around the panda’s shoulder or arm.
Tips for Success
- Tension Control: When working with plush yarn, it can be easy to lose track of your stitches. Use a stitch marker at the end of every round to ensure your counts are accurate.
- Hiding Ends: Since plush yarn is thick, use your yarn needle to weave the ends deeply into the stuffing before securing them. This prevents the tails from popping out through the fabric.
- Stuffing: Don’t be afraid to overstuff! A plump panda looks much cuter and holds its shape better over time.
- Customization: Feel free to change the accessory! Instead of a watermelon, you could make a tiny bamboo stalk using green yarn.