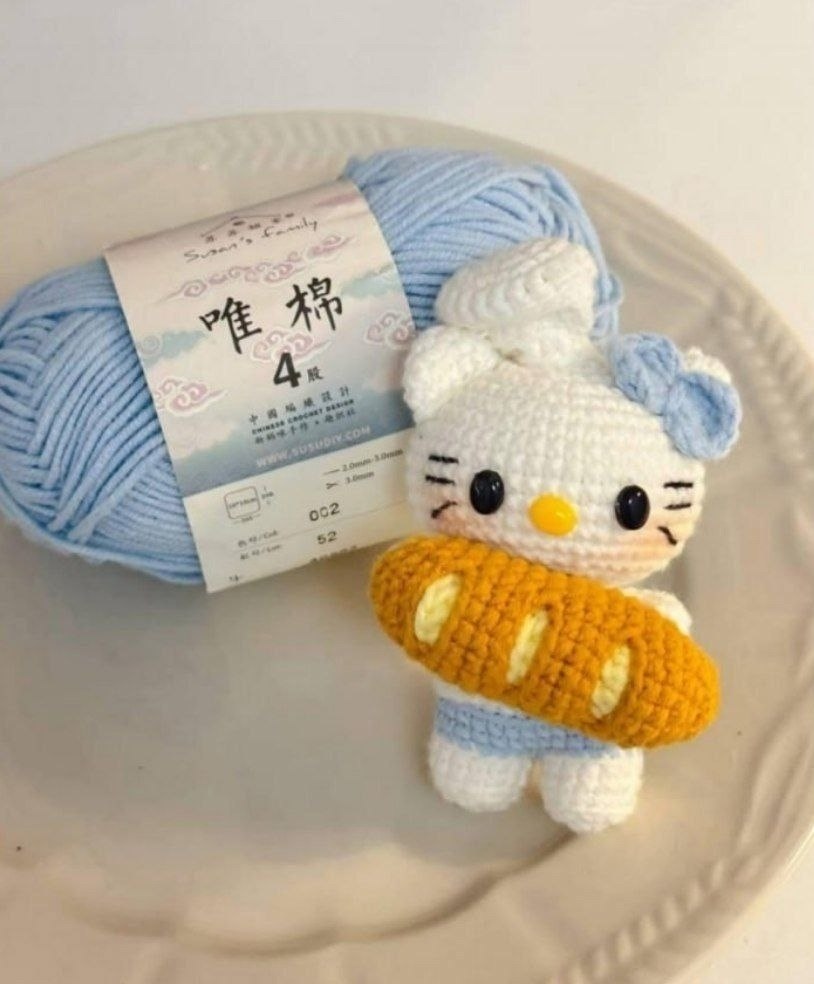
How to Crochet a Cute Baker Cat: Free Amigurumi Pattern
If you are looking for a project that combines the charm of kittens with the coziness of a bakery, this Baker Cat amigurumi is the perfect choice. This adorable little character, complete with a chef’s hat and a golden baguette, is a wonderful project for beginners and intermediate crocheters alike. Whether you are making a gift for a food lover or adding to your own collection of cute plushies, this step-by-step guide will walk you through every stitch.
In this tutorial, we use standard US crochet terms. The finished cat is small and portable, making it a great “desk buddy” or a cute accessory. Let’s grab our hooks and get started!
Materials & Abbreviations
To create your Baker Cat, you will need the following supplies:
- Yarn: Medium weight (Worsted or DK) cotton or acrylic blend in White, Light Blue, and Golden Yellow.
- Crochet Hook: 2.5mm or 3.0mm (depending on your tension to ensure the stuffing doesn’t show).
- Safety Eyes: 6mm or 8mm black safety eyes.
- Stuffing: High-quality polyester fiberfill.
- Tools: Tapestry needle, stitch markers, and scissors.
Abbreviations (US Terms)
- MR: Magic Ring
- sc: Single crochet
- inc: Increase (two single crochets in one stitch)
- dec: Decrease (single crochet two stitches together)
- ch: Chain
- dc: Double crochet
- sl st: Slip stitch
- BLO: Back loop only
- FLO: Front loop only
- st(s): Stitch(es)
Step-by-Step Instructions
The Head
The head is worked in a continuous spiral. Do not join rounds with a slip stitch unless specified. Use a stitch marker to keep track of the first stitch of each row.
- Round 1: 7 inc in MR (7 sts)
- Round 2: 7 inc (14 sts)
- Round 3: (sc, inc) repeat 7 times (21 sts)
- Round 4: (sc, inc, sc) repeat 7 times (28 sts)
- Round 5: (3 sc, inc) repeat 7 times (35 sts)
- Round 6: 2 sc, inc, 2 inc, then continue with increases and sc to shape the cheeks (approximately 40 sts)
- Round 7: (5 sc, inc) repeat 7 times (42 sts)
- Rounds 8-14: sc in each stitch around for 7 rounds (42 sts)
- Round 15: (5 sc, dec) repeat 6 times (36 sts)
- Round 16: 2 sc, dec, 2 sc, continue decreasing evenly around (approximately 30-32 sts)
- Round 17: (3 sc, dec) repeat around
- Round 18: (sc, dec, sc) repeat around
- Round 19: (sc, dec) repeat around
- Round 20: dec until closed.
Fasten off and weave in the ends. Stuff the head firmly with fiberfill before sewing it to the body.
The Legs and Body
You will start by making two legs, then join them to create the lower body.
Legs (Make 2):
- Round 1: 7 sc in MR (7 sts)
- Round 2: 7 inc (14 sts)
- Round 3: BLO sc in each st around (14 sts)
- Rounds 4-5: sc in each st around (14 sts)
The Body:
Join the two legs together using a chain or by crocheting across both pieces. From this point, you are working in one large loop.
- Round 6: Change to Light Blue. BLO sc in each st around (28 sts)
- Rounds 7-8: sc in each st around (28 sts)
- Round 9: Change to White. BLO sc in each st around (28 sts)
- Round 10: Work 28 sc in BLO, then work a second set of 28 sc in FLO (this creates a decorative rim).
- Round 11: sc in each st around (28 sts)
- Round 12: dec at the beginning and end of the round (26 sts)
- Round 13: dec twice at the beginning and twice at the end of the round (22 sts)
- Round 14: dec at the beginning and end of the round (20 sts)
- Round 15: 3 sc, (inc for arm: 3 sc in one stitch), 6 sc, (inc for arm: 3 sc in one stitch), 8 sc.
The Arms (Make 2)
The arms are simple tubes that attach to the increases made in Round 15 of the body.
- Rounds 1-6: 7 sc in each round (7 sts)
Fasten off and leave a tail for sewing.
The Baker’s Hat
Using White yarn:
- Round 1: 7 sc in MR (7 sts)
- Round 2: 7 inc (14 sts)
- Round 3: (sc, inc) repeat around (21 sts)
- Round 4: 21 dc in each st around (21 sts)
- Round 5: BLO sc in each st around (21 sts)
- Round 6: (sc, dec) repeat around
The Ears (Make 2)
Using White yarn:
- Round 1: 6 sc in MR (6 sts)
- Round 2: (sc, inc) repeat around (9 sts)
- Round 3: (sc, inc, sc) repeat around (12 sts)
- Round 4: sc in each st around (12 sts)
The Bow
Using Light Blue yarn:
- Start with a Magic Ring.
- Chain 3, work 5 dc into the ring, chain 3, slip stitch into the ring.
- Repeat the sequence (ch 3, 5 dc, ch 3, sl st) one more time.
- Pull the magic ring tight to create a bow shape and fasten off.
The Bread (Baguette)
Using Golden Yellow yarn:
- Chain 11.
- Working around the chain: sc in second ch from hook and next 9 sts.
- At the end of the chain, work 3 sc in the last stitch to turn the corner.
- Work 9 sc along the bottom of the chain.
- Work 3 sc in the final corner stitch.
- Continue working in sc around for 2-3 rounds to give the bread thickness.
- Stuff lightly and sew the end closed.
Finishing and Assembly
Now comes the most rewarding part—putting your Baker Cat together!
- Face: Attach the safety eyes between rounds 12 and 13 of the head, spaced about 5-6 stitches apart. Embroider a small yellow nose between the eyes using a scrap of yellow yarn.
- Head to Body: Sew the head securely to the top of the body.
- Arms: Sew the arms to the increases created on the body.
- Accessories: Sew the ears to the top of the head. Place the baker’s hat between the ears and sew it in place. Attach the blue bow to the side of the hat or the head.
- The Bread: Finally, sew the baguette across the cat’s chest so it looks like it’s being held in its arms.
Pro Tips for Amigurumi Success
To ensure your Baker Cat looks professional and polished, keep these tips in mind:
- Tight Tension: When crocheting amigurumi, use a hook slightly smaller than what the yarn label suggests. This prevents the stuffing from peeking through the stitches.
- Invisible Decreases: For a smoother look, use the “invisible decrease” method. Instead of a standard dec, insert your hook into the front loop of the first stitch and then the front loop of the second stitch, completing the sc.
- Stuffing Strategy: Stuff your pieces firmly but not so tight that the fabric stretches. Use a chopstick or a knitting needle to push stuffing into the corners of the head and legs.
- Symmetry: Use stitch markers for the eyes and the center of the face to make sure everything is aligned before you sew the pieces together.