How to Crochet an Adorable Llama: Free Amigurumi Llama Pattern
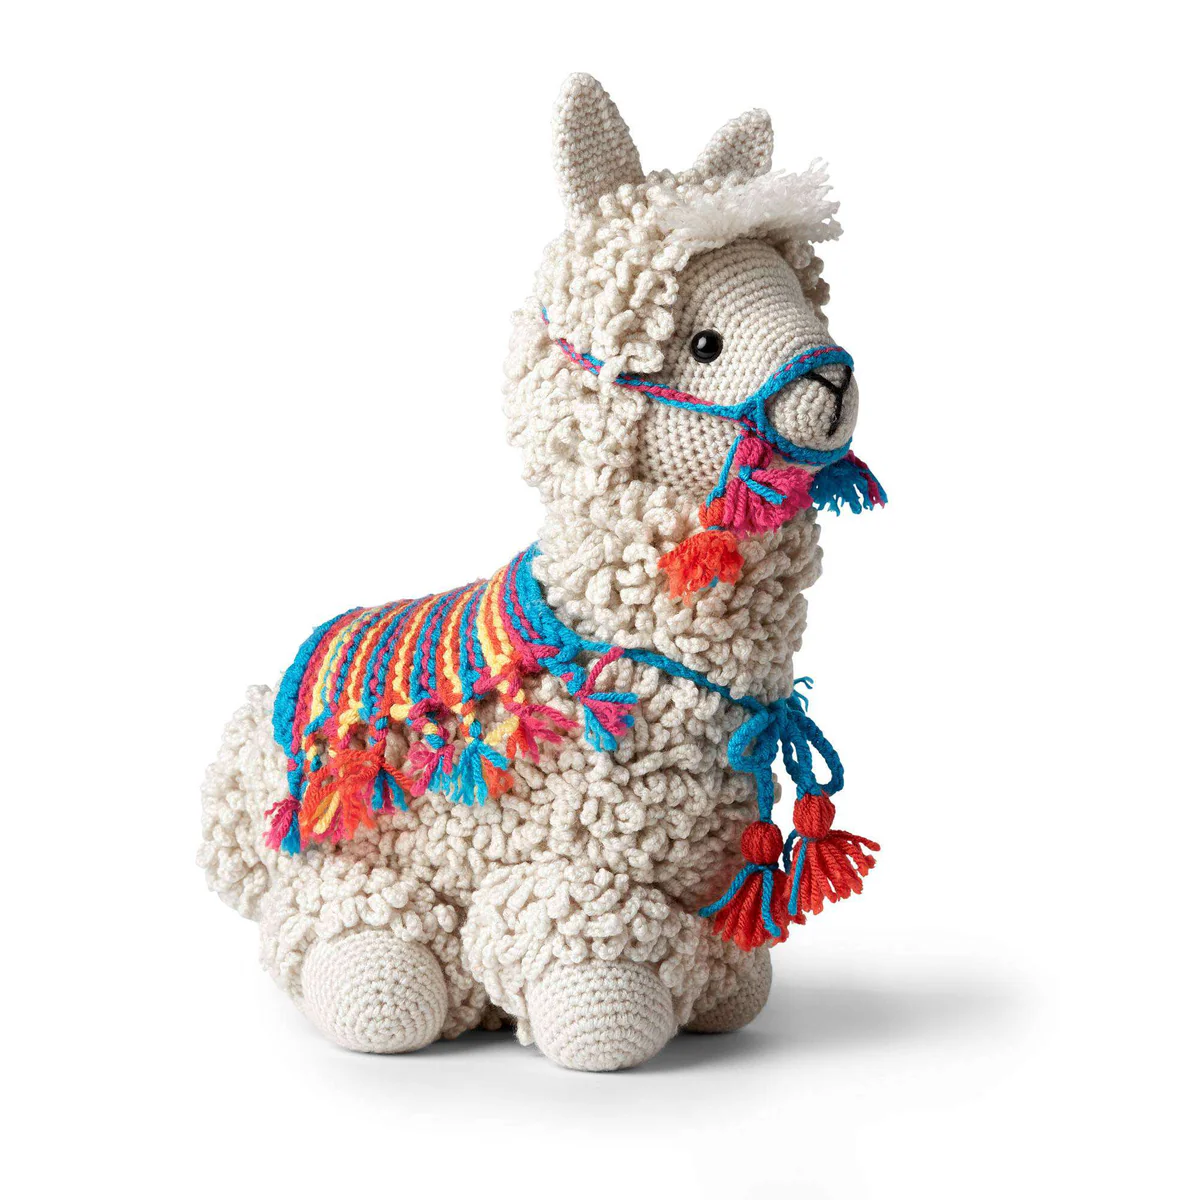
Looking for a fun, colorful project to brighten up your crochet nook? This “No-Drama” Llama is the perfect companion for any crochet lover. With its whimsical expressions, fluffy texture, and a vibrant little blanket, this plushie is a joy to create and an even bigger joy to gift. While this pattern is marked for intermediate crafters, we have broken down the steps to make it accessible for anyone comfortable with basic stitches and working in the round.
In this tutorial, you will learn how to create a textured “fur stitch” that gives your llama that signature woolly look. Grab your hooks and yarn, and let’s get started!
Materials & Abbreviations
Yarn Requirements
For this project, we recommend a medium weight (4) acrylic yarn for durability and brightness. You will need the following colors:
- Color A (Main Color – Eggshell): 3 balls
- Color B (Blue Hawaii): 1 ball
- Color C (Bubblegum): 1 ball
- Color D (Tigerlily): 1 ball
- Color E (Daffodil): 1 ball
- Color F (Black): A small amount for embroidery
Tools & Notions
- Crochet Hooks: U.S. F/5 (3.75 mm) and U.S. L/11 (8 mm)
- Safety Eyes: Two 15 mm safety eyes
- Stuffing: Polyester fiberfill
- Extras: Stitch marker, yarn needle, and scissors
Abbreviations (US Terms)
- Beg: Beginning
- Ch: Chain
- Sc: Single crochet
- Sl st: Slip stitch
- Sc2tog: Single crochet two together (decrease)
- Rnd: Round
- St(s): Stitch(es)
- PM: Place marker
- Yoh: Yarn over hook
Finished Size: Approximately 14.5 inches tall by 11 inches long (excluding the tail).
Step-by-Step Instructions
The Head and Neck
Using the smaller hook and Color A, start at the muzzle. Chain 2.
Round 1: Work 6 sc in the 2nd chain from the hook. Join with a slip stitch. PM for the beginning of the round.
Round 2: Ch 1. 2 sc in each sc around. Join. (12 sc)
Round 3: Ch 1. (1 sc in next sc, 2 sc in next sc) 6 times. Join. (18 sc)
Round 4: Ch 1. (1 sc in each of next 2 sc, 2 sc in next sc) 6 times. Join. (24 sc)
Round 5: Ch 1. (1 sc in each of next 3 sc, 2 sc in next sc) 6 times. Join. (30 sc)
Round 6: Ch 1. 1 sc in each sc around. Join.
Round 7: Ch 1. (1 sc in each of next 4 sc, 2 sc in next sc) 6 times. Join. (36 sc)
Rounds 8-10: Ch 1. 1 sc in each sc around. Join.
Round 11: Ch 1. (1 sc in each of next 5 sc, 2 sc in next sc) 6 times. Join. (42 sc)
Rounds 12-13: Ch 1. 1 sc in each st around. Join.
Round 14: Ch 1. (1 sc in each of next 6 sc, 2 sc in next sc) 6 times. Join. (48 sc)
Round 15: Ch 1. (1 sc in each of next 7 sc, 2 sc in next sc) 6 times. Join. (54 sc)
Round 16: Ch 1. 1 sc in each st around. Join.
Round 17: Ch 1. (1 sc in each of next 8 sc, 2 sc in next sc) 6 times. Join. (60 sc)
Rounds 18-19: Ch 1. 1 sc in each sc around. Join.
Creating the Neck Opening
Round 1: Ch 1. 1 sc in the same space as the slip stitch. Ch 15, skip the next 15 sc. 1 sc in each remaining sc to the end of the round. Join.
Round 2: Ch 1. 1 sc in the same space as the slip stitch. 1 sc in each of the next 15 chains. 1 sc in each sc to the end of the round. Join. (60 sc)
Adding the Fur and Shaping the Neck
The “Fur Stitch” is a key feature. For the first round of fur, work in front loops only: (Ch 10, 1 sc in next sc) repeat around. For the second round of fur, work in back loops only two rounds below: 1 sc in each st around, pushing the ch-10 loops to the front.
Continue shaping the neck with decreases (sc2tog) and repeating the fur stitch sequence until the neck tapers. Follow the pattern provided in the rounds to decrease from 60 sts down to 6 sts before fastening off.
Eyes and Face: Flatten the head to center the neck opening. Attach 15 mm safety eyes between the 15th and 16th rounds, roughly 13 stitches apart. Using Color F (Black), embroider a simple “Y” shape for the nose and mouth on the muzzle.
The Body
Begin at the chest using the smaller hook and Color A. Chain 2.
Round 1: 6 sc in 2nd ch from hook. Join. PM for beginning of round.
The body grows similarly to the head, utilizing the Fur Stitch (Ch 10 in front loops, sc in back loops two rounds below). Increase until you reach 60 stitches. Create a neck opening by chaining 18 and skipping 18 stitches, then work around to maintain 60 stitches.
Continue working the body length by repeating the fur and plain sc rounds. Once the body is the desired length, begin tapering the bottom using sc2tog decreases until you reach 12 stitches. Finish with a final fur stitch round before fastening off.
Legs, Ears, and Tail
Legs (Make 4): Start at the foot with 6 sc in a magic ring. Increase to 30 sc, work several rounds of plain sc, and then decrease and add fur stitch at the top. Fasten off, leaving a long end for sewing.
Ears (Make 2): Ch 18 and join into a ring. Work sc around, then gradually decrease using sc2tog until the ear reaches a point (10 sts). Fasten off.
Tail: Ch 7 and work around both sides of the chain. Use the fur stitch sequence to create a fluffy texture, then decrease to a point and fasten off.
The Halter and Blanket
Halter: Use Color B. Create a noseband (Ch 30, join to form a ring) and a head strap (Ch 49). Join them together and add small tassels using Colors B, C, and D.
Blanket: Use the larger hook (8mm) and two strands of Color B held together. Chain 26. Work rows of slip stitches in the front loops only, changing colors in the sequence: [D, E, B, C] four times, then E, D, and C. Finish with two rows of Color B. Create a braided fringe using the yarn tails at the ends of the rows.
Finishing
Now it is time to assemble your llama!
- Legs: Sew the front legs directly under the shoulders (around the 20th round of the body) and the back legs at the hip area. Make sure the legs are side-by-side with edges touching.
- Head & Neck: Insert the neck into the body opening. Ensure the muzzle is facing forward and sew securely. Stuff the head and neck firmly.
- Tail & Ears: Sew the tail to the upper rear of the body and the ears to the top of the head, about 2 inches apart.
- Bangs: Chain 10 with Color A. Create a fringe by knotting 3-inch strands of yarn across the chain. Sew the strip to the top of the head.
- Final Touch: Tie the colorful blanket around the neck and place the halter on the head.
Tips for Success
- Stuffing: Stuff your llama firmly, especially the neck and legs, to ensure it holds its shape and doesn’t sag.
- Fur Stitch Tip: When working the back loops two rounds below, use a stitch marker to keep track of where you are so you don’t accidentally skip a stitch.
- Eye Placement: Do not snap the safety eye washers into place until you are completely happy with the position of the eyes.
- Tension: Keep your tension consistent, especially on the blanket, to ensure the stripes look even.