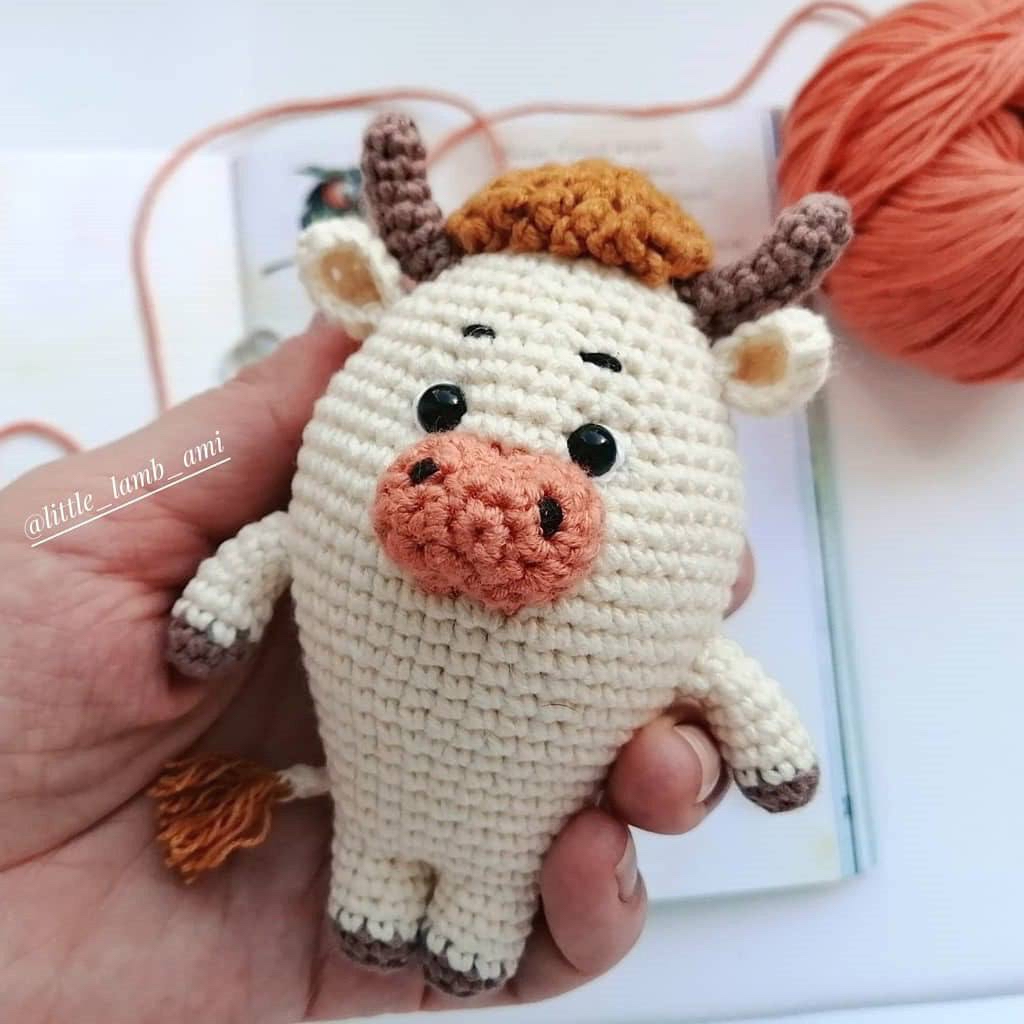
Cute Crochet Bull Amigurumi Pattern: A Step-by-Step Tutorial
Looking for a charming new project to add to your crochet collection? This adorable little bull amigurumi is the perfect blend of “cute” and “cuddly.” Whether you are making a gift for a baby shower, a unique desk companion, or just practicing your skills, this project is a fantastic choice. With its chunky body and curly hair, this calf is sure to bring a smile to anyone’s face.
This pattern is designed to be beginner-friendly, though it uses some shaping techniques that will help you level up your amigurumi game. We will be creating the body and head as one continuous piece starting from the feet, which minimizes the amount of sewing you have to do at the end. Grab your favorite colors of yarn, and let’s get started!
Materials & Abbreviations
To create your little bull, you will need the following materials. While the original design uses specific colors, feel free to customize your calf with any colors you like!
Materials Needed
- Yarn: Medium weight (Worsted) yarn in the following colors:
- Main Color (Beige or Cream)
- Accent Color (Brown)
- Muzzle Color (Peach or Light Pink)
- Hair/Horn Color (Brown or Mustard Yellow)
- Crochet Hook: 3.25mm or 3.5mm (adjust size to ensure your stitches are tight so the stuffing doesn’t show).
- Stuffing: Polyester fiberfill.
- Eyes: 6mm black safety eyes or black sewing beads.
- Tools: Tapestry needle, scissors, and stitch markers.
- Embroidery Thread: Small amounts of white and dark brown yarn/thread for facial details.
Abbreviations (US Terms)
- MR: Magic Ring
- ch: Chain
- sc: Single crochet
- inc: Increase (2 sc in one stitch)
- dec: Decrease (sc 2 together)
- blo: Back loop only
- hdc: Half double crochet
- dc: Double crochet
- sl st: Slip stitch
- st: Stitch
Step-by-Step Instructions
The Legs, Body, and Head
We start by making the legs. The first leg will be fastened off, but the second leg will remain attached to the yarn so we can join them and work the body in a spiral.
Leg 1:
Start with Brown yarn.
Round 1: 9 sc in MR.
Round 2: 9 sc in BLO.
Switch to Main Color (Beige/Cream).
Rounds 3-6: 9 sc in each round (4 rounds total). Fasten off.
Leg 2:
Repeat the instructions for Leg 1, but do not fasten off. We will now join the two legs together.
The Body:
Round 7: 4 sc on Leg 2, join to Leg 1 and work 9 sc around it, then work 5 sc on Leg 1 = 18 sc.
Round 8: (2 sc, 1 inc) * 6 = 24 sc.
Rounds 9-10: 24 sc in each round.
Round 11: (3 sc, 1 inc) * 6 = 30 sc.
Rounds 12-13: 30 sc in each round.
Round 14: (4 sc, 1 inc) * 6 = 36 sc.
Rounds 15-16: 36 sc in each round.
Round 17: (5 sc, 1 inc) * 6 = 42 sc.
Rounds 18-19: 42 sc in each round.
Round 20: (6 sc, 1 inc) * 6 = 48 sc.
Rounds 21-25: 48 sc in each round (5 rounds total).
The Head:
Round 26: (6 sc, 1 dec) * 6 = 42 sc.
Round 27: 42 sc.
Round 28: (5 sc, 1 dec) * 6 = 36 sc.
Round 29: 36 sc.
Round 30: (4 sc, 1 dec) * 6 = 30 sc.
Round 31: 30 sc.
Round 32: (3 sc, 1 dec) * 6 = 24 sc.
Round 33: 24 sc.
Round 34: (2 sc, 1 dec) * 6 = 18 sc.
Round 35: 18 sc.
Round 36: In BLO, (1 sc, 1 dec) * 6 = 12 sc.
Round 37: In BLO, 6 dec = 6 sc.
Fasten off and weave in the end, closing the hole in BLO. Note: We are leaving the front loops of the last few rounds open to attach the curly hair later!
The Muzzle
Use the Peach/Light Pink yarn.
Round 1: 6 sc in MR.
Round 2: (1 inc sc, 2 inc hdc, 1 inc sc, 2 inc hdc) = 12 sc.
Round 3: 2 sl st, (1 inc hdc, 1 inc dc, 1 inc hdc), 3 sl st, (1 inc hdc, 1 inc dc, 1 inc hdc), 1 sl st = 18 sc.
Round 4: 18 sc. Fasten off, leaving a long tail for sewing.
The Horns
Use Brown yarn. Make two.
Round 1: 6 sc in MR.
Rounds 2-3: 6 sc in each round.
Round 4: 1 dec, 1 sc, 1 inc, 2 sc = 6 sc.
Round 5: 3 sc, 1 inc, 2 sc = 7 sc.
Round 6: 1 dec, 2 sc, 1 inc, 2 sc = 7 sc.
Round 7: 1 dec, 2 sc, 2 inc, 1 sc = 8 sc. Fasten off.
The Arms
Use Brown yarn. Make two.
Round 1: 8 sc in MR.
Round 2: 8 sc in BLO.
Switch to Main Color.
Rounds 3-4: 8 sc in each round.
Rounds 5-8: (5 sc, 3 sl st) = 8 sc. (The slip stitches help create a slight natural curve in the arms). Fasten off.
The Ears
Use Main Color. Work these in rows rather than rounds. Make two.
Row 1: Ch 2, work 2 sc in the 2nd ch from hook, ch 1, turn.
Row 2: 1 inc, 1 sc = 3 sc, ch 1, turn.
Row 3: 1 sc, 1 inc, 1 sc = 4 sc, ch 1, turn.
Row 4: 4 sc, ch 1, turn.
Row 5: 1 sc, 1 dec, 1 sc = 3 sc, ch 1. Work a round of sc around the entire edge to finish. Fasten off.
The Tail
Use Main Color. Chain 15. Work a row of slip stitches back down the chain. Switch to Brown or Mustard yarn and create a small tassel at the end using the same method as the hair (below).
The Curly Hair
Use Mustard or Brown yarn. Attach the yarn to the first front loop remaining on the top of the head.
(Ch 3, sl st into the same loop), (ch 3, sl st into the next loop), (ch 3, sl st into the same loop). Repeat this “curly” sequence until all available front loops on the top of the head are filled. Fasten off.
Finishing & Assembly
Now it is time to bring your bull to life! Use a tapestry needle and a matching color of yarn for all sewing.
- Horns: Sew the horns to the top of the head, directly beneath the curly hair.
- Ears: Sew the ears just below the horns, leaving about one row of space between them.
- Muzzle: Stuff the muzzle lightly with fiberfill. Sew it to the face between rounds 21 and 25.
- Facial Details: Use dark brown yarn to embroider two small nostrils on the muzzle. Place the eyes directly above the muzzle on either side. Use a small piece of white thread to embroider “eye whites” or highlights around the beads to give the bull more expression.
- Arms: Sew the arms to the sides of the body around rounds 19 and 20.
- Tail: Sew the tail to the back of the body.
Tips for Success
- Tension is Key: Amigurumi requires tight stitches to prevent the stuffing from leaking. If you see gaps, try dropping down half a hook size.
- Stitch Markers: Because we are working in continuous spirals, a stitch marker is essential to keep track of the beginning of your rounds.
- Stuffing: Stuff the body firmly, but be careful not to overstuff the head, or it might lose its shape.
- Customization: You can change the “Mustard” hair to a bright orange or a deep chocolate brown to create different breeds of cattle!