Free 4th of July Crochet Beach Bag Pattern
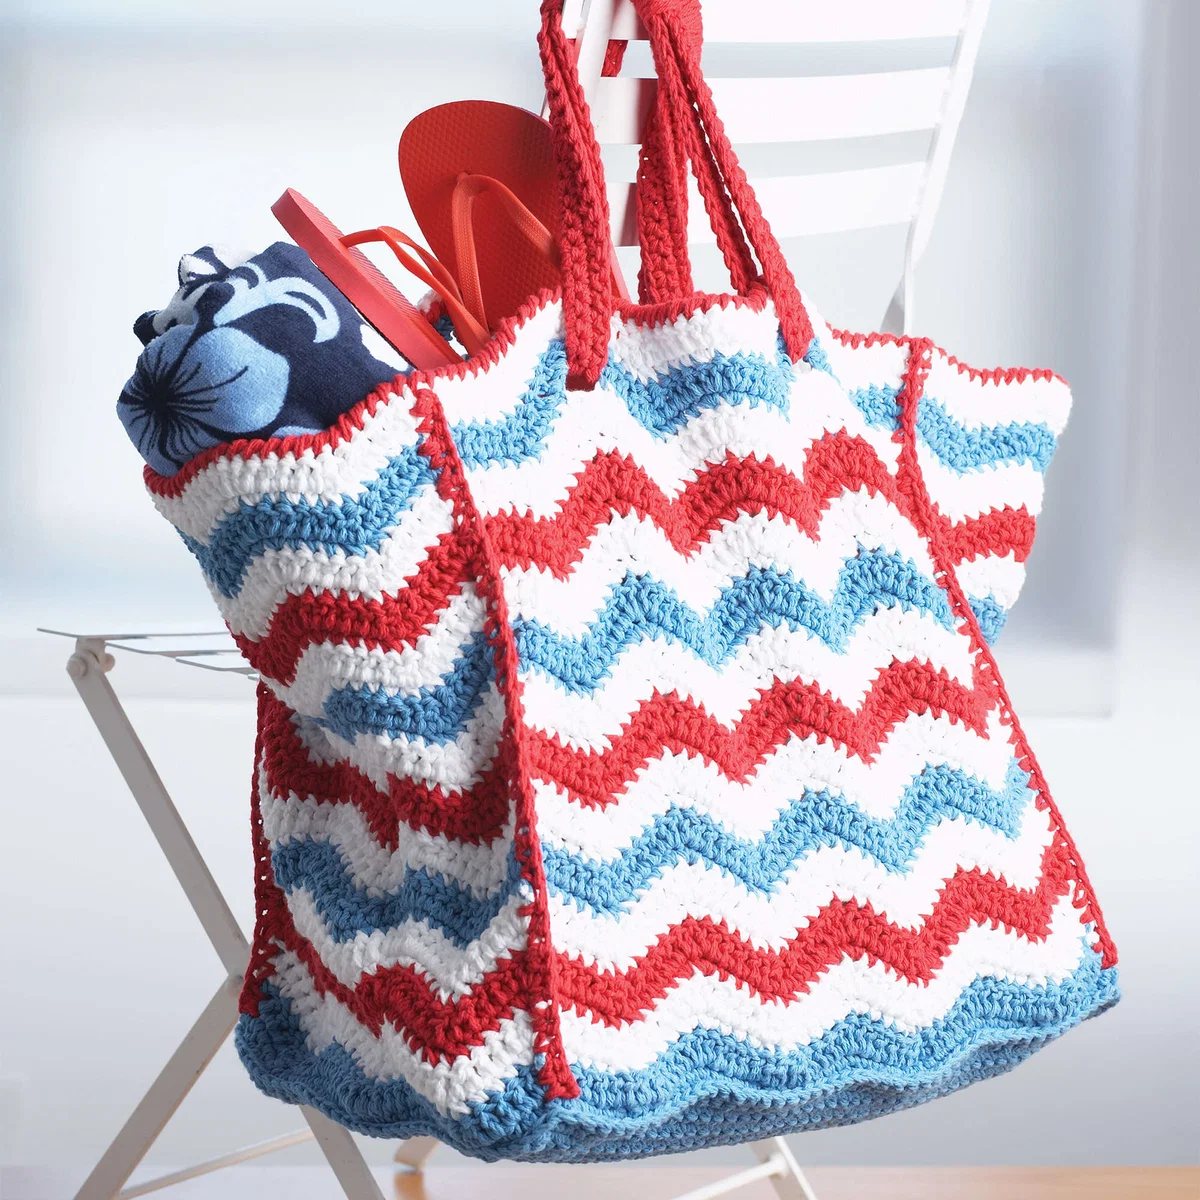
Get ready for summer picnics, beach trips, and patriotic parades with this stunning 4th of July crochet beach bag! Whether you are heading to a family BBQ or lounging by the ocean, this sturdy, vibrant tote is the perfect accessory to carry your essentials. With its classic red, white, and blue stripes and a durable design, this bag is as practical as it is festive.
This pattern uses a “double-strand” technique, meaning you’ll be crocheting with two strands of yarn held together. This creates a thicker, more durable fabric that can handle the weight of towels, sunscreen, and snacks without stretching out too much. Even if you are a beginner, this tutorial will guide you through the process step-by-step.
Materials & Abbreviations
To get started on your Americana tote, gather the following materials. We recommend using a medium-weight cotton yarn for maximum durability and a clean finish.
Materials
- Yarn: Medium weight (4) cotton yarn in three colors:
- White (Contrast A): Approx. 6-7 balls
- Red (Contrast B): Approx. 5-6 balls
- Blue (Contrast C): Approx. 6-7 balls
- Crochet Hook: Size H-8 (5 mm)
- Notions: Yarn needle for weaving in ends and scissors
Abbreviations (US Terms)
- ch: chain
- sc: single crochet
- hdc: half double crochet
- dc: double crochet
- dc2tog: double crochet two together (decrease)
- sc2tog: single crochet two together (decrease)
- sl st: slip stitch
- st(s): stitch(es)
- RS: right side
- WS: wrong side
Gauge
Using two strands of yarn held together, 12 dc and 6 rows = 4 inches. If your gauge differs, your bag may be slightly larger or smaller than the dimensions listed.
Finished Measurements
Approximately 15 inches wide x 8 inches deep x 16 inches high.
Step-by-Step Instructions
Pro Tip for Color Changes: To keep your stripes looking crisp, change colors on the last stitch of the row. Work the stitch until there are two loops left on your hook, then pull the new color through those loops to complete the stitch and start the next row.
The Stripe Pattern
The bag follows a repeating 8-row sequence. You will refer back to this sequence throughout the project:
- Row 1 & 2: White (Contrast A)
- Row 3 & 4: Red (Contrast B)
- Row 5 & 6: White (Contrast A)
- Row 7 & 8: Blue (Contrast C)
Front and Back Panels (Make 2)
Using two strands of Blue (Contrast C) held together, chain 49.
Row 1: Sc in 2nd ch from hook. Sc in next 3 chs. *1 hdc in next ch, 1 dc in each of next 2 chs, 1 hdc in next ch, sc in each of next 8 chs.* Repeat from * to last 8 chs. 1 hdc in next ch, 1 dc in each of next 2 chs, 1 hdc in next ch, sc in each of next 4 chs. Turn.
Row 2: Ch 3 (counts as 2 dc). 1 dc in the first sc. *1 dc in each of next 3 scs. Work a dc2tog over the next 2 sts, then another dc2tog over the next 2 sts. 1 dc in each of next 3 scs. Work 2 dc in the next sc twice.* Repeat from * ending with 2 dc in the next sc. Join with Contrast A. Turn.
Row 3: With Contrast A, ch 1. Work 2 sc in the first dc. *1 sc in each of next 3 dcs. Work a sc2tog over the next 2 sts, then another sc2tog over the next 2 sts. 1 sc in each of next 3 dcs. Work 2 sc in the next dc twice.* Repeat from * ending with 2 sc in the top of the turning chain. Turn.
Continue repeating the Stripe Pattern (Rows 1-8) until the panel measures approximately 14 inches from the beginning. Ensure you end with two rows of Red (Contrast B).
Creating the Slits for Handles:
With Contrast A, ch 1. 2 sc in first dc. *1 sc in each of next 3 dcs. Work sc2tog twice. 1 sc in each of next 3 dcs. Ch 4, skip next 2 dcs, 1 sc in each of next 3 dcs. Work sc2tog twice. 1 sc in each of next 3 dcs.* 2 sc in each of next 2 dcs. Repeat from * once more. 2 sc in the top of the turning chain. Turn.
Final Row: Ch 3 (counts as 2 dc). *1 dc in each of next 3 scs. Work dc2tog twice. 1 dc in each of next 2 sts. Work 6 dc into the ch-4 space. 1 dc in each of next 2 sts. Work dc2tog twice. 1 dc in each of next 3 scs.* 2 dc in each of next 2 scs. Repeat from * once more. 2 dc in last sc. Join with Contrast C. Turn. Work 2 more rows in the established pattern and fasten off.
Side Panels (Make 2)
Using two strands of Blue (Contrast C), chain 37.
Follow the same instructions as the Front and Back Panels (from Row 1 through Row 3), then continue the Stripe Pattern until the panel measures 16 inches. Fasten off.
The Base
Using two strands of Blue (Contrast C), chain 49.
Row 1: Sc in 2nd ch from hook and in each ch across. Turn. (48 sc)
Row 2: Ch 1, sc in each st across. Turn.
Repeat Row 2 until the base measures 12 inches. End on a wrong-side (WS) row. Do not fasten off.
Finishing and Assembly
Joining the Panels
Arrange your four panels to form a rectangle, placing the side panels opposite each other. With the wrong sides of two panels touching, join two strands of Red (Contrast B) with a slip stitch to the top left corner. Ch 1, working through both thicknesses, sc evenly along the side edge. Fasten off and repeat for the remaining panels.
Attaching the Base
Place the right side (RS) of the base facing up. Position the lower edge of your joined panels behind the base so the wrong sides are touching. Align the corners of the base with the joining rows of the panels.
Next Round: Ch 1. Working through both thicknesses, sc evenly around all four sides of the base. Join with a slip stitch to the first sc. Fasten off.
Top Edging
With the RS of the bag facing you, join two strands of Red (Contrast B) with a slip stitch to any corner of the top edge. Ch 1. Working from left to right (reverse of usual), work one round of reverse single crochet (crab stitch) evenly around the top edge. Join with a slip stitch and fasten off.
Adding the Handles (Make 2)
Using two strands of Red (Contrast B), chain 95 loosely.
Row 1: Sc in 2nd ch from hook and in each ch across. Turn. (94 sc)
Row 2: Ch 1, sc in each st across. Turn.
Repeat Row 2 once more. Fasten off.
Attachment: Push the ends of the handle through the slits created in the Front Panel to the wrong side. Sew the ends together securely. To finish, bring the two halves of the handle together. Using two strands of White (Contrast A), wrap the center 4 inches of the handle to create a decorative accent. Fasten securely. Repeat for the Back Panel.
Tips for Success
- Consistent Tension: Because you are using two strands of yarn, it can be easy to pull too tight. Keep your tension relaxed to ensure the bag remains flexible.
- Yarn Management: To avoid tangles, try using two separate balls of the same color—one hanging from each side of your work.
- Blocking: If your panels seem a bit uneven, a light steam block can help square them up before you join them together.
- Customizing: While this is a 4th of July theme, you can use any three colors to make this a personalized tote for a friend or a sports team!