Easy Dusty Snowflake Crochet Throw Pattern: A Step-by-Step Guide
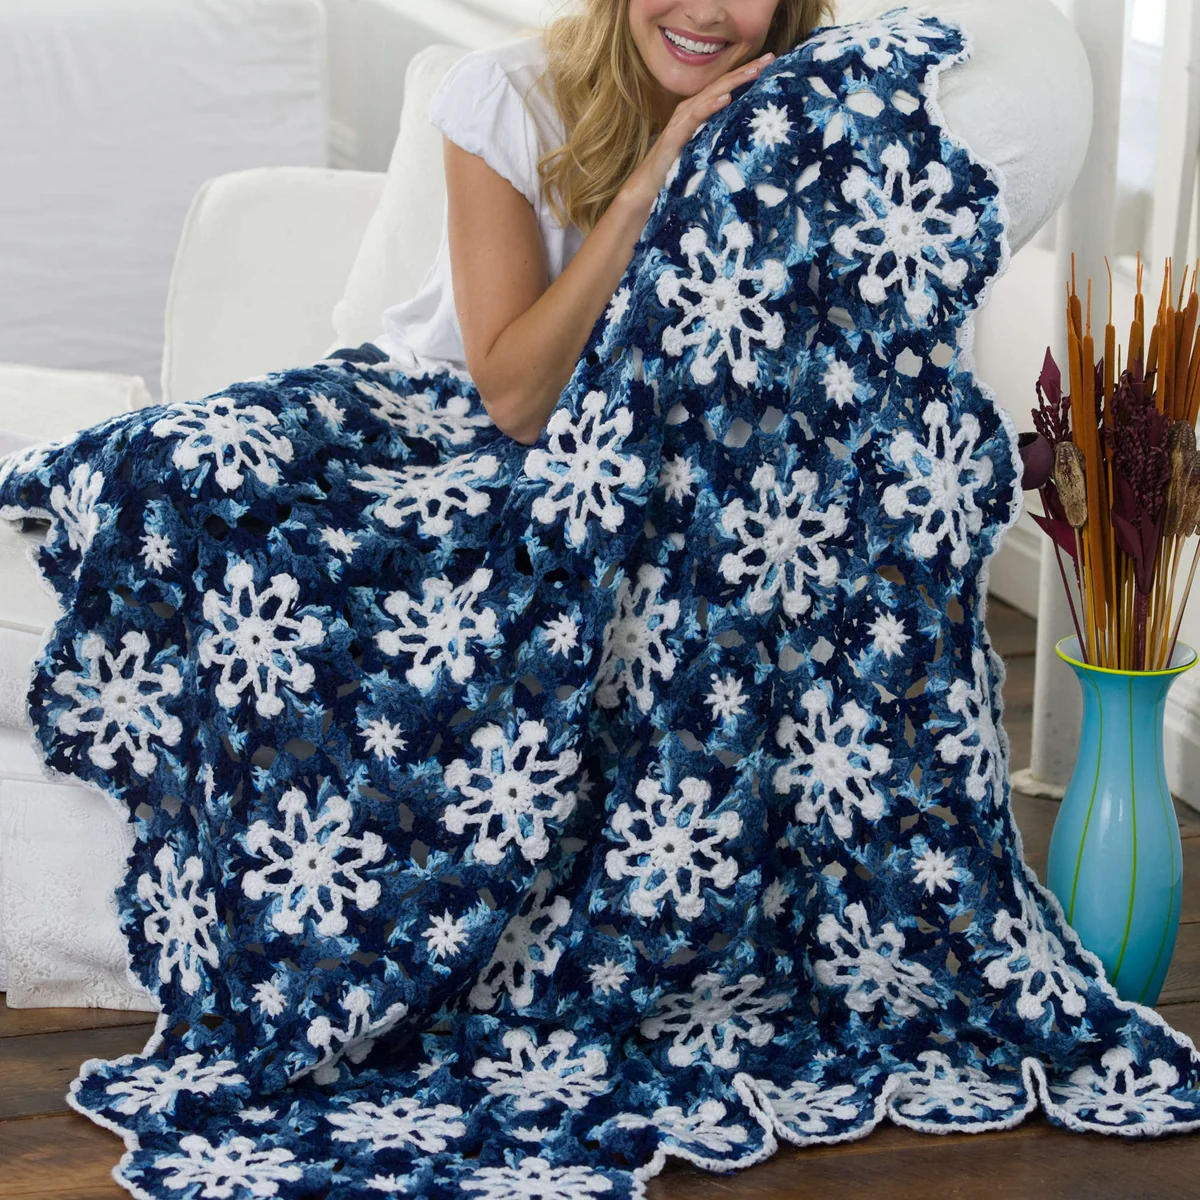
There is nothing quite like the feeling of a cozy, handmade blanket draped over your shoulders during the chilly winter months. If you are looking for a project that combines a stunning, intricate look with a beginner-friendly technique, this Dusty Snowflake Crochet Throw is the perfect choice. With its striking contrast of crisp white and deep blue, this blanket creates a wintry wonderland vibe in any room.
This project is created using a “motif” style, meaning you will crochet individual snowflake circles and small filler circles, then join them together to create a large, luxurious throw. While the final result looks complex, the repetitive nature of the motifs makes it a relaxing project for any crocheter. In this tutorial, we will walk you through everything you need to create this beautiful piece from start to finish.
Materials & Abbreviations
Before you pick up your hook, gather all your supplies. To achieve the look shown in the pattern, we recommend using a medium-weight acrylic yarn for durability and easy care.
Materials Needed
- Yarn: Medium weight (4) yarn.
- Contrast A: White (approximately 2 balls)
- Contrast B: Dark Blue or Shaded Dusk (approximately 6 balls)
- Crochet Hook: Size I/9 (5.5 mm) or the size needed to obtain your gauge.
- Additional Tools: Yarn needle for weaving in ends and scissors.
Gauge and Measurements
The finished throw measures approximately 45″ x 52½″. To ensure your blanket is the correct size, check your gauge for a single motif: it should be approximately 7½″ in diameter.
Abbreviations (US Terms)
- Approx: Approximately
- Beg: Beginning
- Ch: Chain
- Dc: Double crochet
- Rep: Repeat
- Rnd(s): Round(s)
- Sc: Single crochet
- Sl st: Slip stitch
- Sp(s): Space(s)
- St(s): Stitch(es)
- Tr: Treble crochet
Step-by-Step Instructions
This blanket is composed of two different types of motifs: the Large Snowflake Motif and the Filler Motif. We will start with the large snowflakes, as these form the main body of the throw.
The Large Snowflake Motif
Note: For all rounds, the starting chain 3 counts as your first double crochet (dc). Always join your rounds with a slip stitch to the first stitch of the round.
Round 1: Using Color A (White), chain 5. Join with a slip stitch to form a magic ring. Chain 3, then work 15 dc into the ring. Join with a slip stitch to the top of the starting chain-3.
Round 2: Chain 1. Work 1 sc in the same space as the slip stitch. Chain 7, then skip the next dc. (Work 1 sc in the next dc, chain 7, skip the next dc) 7 times. Join and fasten off the white yarn.
Round 3: Change to Color B (Blue). Locate the skipped dc from Round 1 (it will be behind the chain-7 spaces). Join the blue yarn with a slip stitch in any skipped dc. Chain 3, and work 2 dc in the same space as the slip stitch. Work 3 dc in each of the remaining 7 skipped dc. Join and fasten off.
Round 4: Chain 3. In the next dc, work (1 dc, chain 1, 1 dc). Work 1 dc in each of the next 2 dc. Repeat the sequence (1 dc, ch 1, 1 dc) followed by 2 dc until you reach the last dc. Work 1 dc in the last dc. Join and fasten off.
Round 5: Return to Color A (White). You will now work into the chain-1 spaces of Round 4 and the chain-7 spaces of Round 2 simultaneously. Join with a slip stitch in any space. Chain 3, then work 4 dc in the same space as the slip stitch. *Chain 1, skip the next 2 dc, and slip stitch in the space between stitches. Chain 1, skip the next 2 dc, then work 5 dc in the next space.* Repeat from * around. Join and fasten off.
Round 6: Return to Color B (Blue). Join with a slip stitch in the back loop of the center dc of any 5-dc group from Round 5. Chain 1, then work 1 sc in the same space. *Working over the slip stitch of the previous round, work (1 tr, ch 1, 1 tr, ch 2, 1 tr, ch 1, 1 tr) all in the next space. Work 1 sc in the back loop of the center dc of the next 5-dc group.* Repeat from * around. Join.
Joining the Large Motifs (Round 7)
The joining process depends on whether you are making the very first motif or subsequent motifs.
For the First Motif Only: Chain 3. In the same space as the slip stitch, work (1 dc, ch 1, 2 dc). *Work 1 sc in the next ch-1 space. In the next ch-2 space, work (2 dc, ch 3, 2 dc). Work 1 sc in the next ch-1 space. In the next sc, work (2 dc, ch 1, 2 dc).* Repeat from * around. Join and fasten off.
For All Other Motifs: Chain 3. Work (1 dc, ch 1, 2 dc) in the same space as the slip stitch. Work 1 sc in the next ch-1 space. *Work 2 dc in the next ch-2 space. Chain 1 and slip stitch into the corresponding ch-3 space of the previous motif. Chain 1, then work 2 dc in the same space on the current motif. Work 1 sc in the next ch-1 space, then work 2 dc in the next sc. Slip stitch into the corresponding ch-1 space on the previous motif. Work 2 dc in the same space on the current motif and 1 sc in the next ch-1 space.* Repeat this join for each connecting motif. To finish the round, work (2 dc, ch 1, 2 dc) in the next sc, 1 sc in the next ch-1 space, and (2 dc, ch 3, 2 dc) in the next ch-2 space. Join and fasten off.
The Filler Motif
Filler motifs are smaller circles that sit between the large snowflakes to complete the grid.
Round 1: Using Color A, chain 4 and join with a slip stitch to form a ring. Chain 4, then work (1 dc, ch 1) 7 times into the ring. Join in the 3rd chain of the starting chain-4. Fasten off.
Round 2: Join Color B with a slip stitch in any dc. Chain 1, work 1 sc in the same space. Work (1 dc, ch 1, 1 dc) in the next ch-1 space. Repeat (1 sc in next dc, 1 dc, ch 1, 1 dc in next ch-1 space) 7 times. Join.
Round 3 (Joining): This round is used to attach the filler motif to the surrounding large snowflakes. Slip stitch into the next ch-1 space. Chain 3, 1 dc in the same space. Chain 1 and slip stitch into the corresponding ch-3 space of a large motif. Chain 1, 2 dc in the same space on the filler motif. Repeat the joining sequence of 2 dc and slip stitches to connect the filler motif to the surrounding snowflakes. Finish the round with (2 dc, ch 1, 2 dc) in the next ch-1 space, (2 dc, ch 3, 2 dc) in the next ch-1 space, and (2 dc, ch 1, 2 dc) in the final ch-1 space. Join and fasten off.
Finishing the Throw
Assembling the Layout
To create the full throw, you will need to arrange your motifs in 6 rows, with 7 large motifs in each row. Once your first row of 7 large motifs is complete, join 6 filler motifs in the spaces between the rows to bridge the gaps and create a solid fabric.
The Final Border
To give the blanket a clean, professional edge, add a final border in Color A (White).
Join the yarn with a slip stitch in the ch-3 space at the top right corner. Chain 1, and work 5 sc in the same space. *Skip the next 2 stitches, 1 sc in the next stitch, 3 sc in the next ch-sp, skip the next 2 stitches, 1 sc in the next stitch, and 5 sc in the next ch-sp.* Repeat this sequence 3 times. Work 5 sc in the next ch-sp to reach the left corner. Repeat the pattern around the entire blanket, ensuring you place 5 sc in each corner space. Join with a slip stitch and fasten off.
Tips for Success
- Keep Tension Consistent: Because this pattern involves a lot of joining, your tension can vary. Try to keep your stitches relaxed so the blanket doesn’t pucker.
- Weave as You Go: With so many color changes and motifs, you will have many yarn tails. Use your yarn needle to weave in ends every few motifs so you aren’t left with a mountain of ends at the end of the project.
- Blocking: If your snowflakes aren’t perfectly flat, a light steam blocking or wet blocking will help the motifs open up and make the final blanket lay flat.
- Color Customization: While blue and white are classic, this pattern looks stunning in gold and cream for a luxury feel or red and white for a holiday-themed gift!