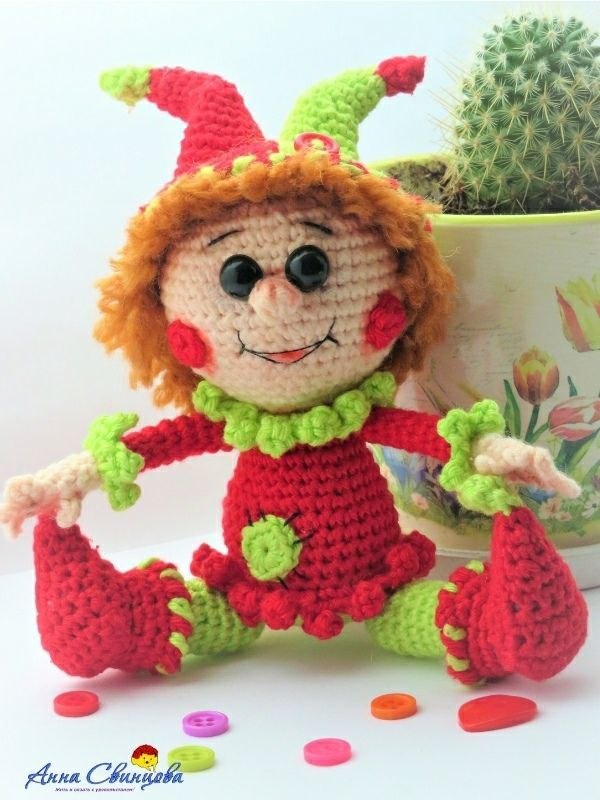
Stitch Your Own Whimsical Wonder: The Ultimate Cheerful Jester
How to Crochet a Cheerful Jester Doll: Step-by-Step Pattern
Create your own whimsical and colorful Jester Doll! This detailed guide will walk you through every stitch to create a joyful companion for children or a unique addition to your amigurumi collection.
Materials Needed
- Yarn:
- Skin tone (Peach) – Cotton blend yarn
- Bright Red – Cotton yarn
- Bright Green – Cotton yarn
- Brown – Soft yarn for hair
- Black and Red embroidery floss for facial details
- Tools:
- 0.90 mm crochet hook (or a size that suits your yarn tension)
- Stitch markers
- 9mm safety eyes (2 pieces)
- Fiberfill stuffing
- Tapestry needle
- Small-toothed comb (for the hair)
- Pastels (for adding blush to cheeks and nose)
Finished Size: Approximately 6.7 inches (17 cm) tall when standing.
Crochet Abbreviations (US Terms)
- MR: Magic Ring
- ch: Chain
- sc: Single Crochet
- inc: Increase (2 sc in one stitch)
- dec: Decrease (sc 2 together)
- sl st: Slip Stitch
- BLO: Back Loop Only
- FLO: Front Loop Only
- dc: Double Crochet
- rsc: Reverse Single Crochet (Crab Stitch)
Step 1: Head and Body
The head and body are worked as one continuous piece. Start with the skin-tone yarn.
Head:
- R1: 6 sc in MR (6)
- R2: 6 inc (12)
- R3: (1 sc, 1 inc) * 6 (18)
- R4: 1 sc, 1 inc, (2 sc, 1 inc) * 5, 1 sc (24)
- R5: (3 sc, 1 inc) * 6 (30)
- R6: 30 sc (30)
- R7: 2 sc, 1 inc, (4 sc, 1 inc) * 5, 2 sc (36)
- R8: (5 sc, 1 inc) * 6 (42)
- R9-14: 42 sc (42)
Note: Insert safety eyes between rounds 10 and 11, spaced 2 stitches apart.
- R15: (5 sc, 1 dec) * 6 (36)
- R16-17: 36 sc (36)
- R18: 2 sc, 1 dec, (4 sc, 1 dec) * 5, 2 sc (30)
- R19: (3 sc, 1 dec) * 6 (24)
- R20: 24 sc (24)
- R21: (2 sc, 1 dec) * 6 (18). Stuff the head firmly.
- R22: (1 sc, 1 dec) * 6 (12)
- R23: 12 sc (12)
Body:
Change yarn color to Red.
- R24: BLO (1 sc, 1 inc) * 6 (18)
- R25: 18 sc (18)
- R26: (2 sc, 1 inc) * 6 (24)
- R27-28: 24 sc (24)
- R29: (3 sc, 1 inc) * 6 (30)
- R30-34: 30 sc (30)
Change yarn color to Green.
- R35: BLO 30 sc (30)
- R36: (3 sc, 1 dec) * 6 (24)
- R37: 24 sc (24). Stuff the body firmly.
- R38: (2 sc, 1 dec) * 6 (18)
- R39: (1 sc, 1 dec) * 6 (12)
- R40: 6 dec (6). Fasten off and leave a tail to sew the hole closed.
Step 2: Collar and Shirt Details
The Collar (Green): Attach green yarn to the Front Loops (FLO) of the neck. Work from back to front.
- R1: 12 inc (24)
- R2: sl st, ch 4. Starting from 2nd ch from hook, work 3 sc, then 2 sc into the base of the collar. Repeat this sequence 11 more times to create 12 tabs. Fasten off.
Shirt Frill (Red): Attach red yarn to the Front Loops (FLO) of the body.
- ch 5. Starting from 2nd ch from hook, work 4 sc, then 2 sc into the base of the body. Repeat this sequence 14 times to create 15 tabs. Fasten off.
Step 3: The Nose
Using skin-tone yarn:
- ch 3. In the 3rd chain from the hook, create a puff stitch (work 3 dc together in one stitch). Fasten off, leaving a tail for sewing.
Step 4: The Jester Hat
The hat consists of two pointed caps joined together.
Cap 1 (Green Start):
- R1: 3 sc in MR (3)
- R2: 3 inc (6)
- R3: 3 dec (3)
- R4: Change to Red, 3 inc (6)
- R5: (2 sc, 1 inc) * 2 (8)
- R6: 8 sc (8)
- R7: (3 sc, 1 inc) * 2 (10)
- R8: 5 sc, 5 sc BLO (10)
- R9: (4 sc, 1 inc) * 2 (12)
- R10: 6 sc, 5 sc in FLO of R8, 1 sc in R9 (12)
- R11: (5 sc, 1 inc) * 2 (14)
- R12: 14 sc (14)
- R13: (6 sc, 1 inc) * 2 (16)
- R14: 16 sc (16)
- R15: (7 sc, 1 inc) * 2 (18)
- R16: 18 sc (18). Do not cut thread.
Cap 2 (Red Start): Follow the same instructions as Cap 1, but swap the colors (start with red, then switch to green). Shift your marker by one stitch. Fasten off.
Joining and Finishing the Hat:
- Join the two caps by working 3 sc into the first (red) cap, then 3 sc together with the second cap. Work 12 sc into the red cap.
- R1: 3 sc into red cap, change color, and work 27 sc around the caps, alternating colors (30).
- R2: (4 sc, 1 inc) * 6 (36)
- R3: (5 sc, 1 inc) * 6 (42)
- R4: (6 sc, 1 inc) * 6 (48)
- R5-9: 48 sc (48)
- R10: Work a round of rsc (Reverse Single Crochet) into the FLO, alternating red and green yarn.
Adding Hair: Cut brown yarn into 10 cm (4 inch) strands. Attach them to the back loops of the hat. Trim to desired length and brush with a fine-toothed comb to make it fluffy.
Step 5: Cheeks, Legs and Arms
Cheeks (Make 2): Work 6 sc in MR. Fasten off and sew to the face.
Legs (Make 2): Start with Green (Boot).
- R1: 3 sc in MR (3)
- R2: 3 inc (6)
- R3: 3 dec (3)
- R4: Change to Red, 3 inc (6)
- R5: (2 sc, 1 inc) * 2 (8)
- R6: 8 sc (8)
- R7: (3 sc, 1 inc) * 2 (10)
- R8: 10 sc (10)
- R9: ch 1, turn. 6 sc (6)
- R10: ch 1, 6 sc (6)
- R11: ch 1, 2 sc, 2 inc, 2 sc (8)
- R12-13: ch 1, 8 sc (8)
- R14: ch 1, 8 sc. Then work in rounds: 6 sc along the side, 4 sc in the base, 6 sc along the second side (24).
- R15: (2 sc, 1 dec) * 6 (18)
- R16: (1 sc, 1 dec) * 6 (12). Stuff the foot.
- R17: Work into FLO of base: 1 sc, 1 inc, 2 sc, 1 inc, 7 sc (14).
- Leg (Back loops): Work 12 sc for 10 rounds. Then work (1 sc, 1 dec) * 4 (8). Stuff and close.
- Finish Boot (Front loops): R18: (2 sc, 1 inc) * 4, 2 sc (18). R19: 18 sc. R20: Work rsc around, alternating colors.
Arms (Make 2): Start with skin-tone yarn.
- Left Arm: R1: (ch 4, sl st in 4th ch) * 3, ch 1, 6 sc around finger bases. R2: 1 sc, (ch 4, sl st in 4th ch), 5 sc. R3: 1 sc (fold finger), 1 sc, 1 inc, 2 sc, 1 inc (8). R4: 8 sc. R5: (2 sc, 1 dec) * 2 (6). R6: 6 sc. R7: Change to Red, BLO 6 sc. R8-16: 6 sc. Close.
- Right Arm: Similar to left, but mirror the finger placement.
- Sleeve Trim (Green): Attach green yarn to FLO of sleeve. ch 3, starting from 2nd ch, 2 sc, 1 sc in base. Repeat 5 times.
Step 6: Final Assembly
- Patch: In MR, work 1 sc, ch 1, 2 sc, ch 1, 2 sc, ch 1, 2 sc, ch 1, 1 sc. Close ring and sew to the body with black thread.
- Sewing: Attach the arms, legs, and hat to the body securely. Sew on the nose.
- Facial Details: Use black embroidery floss to sew the eyebrows and mouth.
- Finishing Touch: Use pastels to lightly shade the cheeks, nose, and area around the mouth for a lifelike, cute look.