Adorable Snowy Owl Crochet Hat Pattern: A Step-by-Step Tutorial
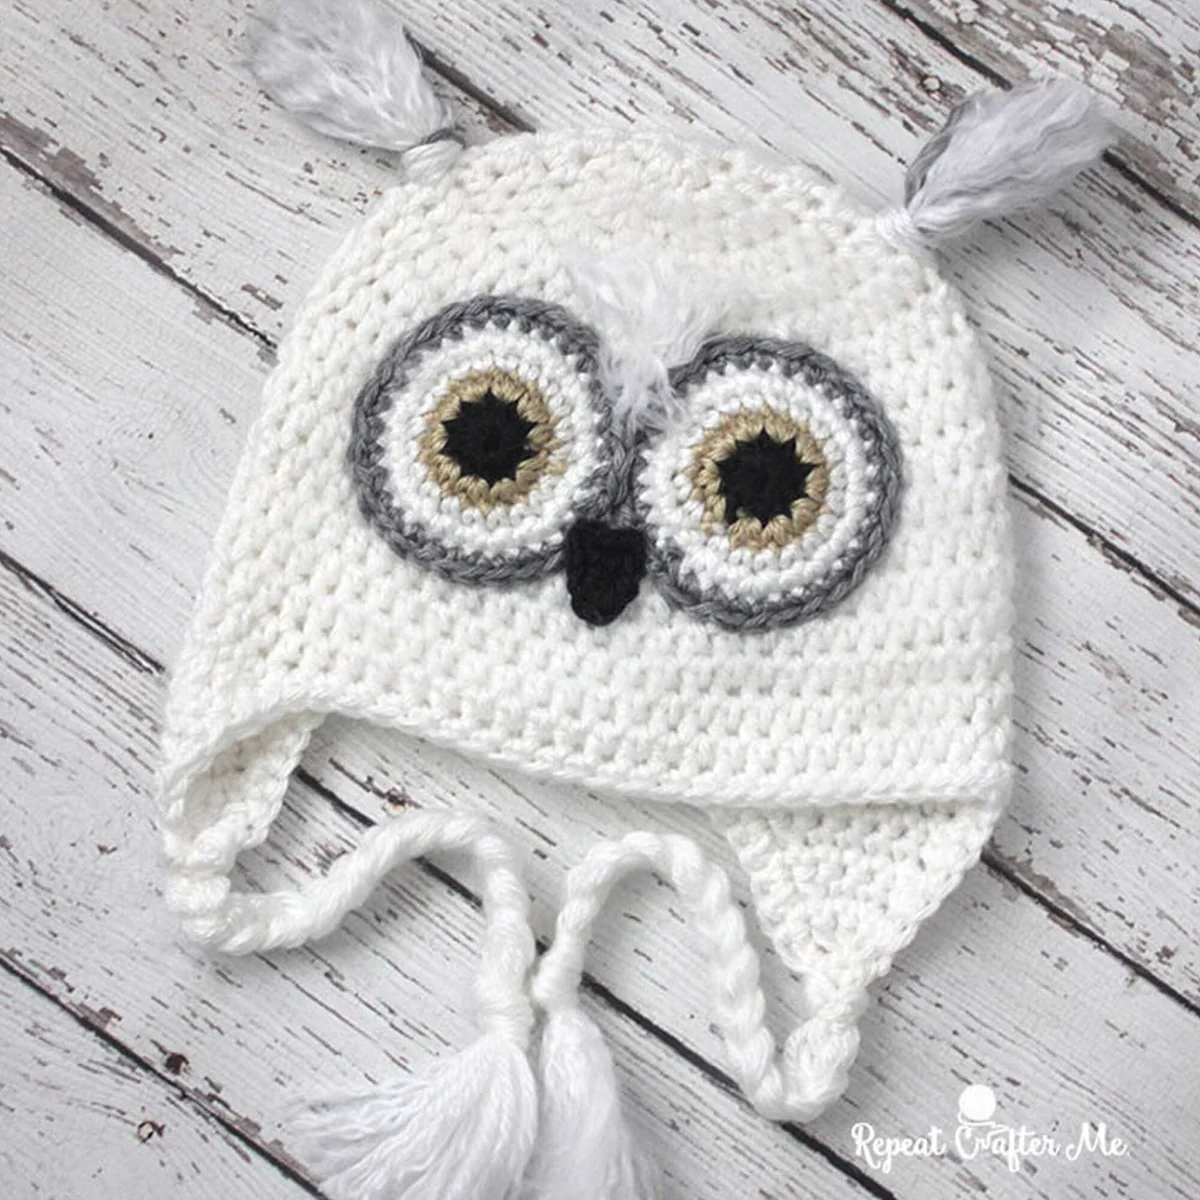
Looking for a cozy and cute project to keep your little ones warm this winter? This Snowy Owl Crochet Hat is the perfect blend of practical and precious. With its sweet owl face, cozy earflaps, and a unique “fluffy” texture, this hat is sure to be a hit at any baby shower or family gathering.
Whether you are crafting for a newborn or an adult, this pattern is designed to be beginner-friendly. We will walk you through the process of creating the hat base, adding the charming owl details, and using a simple trick to give the yarn a soft, faux-fur appearance. Let’s grab our hooks and get started!
Materials & Abbreviations
To create this owl hat, you will need a few basic supplies. We recommend a soft, lightweight acrylic yarn to ensure the hat is comfortable and washable.
Materials Needed
- Yarn: Medium weight yarn (such as Caron Simply Soft).
- Main Color (MC): White
- Accent Colors: Small amounts of Black, Bone, and Grey Heather
- Hook: Size U.S. H/8 (5 mm) crochet hook, or whatever size is needed to obtain the gauge.
- Notions: Stitch markers, yarn needle, and scissors.
- The Secret Tool: A wire brush (used for brushing out the yarn to create a “furry” effect).
Gauge
13 single crochet (sc) and 14 rows = 4 inches. If your work is too large, try a smaller hook; if it is too tight, try a larger one.
Abbreviations (US Terms)
- Beg: Beginning
- Ch: Chain
- Dc: Double crochet
- Hdc: Half double crochet
- Rep: Repeat
- Rnd(s): Round(s)
- RS: Right side
- Sc: Single crochet
- Sc2tog: Single crochet two together (decrease)
- Sl st: Slip stitch
- St(s): Stitch(es)
- WS: Wrong side
- Yoh: Yarn over hook
Step-by-Step Instructions
Important Note: Throughout this pattern, the chain 2 (ch 2) at the beginning of a round does not count as a half double crochet (hdc).
The Hat Base
Using the Main Color (MC) White, start by chaining 4. Join with a slip stitch to the first chain to form a magic ring. We will now work in continuous rounds to create the crown of the hat.
- 1st rnd: Ch 2. Work 9 hdc into the ring. Join with a sl st to the top of the ch 2.
- 2nd rnd: Ch 2. Work 2 hdc in each hdc around. Join with a sl st to the top of the ch 2. (18 hdc)
- 3rd rnd: Ch 2. *1 hdc in next hdc, 2 hdc in next hdc. Repeat from * around. Join with a sl st to the top of the ch 2. (27 hdc)
- 4th rnd: Ch 2. *1 hdc in each of next 2 hdc, 2 hdc in next hdc. Repeat from * around. Join with a sl st to the top of the ch 2. (36 hdc)
- 5th rnd: Ch 2. *1 hdc in each of next 3 hdc, 2 hdc in next hdc. Repeat from * around. Join with a sl st to the top of the ch 2. (45 hdc)
Sizing Adjustments
Depending on the size you are making, follow the instructions below for the 6th round and beyond:
For size 3/6 months only:
- 6th rnd: Ch 2. *1 hdc in each of next 8 hdc, 2 hdc in next hdc. Repeat from * around. Join with a sl st to the top of the ch 2. (50 hdc)
For sizes 6/12 mos, 2/4 yrs, 6/10 yrs, and Adult:
- 6th rnd: Ch 2. *1 hdc in each of next 4 hdc, 2 hdc in next hdc. Repeat from * around. Join with a sl st to the top of the ch 2. (54 hdc)
For sizes 2/4 yrs, 6/10 yrs, and Adult only:
- 7th rnd: Ch 2. Work 1 hdc in each hdc around. Join with a sl st to the top of the ch 2.
- 8th rnd: Ch 2. *1 hdc in each of next 8 hdc, 2 hdc in next hdc. Repeat from * around. Join with a sl st to the top of the ch 2. (60 hdc)
For sizes 6/10 yrs and Adult only:
- 9th rnd: Ch 2. *1 hdc in each of next (29-9) hdc, 2 hdc in next hdc. Repeat from * around. Join with a sl st to the top of the ch 2. (62-66 hdc)
Finalizing the Hat Body (All Sizes):
Work one round of hdc in each stitch around, joining with a sl st to the top of the ch 2. Repeat this last round 8 (8-9-9-10-11) more times depending on your size. Do not fasten off yet, as we need to start the earflaps!
The Earflaps
We will create two earflaps. We start with the first one while still attached to the hat.
First Earflap:
- 1st row: Ch 1. Work 1 dc in each of the next 10 (10-10-10-12-12) hdc. Turn. Leave remaining stitches unworked.
- 2nd row (WS): Ch 1. Sc2tog, 1 sc in each of next 6 (6-6-6-8-8) sc, sc2tog. Turn. (8-10 sts)
- 3rd row: Ch 1. 1 sc in each stitch to the end of the row. Turn.
- 4th row: Ch 1. Sc2tog, 1 sc in each sc to the last 2 sc, sc2tog. Turn. (6-8 sts)
- 5th row: Repeat the 3rd row.
Continue repeating the last two rows until only 4 stitches remain. Then work (sc2tog) twice (2 sts), and finally sc2tog one last time. Fasten off.
Second Earflap: Fold the hat in half to align the first earflap. Use stitch markers to mark the corresponding 10 (10-10-10-12-12) hdc on the opposite side. Join the white yarn with a sl st at the marker and repeat the steps for the First Earflap.
The Owl Face Details
Now for the fun part—giving our owl some personality!
Eyes (Make 2):
- Rnd 1: With Black yarn, ch 2. Work 10 sc in the 2nd ch from hook. Join with Bone yarn using a sl st.
- Rnd 2: With Bone, ch 1. Work 2 sc in each sc around. Join with MC White using a sl st. (20 sc)
- Rnd 3: With MC White, 1 sc in each sc around. Join with a sl st.
- Rnd 4: Ch 1. *1 sc in next sc, 2 sc in next sc. Repeat from * around. Join with Grey Heather using a sl st. (30 sc)
- Rnd 5: With Grey Heather, ch 1. 1 sc in each sc around. Join with a sl st and fasten off.
Nose: With Black yarn, ch 5. Work 1 sc in the 2nd ch from hook, 1 hdc in the next ch, and 1 dc in each of the last 2 chains. Fasten off, leaving a long tail for sewing.
Finishing
It is time to assemble your Snowy Owl hat!
Assembly
Sew the eyes and nose to the front of the hat as shown in your project layout. To create the “eyebrows,” loop a few strands of white yarn between the eyes and tie them securely. Use your wire brush to fluff these strands and trim them to size.
Braided Tails (Make 2)
Cut 12 strands of white yarn, each 36 inches long. Take 6 strands and thread them through the end of an earflap, knotting them at the top. Divide the 12 strands into three groups of four and braid them. Knot the end to secure and use the wire brush to fluff the ends of the braids.
Owl Ears
Cut 10 strands of white yarn and 4 strands of Grey Heather, each 12 inches long. Combine 5 white and 2 grey strands, and loop them through the stitches at the top of the hat on either side. Knot them and trim to approximately 1 inch. Use the wire brush to fluff them up!
Tips for a Professional Finish
The secret to making this hat look like a real snowy owl is the texture. Because we are using a lightweight yarn, the wire brush is your best friend. Once the hat is complete, you can lightly comb the entire surface of the hat with the wire brush. This breaks up the stitch definition and creates a soft, “furry” layer that mimics an owl’s plumage.
If you find your yarn isn’t fluffing enough, ensure you are using a yarn with a bit of “loft” or a soft acrylic blend. Happy crocheting!