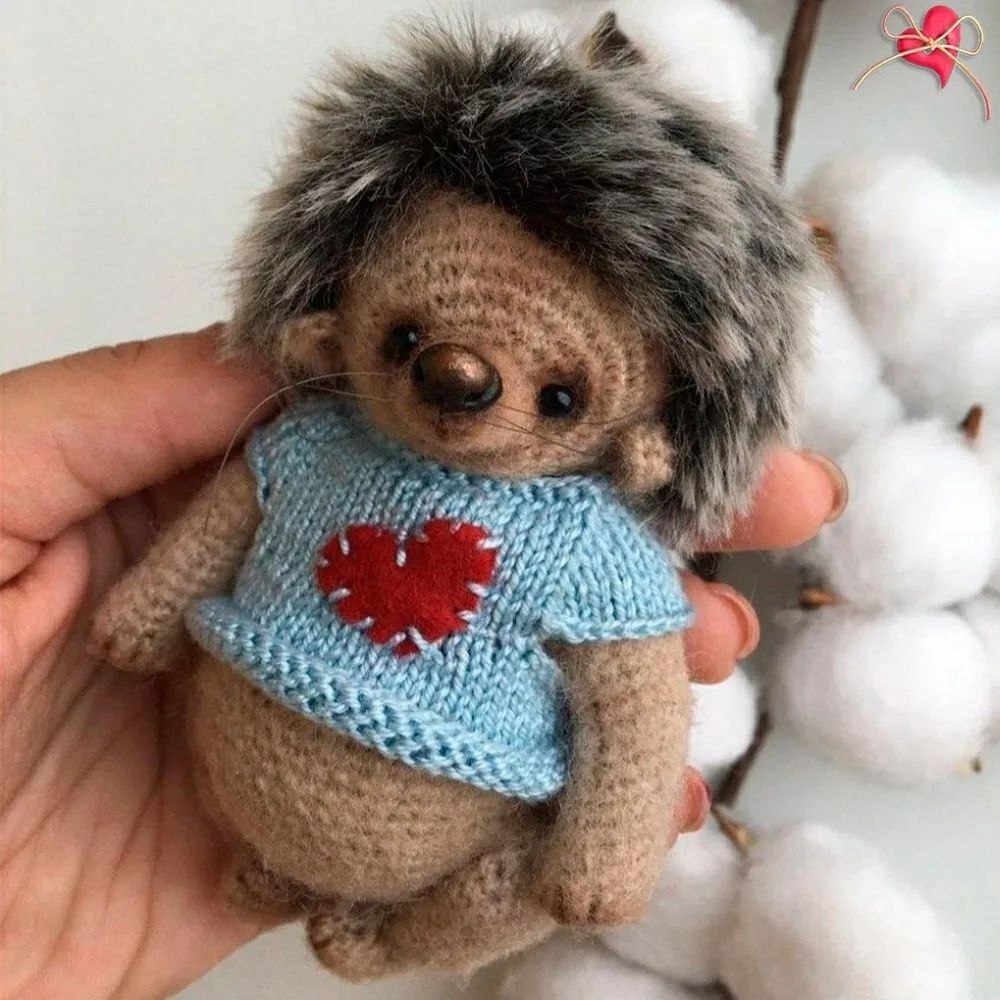
Prickly Perfection: How to Crochet a Hyper-Realistic Hedgehog
Create your own adorable, handcrafted hedgehog with this detailed crochet pattern. This project combines amigurumi techniques with sculpting and mixed-media elements to achieve a realistic, professional look. Perfect for toy collectors and craft enthusiasts!
Materials and Tools
Yarn and Fabric
- Main Body Yarn: Wool or a wool blend (approximately 500 meters per 100 grams). You can choose any texture or color that suits your preference.
- Textured Yarn: A fluffy or stretch-textured yarn (like “Lotus Travka Stretch”) for added realism.
- Faux Fur/Spines: 6mm mohair or a fur-imitation yarn. Alternatively, you can use mohair and brush it out with a slicker brush for a fuzzy effect.
- Fabric: Small scraps of cotton fabric for the base of the spine overlays.
Hardware and Notions
- Joints (Cotter Pins & Discs):
- Head: 18mm disc
- Neck: 15mm disc
- Internal Body (Arms/Legs): 12mm discs (6 pieces)
- Legs: 15mm discs (2 pieces)
- Cotter Pins: 2.0:20 for the head; 1.6:20 for arms and legs.
- Eyes: Glass eyes (no larger than 3mm).
- Nose Material: Two-component grey plastic or polymer clay (bakeable or self-hardening).
Tools
- Crochet Hooks: 1.5mm for wool; 2.0mm to 2.5mm for textured yarns.
- Sculpting Tools: Oil pastels (3 shades for toning), stiff synthetic or bristle brushes for blending, dotting tools, and a needle.
- Finishing Tools: Scissors, sewing needle, strong sewing thread, gel glue, fishing line (for whiskers), and a slicker brush/Velcro for brushing the yarn.
- Other: Acrylic paints and glossy varnish for the nose.
Step 1: Crocheting the Head
Note: sc = single crochet, inc = increase, dec = decrease, ch = chain, MR = magic ring.
- Ch 2, 6 sc in the second ch from hook (6)
- (1 sc, inc) * 3 (9)
- Sc around (9)
- (2 sc, inc) * 3 (12)
- Sc around (12)
- (1 sc, inc) * 6 (18)
- (2 sc, inc) * 6 (24)
- 6 sc, 12 inc, 6 sc (36)
- 6 sc, (1 sc, inc) * 12, 6 sc (48)
- Rounds 10-16: Sc around (7 rounds)
- Joint Installation: Place the head cotter pin between rounds 13 and 14, one sc to the right of your marker.
- Round 17: (6 sc, dec) * 6 (42)
- Round 18: Sc around (42)
- Round 19: (5 sc, dec) * 6 (36)
- Round 20: Sc around (36)
- Round 21: (4 sc, dec) * 6 (30)
- Round 22: (3 sc, dec) * 6 (24)
- Round 23: (2 sc, dec) * 6 (18)
- Finishing the Head: Brush out the yarn if desired. Stuff the head firmly, ensuring the nose and cheek areas are well-filled to create a rounded face.
- Round 24: (1 sc, dec) * 6 (12)
- Round 25: Sc around (12)
- Round 26: 6 dec. Close the hole and sew shut with a needle.
Step 2: Sculpting the Face
Eye and Nose Tightening
- Eyes: Place pins to mark the eye sockets. Position them in the first round of increases or between rounds 8 and 9 from the start of the nose. Keep a distance of 7-8 sc between the eyes.
- Nose: In the same row as the eyes, create a tightening stitch 3-4 stitches wide. Pull the thread down toward the center of the head to create the snout’s dip.
Step 3: Making the Ears
- Ch 2, 6 sc in the second ch from hook.
- Ch 1, turn.
- 3 hdc, inc hdc, 2 hdc.
- Fold the ear in half and sc across the edge to close.
- Placement: Pin the ears to the head so they are on the same horizontal plane as the nose and eyes. Sew them firmly in place.
Step 4: Crafting the Nose
- Mixing: Mix equal parts brown and black polymer clay or plastic.
- Shaping: Roll the clay into an oval, then flatten it from three sides to form a small triangle.
- Detailing: Press the nose onto the crocheted form. Use a needle to create a center crease and a dotting tool to make symmetrical indentations.
- Texture: Use a needle to deepen the pits and create a porous, realistic skin texture.
- Finishing: Bake or dry according to clay instructions. Apply a coat of glossy varnish for a wet look.
- Attachment: Glue the nose to the face, tilting it slightly upward.
Step 5: Crocheting the Legs
- Ch 5, start in the second ch from hook.
- inc, 2 sc, 3 sc in one, 2 sc, inc (11)
- Sc around (11 sc)
- inc, 4 sc, inc, 5 sc (13)
- 2 dec, 7 sc
- 2 dec, 5 sc, dec (8)
- Rounds 7-8: Sc around (8 sc)
- 1 sc, 3 sc in one, 4 sc, dec (9)
- 3 sc, inc, 5 sc (10)
- 2 sc, 5 hdc, 2 sc, 3 sc in one (12)
- 2 sc, 7 hdc, 2 sc, 3 sc in one (14)
- Rounds 13-14: Sc around (2 rounds)
- Round 15: 6 sc, inc, 6 sc, inc (16)
- Rounds 16-17: Sc around (2 rounds)
- Armature & Joints: Reinforce the leg with a wire armature. Install the cotter pin one row down and 1 sc away from the marker.
- Repeat for the second leg (ensure you make a left and a right leg).
- Stuff the legs firmly.
- Round 18: (1 sc, dec) * 5, 1 sc
- Round 19: Dec until closed and sew shut.
Step 6: Crocheting the Arms
- 6 sc in MR (6)
- 6 inc (12)
- Rounds 3-4: Sc around (12)
- Round 5: 3 sc, dec, 4 sc, inc, 2 sc
- Round 6: 3 sc, dec, 4 sc, inc, 1 sc, inc
- Round 7: 2 sc, dec, 4 sc, inc, 4 sc
- Round 8: 2 sc, dec, 4 sc, inc, 2 sc, inc, 1 sc
- Round 9: 2 sc, dec, 5 sc, inc, 4 sc
- Round 10: 2 sc, dec, 4 sc, inc, 1 sc, inc, 3 sc
- Round 11: 9 sc, inc, 5 sc
- Round 12: 2 sc, dec, 4 sc, inc, 2 sc, inc, 4 sc
- Round 13: 2 sc, dec, 4 sc, inc, 4 sc, inc, 3 sc
- Round 14: 2 sc, dec, 7 sc, inc, 6 sc
- Round 15: 2 sc, dec, 5 sc, inc, 1 sc, inc, 6 sc
- Round 16: 2 sc, dec, 8 sc, inc, 6 sc
- Round 17: 2 sc, dec, 7 sc, inc, 2 sc, inc, 4 sc (20)
- Round 18: Sc around (20)
Pro Tip: Keep the decreases at the top of the arm to create a natural bend.
Step 7: Crocheting the Body
- 6 sc in MR (6)
- 6 inc (12)
- (1 sc, inc) * 6 (18)
- (2 sc, inc) * 6 (24)
- Rounds 5-6: Sc around (2 rounds)
- (3 sc, inc) * 6 (30)
- Rounds 8-9: Sc around (2 rounds)
- (4 sc, inc) * 6 (36)
- Rounds 11-13: Sc around (3 rounds)
- Head Attachment: Attach the head using a 12mm disc at the center of the body’s magic ring.
- Arm Attachment: Insert arm joints between rounds 11 and 12. Ensure the top of the arm is two rows lower than the head.
- Round 14: 12 sc, (1 sc, inc) * 6, 12 sc (42)
- Round 15: Sc around
- Round 16: (3 sc, inc) * 10, 2 sc (52)
- Rounds 17-24: Sc around (8 rounds)
- Round 25: (3 sc, dec) * 10, 2 sc (42)
- Round 26: Sc around
- Round 27: (5 sc, dec) * 6 (36)
- Round 28: Sc around
- Round 29: (4 sc, dec) * 6 (30)
- Round 30: Sc around
- Round 31: (3 sc, dec) * 6 (24)
- Round 32: (2 sc, dec) * 6 (18)
- Leg Attachment: Insert leg joints between rounds 27 and 28. Test the “sit” of the toy; the bottom of the body should touch the surface comfortably.
- Stuff the body firmly, shaping a small belly, and sew the hole closed.
Step 8: Adding the Spines (Overlays)
Option 1: Crocheted Cap
- Work a standard amigurumi circle: 6 sc in MR, then increase in each round until you reach 48 stitches.
- Work 5-6 rounds without increases.
- Fit the cap to the head and adjust the stitch count if necessary.
- Follow the same principle for the back overlay, but start with an oval shape instead of a circle.
Option 2: Fabric and Mohair Overlay
- Create a paper pattern for the head and back.
- Cut the pattern out of cotton fabric and faux fur/mohair fabric.
- Sew triangle-shaped darts into the mohair fabric to create a 3D curved shape.
- Sew the fabric overlay to the head and back using small, invisible stitches around the perimeter.
Option 3: Yarn Spines
- Pin fur-imitation yarn around the perimeter of the head.
- Sew the yarn in a spiral pattern moving toward the center of the head, carefully laying the “needles” to look natural.
Your realistic crocheted hedgehog is now complete