Stitch Some Magic: Create Your Own Adorable Mini Crochet Unicorn
Cute Mini Crochet Unicorn Pattern: Step-by-Step Amigurumi Tutorial
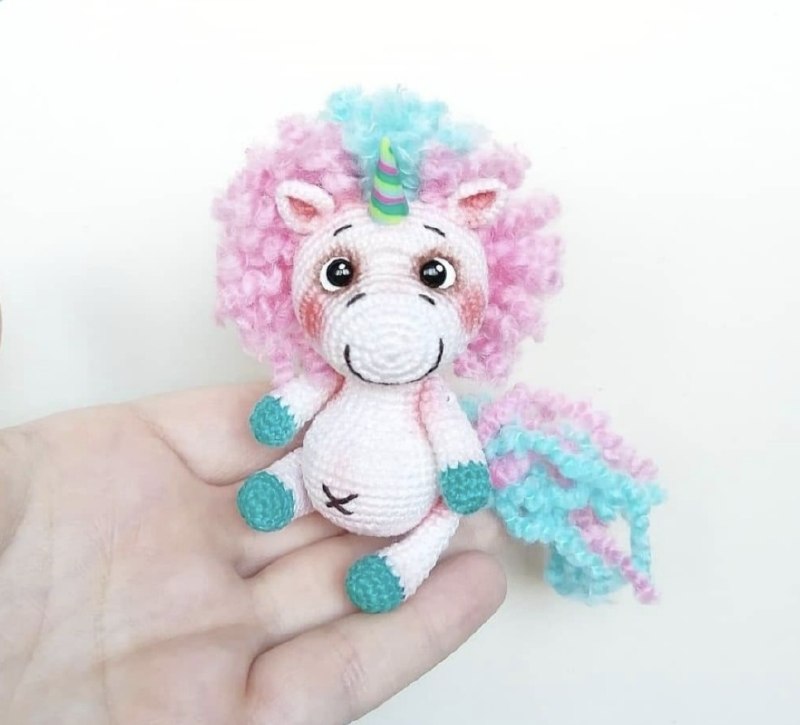
Create your own adorable mini unicorn with this detailed crochet guide. This tiny companion stands about 3 inches (8 cm) tall and features a colorful curly mane and a sweet expression. Perfect for beginners and experienced crocheters alike!
Materials Needed
- Yarn:
- White and Turquoise cotton yarn (for the body)
- Pink and Turquoise curly/bouclé yarn (for the mane and tail)
- Crochet Hooks: 0.8mm (for the body) and 1.0mm (for the mane)
- Eyes: 4mm glass eyes with pins
- Stuffing: High-quality fiberfill
- Assembly Tools:
- Dental floss (for strong, flexible joints)
- Small beads (6 pieces: 2 for head/body, 4 for legs)
- Tapestry needle and a thicker needle
- Small pliers
- Scissors
- Gel glue (strong hold)
- Face Detailing:
- Dry pastels (brown and pink) and a blending brush
- White acrylic paint and a tiny synthetic brush (#0)
- Dark embroidery thread (for the smile and eyebrows)
- Fabric marker
- Medium-hold hairspray (to seal the pastel)
- Horn: Polymer clay (2-3 colors)
Crochet Abbreviations (US Terms)
- MR: Magic Ring
- Ch: Chain
- Sc: Single Crochet
- Inc: Increase (2 sc in one stitch)
- Dec: Decrease (sc 2 together)
- Sl st: Slip stitch
- BLO: Back Loop Only
Step-by-Step Pattern
1. Front Legs (Make 2)
Start with turquoise yarn:
- Round 1: 6 sc in MR (6)
- Round 2: 6 inc (12)
- Rounds 3-4: 12 sc (12)
Switch to white yarn:
- Round 5: 12 sc (12)
- Rounds 6-12: 12 sc (12)
Stuffing Tip: Stuff the turquoise tip firmly. Stuff the white part very lightly or leave it flat.
- Round 13: 6 dec (6)
- Round 14: Decrease until closed. Fasten off and hide the thread.
2. Back Legs (Make 2)
Start with turquoise yarn:
- Round 1: 7 sc in MR (7)
- Round 2: 7 inc (14)
- Rounds 3-4: 14 sc (14)
Switch to white yarn:
- Round 5: 14 sc (14)
- Rounds 6-10: 14 sc (14)
Stuffing Tip: Stuff the turquoise tip firmly and the white part lightly.
- Round 11: (Inc, 6 sc) * 2 (16)
- Rounds 12-14: 16 sc (16)
- Round 15: 8 dec (8)
- Round 16: Decrease until closed. Fasten off and hide the thread.
3. Body
Use white yarn:
- Round 1: 6 sc in MR (6)
- Round 2: 6 inc (12)
- Round 3: 12 inc (24)
- Round 4: (1 inc, 1 sc) * 12 (36)
- Rounds 5-6: 36 sc (36)
- Round 7: (1 inc, 2 sc) * 12 (48)
- Rounds 8-13: 48 sc (48)
Important: Place a marker at the end of Round 13, then count back 11 sc and mark that spot as well.
- Round 14: Dec, (3 sc, dec) * 7, 11 sc (40)
- Round 15: 40 sc (40)
- Round 16: Dec, (2 sc, dec) * 7, 10 sc (32)
- Round 17: 32 sc (32)
- Round 18: Dec, (2 sc, dec) * 5, 10 sc (26)
- Rounds 19-23: 26 sc (26)
Stuff the body firmly with fiberfill.
- Round 24: Working in BLO, decrease until closed. Leave a tail for sewing.
4. Ears (Make 2)
Use white yarn:
- Round 1: 6 sc in MR (6)
- Round 2: 6 inc (12)
- Round 3: (Inc, 1 sc) * 6 (18)
Leave a long tail for sewing.
5. Head
Use white yarn:
- Round 1: 6 sc in MR (6)
- Round 2: 6 inc (12)
- Round 3: 12 inc (24)
- Round 4: 6 inc, 6 sc, 6 inc, 6 sc (36)
- Rounds 5-8: 36 sc (36)
- Round 9: 12 sc, 24 inc (60)
- Rounds 10-17: 60 sc (60)
- Round 18: (Dec, 3 sc) * 12 (48)
- Round 19: 48 sc (48)
- Round 20: (Dec, 2 sc) * 12 (36)
- Round 21: (Dec, 1 sc) * 12 (24)
Stuff the head firmly, especially the muzzle area. Gently press down the area between the eyes and the nose to create a rounded, cute shape.
- Round 22: (Dec, 1 sc) * 8 (16)
Fill any gaps with stuffing. Close Round 23 using decreases. Use a “loop skip” method to create a mesh-like closure; this makes it easier to attach the mane later.
Face Sculpting and Detailing
Muzzle Shaping
Use dental floss to sculpt the face. Mark three points on the muzzle. Sew from the points to pull the muzzle inward, creating a defined nose area. Repeat the process twice for stability and end the thread at the back of the head.
Eyes and Ears
- Count 7 rows from the start of the head. Place the glass eyes in the 7th row, 8 sc apart.
- Fold the ears in half and secure one edge with thread. Sew them to the top of the head, slightly above and behind the eyes.
Embroidery and Makeup
- Use dark thread to embroider a small smile, nostrils, and eyebrows.
- Use a blending brush to apply brown dry pastel around the eyes for depth.
- Using a #0 synthetic brush and white acrylic paint, add tiny white highlights to the eyes.
Assembly
Connecting Head and Body
To allow the head to rotate, we use a bead-joint method with dental floss:
- Thread a needle with double floss. Add one bead.
- Insert the needle into the MR at the bottom of the body and bring it out at the neck.
- In the head, count 11 rows from the bottom and mark the spot. Insert the needle there and bring it out between the ears.
- Add another bead and tie the ends together with 7 tight knots. Hide the ends inside the head.
Attaching Legs
- Front Legs: Use a single strand of floss and a bead. Sew them directly under the ears, tie with 7 knots, and hide the thread.
- Back Legs: Use a double strand of floss. Pull tightly to compress the leg against the body, tie with 7 knots, and hide the thread.
The Belly Detail
Use the same dark thread used for the face to embroider a small “X” on the belly, slightly below the center.
The Final Touches
Creating the Mane and Tail
The Mane: Cut pieces of curly yarn 4-5 inches (11-13 cm) long. You will need about 24-25 turquoise pieces and 48-50 pink pieces. Use a 1.0mm hook to loop the yarn around the bead at the top of the head. Create a turquoise strip down the center and pink strips on the sides. Trim to your desired length.
The Tail: Cut 2 pink and 3 turquoise pieces (about 11-12 inches/28-30 cm long). Tie them together in the middle. Use white thread to sew around the knot, creating a small round ball base. Sew this base to the back of the unicorn between the back legs.
The Horn
- Roll out three thin snakes of different colored polymer clay.
- Twist them together and roll them out again.
- Cut a piece about 0.4 inches (1 cm) long.
- Roll one end into a point to form a cone.
- Bake according to the clay package instructions.
- Glue the horn between the eyebrows, close to the mane, using gel glue.
Final Finishing
Apply a light touch of pink pastel to the cheeks and paws. Once finished, lightly spray the pastel-shaded areas with medium-hold hairspray. This seals the pigment into the yarn so it won’t smudge.
Your mini unicorn is now complete