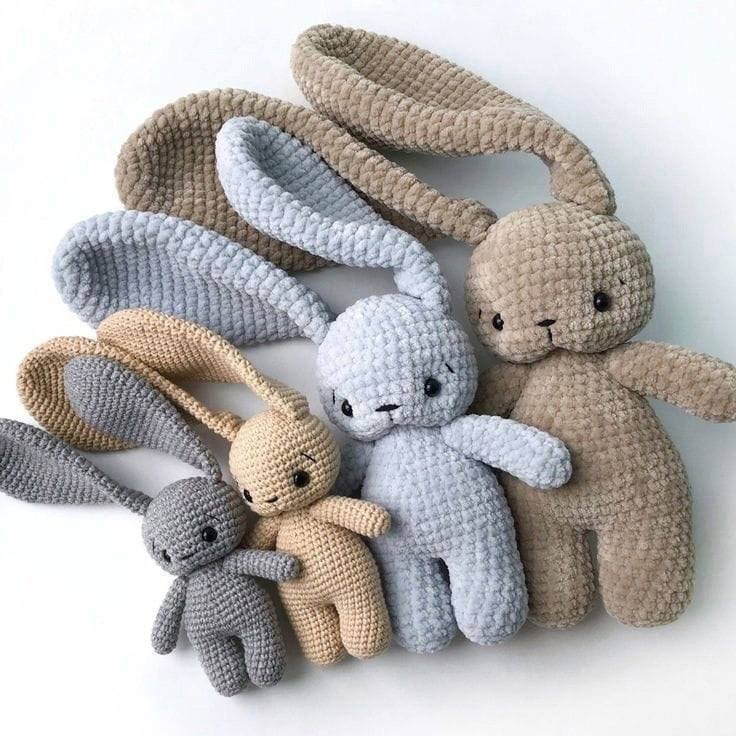
Soft, Squishy, and Sweet: The Ultimate Free Plush Bunny Crochet Pattern
“`html
How to Crochet a Cute Plush Bunny: Free Step-by-Step Pattern
Create your own cuddly companion with this detailed guide to crocheting a soft, plush bunny. This pattern is perfect for beginners and intermediate crocheters who want to make a cozy toy using chenille or velvet-style yarn. Follow these steps to bring your adorable bunny to life!
Materials You Will Need
- Crochet Hooks: 4.0mm and 5.5mm
- Main Yarn: Plush/Chenille yarn (e.g., YarnArt Dolce or similar)
- Detail Yarn: Black embroidery thread or thin black yarn for the nose and eyebrows
- Safety Eyes: 10mm diameter
- Stuffing: High-quality polyester fiberfill
- Tools: Tapestry needle, scissors, stitch markers, pins, and tweezers
Crochet Abbreviations (US Terms)
- MR: Magic Ring
- sc: Single Crochet
- inc: Increase (2 sc in one stitch)
- dec: Decrease (sc 2 together)
- BLO: Back Loop Only
- ch: Chain
- st: Stitch
Step-by-Step Pattern
The Ears (Make 2)
Use a 5.5mm hook. Work in a continuous spiral.
- Round 1: 6 sc in MR (6)
- Round 2: inc x 6 (12)
- Round 3: (inc, sc) x 6 (18)
- Round 4: 18 sc (18)
- Round 5: (inc, 2 sc) x 6 (24)
- Round 6: 24 sc (24)
- Round 7: (inc, 3 sc) x 6 (30)
- Round 8: 30 sc (30)
- Round 9: (inc, 4 sc) x 6 (36)
- Rounds 10-13: 36 sc (36)
- Round 14: (dec, 16 sc) x 2 (34)
- Round 15: 34 sc (34)
- Round 16: (dec, 15 sc) x 2 (32)
- Round 17: 32 sc (32)
- Round 18: (dec, 14 sc) x 2 (30)
- Round 19: 30 sc (30)
- Round 20: (dec, 13 sc) x 2 (28)
- Round 21: 28 sc (28)
- Round 22: (dec, 12 sc) x 2 (26)
- Round 23: sc in each stitch around (26)
- Round 24: (dec, 11 sc) x 2 (24)
- Round 25: 24 sc (24)
- Round 26: (dec, 10 sc) x 2 (22)
- Round 27: 22 sc (22)
- Round 28: (dec, 9 sc) x 2 (20)
- Round 29: 20 sc (20)
- Round 30: (dec, 8 sc) x 2 (18)
- Round 31: 18 sc (18)
- Round 32: (dec, 7 sc) x 2 (16)
- Round 33: 16 sc (16)
- Round 34: (dec, 6 sc) x 2 (14)
- Round 35: 14 sc (14)
- Round 36: (dec, 5 sc) x 2 (12)
- Round 37: 12 sc (12)
Fasten off and weave in the ends.
The Head
Use a 4.0mm hook.
- Round 1: 6 sc in MR (6)
- Round 2: inc x 6 (12)
- Round 3: (inc, 1 sc) x 6 (18)
- Round 4: (inc, 2 sc) x 6 (24)
- Round 5: (inc, 3 sc) x 6 (30)
- Round 6: (inc, 4 sc) x 6 (36)
- Round 7: (inc, 5 sc) x 6 (42)
- Round 8: (inc, 6 sc) x 6 (48)
- Rounds 9-15: 48 sc (48)
- Round 16: (dec, 6 sc) x 6 (42)
- Round 17: (dec, 5 sc) x 6 (36)
- Round 18: (dec, 4 sc) x 6 (30)
- Round 19: (dec, 3 sc) x 6 (24)
- Round 20: (dec, 2 sc) x 6 (18)
Fasten off and weave in the ends.
The Legs (Make 2)
- Round 1: 6 sc in MR (6)
- Round 2: inc x 6 (12)
- Round 3: (inc, 1 sc) x 6 (18)
- Round 4: BLO 18 sc (18)
- Rounds 5-11: 18 sc (18)
Fasten off the first leg. Do not fasten off the second leg, as we will continue to the body.
The Body
- Round 12: 1 ch, 18 sc around the first leg, 1 sc in the chain, 18 sc around the second leg, 1 sc in the chain (38). Place a marker at the start of the round.
- Round 13: 9 sc, 1 inc, 8 sc, 2 inc, 8 sc, 1 inc, 8 sc, 1 inc (43)
- Round 14: 1 inc, 42 sc (44)
- Rounds 15-16: 44 sc (44)
- Round 17: 43 sc, then move your marker one stitch to the right (43)
- Round 18: (dec, 9 sc) x 4 (40)
- Round 19: 40 sc (40)
- Round 20: (dec, 8 sc) x 4 (36)
- Round 21: sc in each stitch around (36)
- Round 22: (dec, 7 sc) x 4 (32)
- Round 23: 32 sc (32)
- Round 24: (dec, 6 sc) x 4 (28)
- Round 25: 28 sc (28)
- Round 26: (dec, 5 sc) x 4 (24)
- Round 27: 24 sc (24)
- Round 28: (dec, 4 sc) x 4 (20)
- Round 29: 20 sc (20)
- Round 30: 5 sc, 1 dec, 8 sc, 1 dec, 3 sc (18)
Fasten off and weave in the ends.
The Arms (Make 2)
- Round 1: 6 sc in MR (6)
- Round 2: inc x 6 (12)
- Rounds 3-12: 12 sc (12)
- Round 13: (dec, 1 sc) x 4 (8)
Fasten off and weave in the ends.
The Tail
- Round 1: 6 sc in MR (6)
- Round 2: inc x 6 (12)
- Round 3: 12 sc (12)
- Round 4: (dec, sc) x 4 (8)
Fasten off and weave in the ends.
Assembly Instructions
- Stuffing: Fill the head, body, arms, legs, and tail firmly with fiberfill. Leave the ears unstuffed.
- Head: Sew the head to the body, adding a little extra stuffing in the neck area for stability.
- Arms: Sew the arms to the body. Position the top of the arm’s last round between rounds 28-29 of the body.
- Tail: Sew the tail to the back of the body.
- Ears: Sew the ears onto the top of the head between rounds 5 and 6.
Adding the Face Details
Eye Indentations (The “Cute Look”)
To give the bunny a deeper, more expressive look, we will create eye indentations:
- Mark four points on the head. Points 1 and 3 should be between rows 19-20 (2-3 stitches apart). Points 2 and 4 should be between rows 13-14 (10-11 stitches apart).
- Using a strong thread (approx. 50cm), insert the needle at Point 1 and bring it out at Point 2.
- Pass the thread through the eye safety washer/hole at Point 2 and back to Point 1.
- Repeat this process for the second eye (Point 3 to Point 4).
- Tie the ends securely and gently pull the thread to sink the eyes into the head until you are happy with the depth.
Nose and Brows
- Nose: Embroider a small nose between rows 14-15, keeping the stitches 2-3 units apart.
- Brows: Embroider small eyebrows above the eyes. You can place these wherever you feel looks cutest!
Congratulations! Your adorable plush bunny is now finished and ready for cuddles!
“`