Stitch Your New Best Friend: The Ultimate Adorable Bunny Crochet Pattern
“`html
How to Crochet an Adorable Bunny Doll: Step-by-Step Pattern
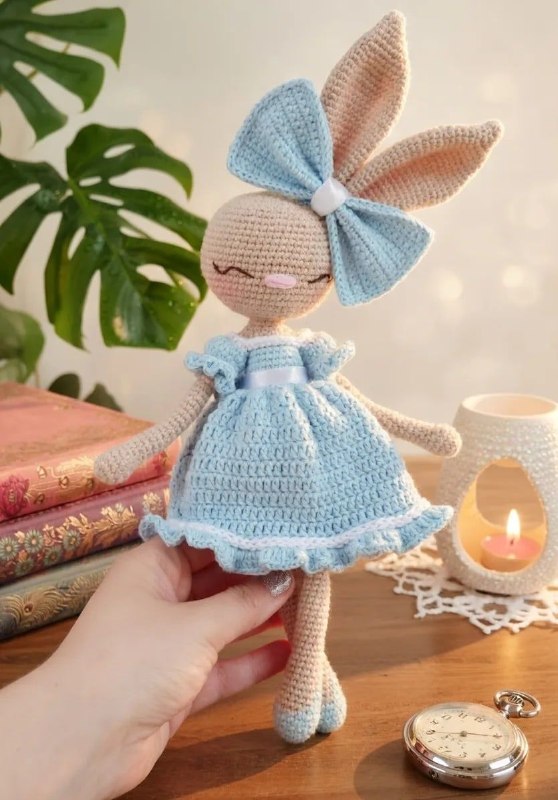
Create your own charming crochet bunny doll with this detailed, beginner-friendly guide. This doll features a sweet expression, a cute blue dress, and long, floppy ears. Follow our step-by-step instructions to bring this little companion to life!
Materials Needed
- Crochet Hook: 2mm (or the size that works best for your yarn tension)
- Yarn: 100% Cotton (The original was made with yarn in 4 strands). Colors required: Cream, Light Blue, and a small amount of Black or Brown for the eyes.
- Recommended Yarn Brands: Catania, Paintbox, Scheepjes, Lion Brand, or Alize Cotton Gold.
- Tools: Sewing needles, pins, scissors.
- Stuffing: Fiberfill for amigurumi.
- Finishing Touches: Pink or red blush and a small brush for the cheeks.
- Optional: A silicone rod for internal body support to keep the head upright.
Pattern Abbreviations (US Terms)
- st: stitch
- ch: chain
- MR: magic ring
- sl st: slip stitch
- inc: increase (2 sc in one stitch)
- dec: decrease (sc 2 together)
- hdc: half double crochet
- dc: double crochet
- sc: single crochet
- FLO: front loop only
- BLO: back loop only
- (…) x n: repeat the sequence inside the parentheses “n” times
- (number): total stitch count at the end of the round
Essential Tips for Success
To ensure a professional look, crochet with tight stitches to avoid gaps where the stuffing might show through. If you see stuffing, try using a smaller hook. All parts are worked in a continuous spiral unless otherwise noted—do not join rounds with a slip stitch unless specified. Use a stitch marker to keep track of the first stitch of each round.
Step 1: The Arms (Make 2)
Use Cream yarn.
- Round 1: 6 sc in MR (6)
- Round 2: (inc) x6 (12)
- Rounds 3-4: 12 sc (2 rounds) (12)
- Round 5: 8 sc, (dec) x2 (10)
- Round 6: 8 sc, dec (9)
- Rounds 7-12: 9 sc (6 rounds) (9)
- Round 13: 7 sc, dec (8)
- Rounds 14-30: 8 sc (17 rounds) (8)
Stuff the arms lightly as you go. Fasten off.
Step 2: The Legs (Make 2)
Start with the Left Leg using Light Blue yarn.
- Round 1: 6 sc in MR (6)
- Round 2: (inc) x6 (12)
- Round 3: 12 sc (12)
- Round 4: (1 sc, inc) x6 (18)
- Round 5: 18 sc (18)
- Round 6: 10 sc, change to cream for 3 sc, change back to light blue for 5 sc (18)
- Round 7: 5 sc, dec, 2 sc, change to cream for 5 sc, change back to light blue for 2 sc, dec (16)
- Round 8: 8 sc, change to cream for 5 sc, change back to light blue for 3 sc (16)
- Round 9: 5 sc, dec, 1 sc, change to cream for 5 sc, change back to light blue for 1 sc, dec (14)
- Round 10: 7 sc, change to cream for 5 sc, change back to light blue for 2 sc (14)
- Round 11: 2 sc, dec, 1 sc, change to cream for 9 sc (13)
- Round 12: 13 sc (13)
- Round 13: 5 sc, dec, 4 sc, dec (11)
- Rounds 14-34: 11 sc (21 rounds) (11)
- Round 35: Change to light blue, 11 sc in BLO (11)
- Round 36: 11 sc (11)
Stuff as you go. Fasten off the left leg.
Right Leg: Repeat rounds 1-36 of the left leg, but do not fasten off. After Round 36, chain 3 and join to the left leg with a sc. This first stitch on the left leg will be the first stitch of the body.
Step 3: The Body
Continue with Light Blue yarn.
- Round 1: (1 sc, inc) x3, inc, (inc, 1 sc) x2, 3 sc (chain 3), then (1 sc, inc) x3, inc, (inc, 1 sc) x2, 3 sc (chain 3) (40)
- Round 2: 40 sc (40)
- Round 3: (9 sc, inc) x4 (44)
- Rounds 4-6: 44 sc (3 rounds) (44)
- Round 7: 7 sc, dec, 20 sc, dec, 13 sc (42)
- Round 8: 42 sc (42)
- Round 9: 7 sc, dec, 19 sc, dec, 12 sc (40)
- Rounds 10-11: 40 sc (2 rounds) (40)
- Round 12: 7 sc, dec, 18 sc, dec, 11 sc (38)
- Round 13: 38 sc (38)
- Round 14: 7 sc, dec, 17 sc, dec, 10 sc (36)
- Round 15: 36 sc (36)
- Round 16: 7 sc, dec, 16 sc, dec, 9 sc (34)
- Round 17: 34 sc (34)
- Round 18: 7 sc, dec, 15 sc, dec, 8 sc (32)
- Round 19: 32 sc (32)
- Round 20: 6 sc, dec, 14 sc, dec, 8 sc (30)
- Round 21: 30 sc in BLO (30)
- Round 22: 5 sc, dec, 13 sc, dec, 8 sc (28)
- Round 23: 28 sc (28)
- Round 24: 4 sc, dec, 12 sc, dec, 8 sc (26)
- Round 25: 26 sc (26)
- Round 26: 3 sc, dec, 11 sc, dec, 8 sc (24)
- Round 27: 24 sc (24)
- Round 28: Change to cream yarn. Work BLO in each stitch: 7 sc, join left arm and body with 4 sc, 9 sc, join right arm and body with 4 sc (24)
- Round 29: 7 sc, join left arm and body with 4 sc, 9 sc, join right arm and body with 4 sc (24)
- Round 30: (2 sc, dec) x6 (18)
- Round 31: (1 sc, dec) x6 (12)
- Rounds 32-33: 12 sc (2 rounds) (12)
Stuff the body firmly. Do not cut the yarn, as you will continue directly into the head.
Step 4: The Head
Continue with Cream yarn.
- Round 1: (inc) x12 (24)
- Round 2: 1 sc, inc, (3 sc, inc) x5, 2 sc (30)
- Round 3: (4 sc, inc) x6 (36)
- Round 4: 4 sc, inc, (5 sc, inc) x5, 1 sc (42)
- Round 5: (6 sc, inc) x6 (48)
- Round 6: 2 sc, inc, (7 sc, inc) x5, 5 sc (54)
- Round 7: (17 sc, inc) x3 (57)
- Rounds 8-16: 57 sc (9 rounds) (57)
- Round 17: (17 sc, dec) x3 (54)
- Round 18: 2 sc, dec, (7 sc, dec) x5, 5 sc (48)
- Round 19: (6 sc, dec) x6 (42)
- Round 20: 4 sc, dec, (5 sc, dec) x5, 1 sc (36)
- Round 21: (4 sc, dec) x6 (30)
- Round 22: 1 sc, dec, (3 sc, dec) x5, 2 sc (24)
- Round 23: (2 sc, dec) x6 (18)
- Round 24: (1 sc, dec) x6 (12)
- Round 25: (dec) x6 (6)
Stuff the head firmly and close the opening using an invisible join. Fasten off.
Step 5: The Sleeves (Make 2)
Use Light Blue yarn.
- Row 1: Ch 14, sl st, ch 1 (14)
- Row 2: 14 sc, sl st, ch 1 (14)
- Row 3: 4 sc, (inc using hdc) x6, 4 sc, sl st, ch 1 (20)
- Row 4: 4 sc, 12 hdc, 4 sc, sl st, ch 1 (20)
- Row 5: 2 sc, (dec) x8, 2 sc, sl st, ch 2 (12)
- Row 6: 4 dc in each stitch, worked in FLO (48)
Close with an invisible join and fasten off. Wrap a small piece of white yarn twice around the sleeve, tie a knot, and sew the ends inside for a decorative detail. Sew the sleeves to the body using the “flat side” closest to the body and the “small bump” side facing up.
Step 6: The Dress
Shoulders
Using White yarn, work 1 sc into each stitch of the top of the dress (the neck area), continuing across the top of the sleeves. Sl st to join and fasten off.
Skirt
Turn the doll upside down. Start with Light Blue yarn at the front of the doll’s waist.
- Row 1: Ch 3, (3 dc in same stitch, 2 dc in same stitch) x15, sl st (75)
- Rows 2-11: Ch 3, 75 dc, sl st (10 rounds) (75)
- Row 12: 3 dc in each stitch, worked in BLO (225)
Sl st to join and fasten off. Using White yarn, work 1 sl st into each stitch of the 11th row to create a clean hem. Tie a white ribbon bow around the waist.
Step 7: The Ears (Make 2)
Use Cream yarn.
- Round 1: 6 sc in MR (6)
- Round 2: (1 sc, inc) x3 (9)
- Round 3: 9 sc (9)
- Round 4: (2 sc, inc) x3 (12)
- Round 5: (3 sc, inc) x3 (15)
- Round 6: (4 sc, inc) x3 (18)
- Round 7: (5 sc, inc) x3 (21)
- Round 8: 21 sc (21)
- Round 9: (6 sc, inc) x3 (24)
- Round 10: (7 sc, inc) x3 (27)
- Round 11: (8 sc, inc) x3 (30)
- Round 12: (9 sc, inc) x3 (33)
- Rounds 13-14: 33 sc (2 rounds) (33)
- Round 15: (dec, 2 sc) x3, 21 sc (30)
- Rounds 16-17: 30 sc (2 rounds) (30)
- Round 18: (dec, 2 sc) x3, 18 sc (27)
- Rounds 19-21: 27 sc (3 rounds) (27)
- Round 22: (dec, 1 sc) x3, 18 sc (24)
- Rounds 23-26: 24 sc (4 rounds) (24)
- Round 27: (dec, 2 sc) x3, 12 sc (21)
- Rounds 28-31: 21 sc (4 rounds) (21)
Do not stuff the ears. Flatten them and sew the bottom opening closed. Sew the ears symmetrically to the left side of the head, two rows above the bottom opening.
Step 8: The Bow
Use Light Blue yarn.
- Row 1: Ch 29.
- Row 2: Starting from 2nd ch from hook: 28 sc, ch 1, turn.
- Rows 3-18: 28 sc, ch 1, turn (16 rows).
Do not cut the yarn. Work sl st around the entire rectangle. Fold the rectangle in half, then fold the two edges toward the center to create a bow shape. Cinch the middle with several stitches and wrap a white ribbon around the center. Sew the bow onto the head, over the ears.
Step 9: Facial Details & Finishing
Eyes and Nose
- Nose: Embroider a wide nose using pink yarn. The nose should span 4 stitches on Round 9 of the head.
- Eyes: Count 2 sc to the left and right of the nose. Embroider the eyes about 5 stitches wide in an inverted “V” shape with two lashes.
Cheeks
Use a small makeup brush and pink or red blush to gently color the cheeks and the inside of the ears for a soft, realistic glow.
Your beautiful bunny doll is now complete!
“`