Crochet Your Own Whimsical Daisy Gnome: A Step-by-Step Guide to Springtime Cheer
“`html
Adorable Daisy Gnome Crochet Pattern: Step-by-Step Guide
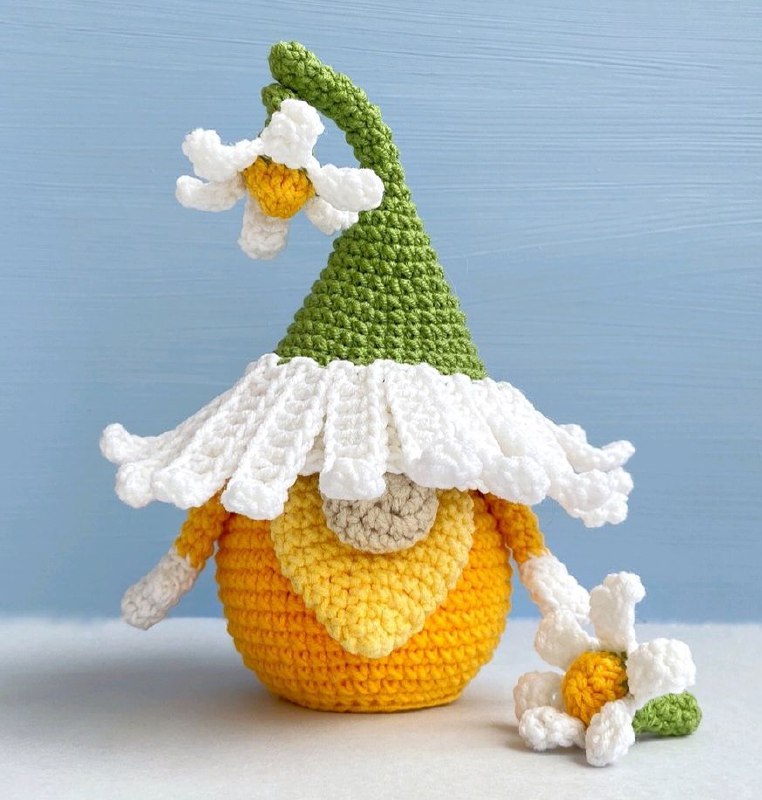
Bring a touch of springtime cheer to your home with this charming Daisy Gnome. This detailed crochet pattern will guide you through creating a whimsical garden companion, perfect for home decor or as a handmade gift. With its bright colors and floral accents, this gnome is a delightful project for crocheters of all levels.
Materials Needed
To create your Daisy Gnome, gather the following materials:
- Yarn: Fine weight (Sport) cotton or cotton/acrylic blend yarn in the following colors:
- Yellow
- Light Yellow
- Green
- White
- Nude/Beige
- Crochet Hook: 2.25 mm (US Size B)
- Stuffing: Fiberfill
- Tools: Thick sewing needle, pins, and a piece of cardboard (approximately 2×2 inches) for the base.
Finished Size: Approximately 6 inches (16 cm) tall.
Crochet Abbreviations
This pattern uses standard US crochet terminology:
- ch: chain stitch
- st: stitch
- sc: single crochet
- hdc: half double crochet
- dc: double crochet
- tr: treble crochet
- sl st: slip stitch
- inc: increase (2 sc in the next stitch)
- dec: decrease (sc2tog, single crochet 2 stitches together)
- BLO: back loop only
- FLO: front loop only
- MR: magic ring
- (16): number of stitches at the end of the round
- (inc, sc)*N: repeat the sequence N times
- 3dcCL: a cluster of 3 double crochets
Step-by-Step Pattern
The Body
Use yellow yarn. Work in continuous rounds without using slip stitches to join.
- Rnd 1: 7 sc in the MR (7)
- Rnd 2: 7 inc (14)
- Rnd 3: (inc, sc)*7 (21)
- Rnd 4: (inc, 2 sc)*7 (28)
- Rnd 5: (inc, 3 sc)*7 (35)
Cut your 2×2 inch cardboard base to size.
- Rnd 6: BLO: inc, 34 sc (36)
- Rnd 7: (inc, 5 sc)*6 (42)
- Rnd 8: 3 sc, (inc, 6 sc)*5, inc, 3 sc (48)
- Rnd 9: (inc, 7 sc)*6 (54)
- Rnd 10-16: sc in each stitch around for 7 rounds.
- Rnd 17: (dec, 7 sc)*6 (48)
- Rnd 18: 3 sc, (dec, 6 sc)*5, dec, 3 sc (42)
Insert the cardboard base into the bottom of the body.
- Rnd 19: (dec, 5 sc)*6 (36)
- Rnd 20: BLO: (dec, 4 sc)*6 (30)
- Rnd 21: (dec, 3 sc)*6 (24)
Stuff the body evenly and firmly with fiberfill.
- Rnd 22: (dec, 2 sc)*6 (18)
- Rnd 23: (dec, 1 sc)*6 (12)
Add a small amount of additional fiberfill.
- Rnd 24: 6 dec (6)
Cut the yarn, leaving a long tail. Use a needle to close the top, tie off, and weave the tail into the body.
The Hat
Use green yarn. Work in continuous rounds.
- Rnd 1: 6 sc in the MR (6)
- Rnd 2-10: sc in each stitch around for 9 rounds.
- Rnd 11: (inc, 2 sc)*2 (8)
- Rnd 12: (inc, 3 sc)*2 (10)
- Rnd 13: (inc, 4 sc)*2 (12)
- Rnd 14: (inc, 5 sc)*2 (14)
- Rnd 15: (inc, 6 sc)*2 (16)
- Rnd 16: (inc, 7 sc)*2 (18)
- Rnd 17: (inc, 5 sc)*3 (21)
- Rnd 18: (inc, 6 sc)*3 (24)
- Rnd 19: (inc, 7 sc)*3 (27)
- Rnd 20: (inc, 8 sc)*3 (30)
- Rnd 21: (inc, 9 sc)*3 (33)
- Rnd 22: (inc, 10 sc)*3 (36)
Crocheting the Petals: Change to white yarn.
- Rnd 23: FLO (1 sl st, 12 chains, start in the 3rd loop from the hook: 9 dc, 1 hdc, 1 sl st in the next stitch of the 22nd round). Repeat this sequence to create 18 petals.
Continuing the Hat: Continue with white yarn.
- Rnd 24: BLO (inc, 11 sc)*3 (39)
- Rnd 25: 6 sc, (inc, 12 sc)*2, inc, 6 sc (42)
- Rnd 26: (inc, 13 sc)*3 (45)
- Rnd 27: 7 sc, (inc, 14 sc)*2, inc, 7 sc (48)
- Rnd 28: (inc, 11 sc)*4 (52)
- Rnd 29: 6 sc, (inc, 12 sc)*3, inc, 6 sc (56)
Cut off the yarn and hide the tail. To finish the round invisibly: thread the yarn through a needle, skip one stitch, and guide the yarn into the next stitch. Insert the needle back into the starting stitch, pull tight, and fasten on the wrong side.
The Arms
Start with white yarn. Work in continuous rounds.
- Rnd 1: 6 sc in the MR (6)
- Rnd 2: (inc, 2 sc)*2 (8)
- Rnd 3: 8 sc
- Rnd 4: 3 sc, 3dcCL (cluster of 3 dc), 4 sc (8)
- Rnd 5: 8 sc
Change to yellow yarn.
- Rnd 6: BLO 8 sc
- Rnd 7-11: sc in each stitch around for 5 rounds.
Stuff the hand (bottom part) with fiberfill. Leave the top part unstuffed so the arms lay flat. Fold the last round flat and crochet the opposite stitches together with 3-4 sc. Cut the yarn, leaving a long tail for sewing.
The Nose
Use nude yarn. Work in continuous rounds.
- Rnd 1: 7 sc in the MR (7)
- Rnd 2: 7 inc (14)
- Rnd 3: (inc, 1 sc)*7 (21)
- Rnd 4: 21 sc
- Rnd 5: (dec, 1 sc)*7 (14)
- Rnd 6: 7 dec (7)
Add a small amount of fiberfill and close the top using a needle.
The Beard
Use light yellow yarn.
- Rnd 1: 6 sc in the MR (6)
- Rnd 2: (inc, 2 sc)*2 (8)
- Rnd 3: (inc, 3 sc)*2 (10)
- Rnd 4: (inc, 4 sc)*2 (12)
- Rnd 5: (inc, 2 sc)*4 (16)
- Rnd 6: (inc, 3 sc)*4 (20)
- Rnd 7: (inc, 4 sc)*4 (24)
- Rnd 8-11: sc in each stitch around for 4 rounds.
- Rnd 12: (dec, 4 sc)*4 (20)
Fold the piece so the stitches of the last round line up. Crochet the opposite stitches together using 9-10 sc. Cut the yarn, leaving a long tail for sewing.
The Little Daisy
Start with green yarn. Work in continuous rounds.
- Rnd 1: 6 sc in the MR (6)
- Rnd 2-4: sc in each stitch around for 3 rounds.
- Rnd 5: (inc, 2 sc)*2 (8)
- Rnd 6: (inc, 1 sc)*4 (12)
Change to white yarn.
- Rnd 7: FLO (1 sl st, 6 chains, start in 3rd loop from hook: 3 dc, 1 hdc, 1 sl st in next stitch of 6th round). Repeat for 6 petals.
Change to yellow yarn.
- Rnd 8: BLO 12 sc
Add a small amount of fiberfill.
- Rnd 9: 6 dec (6)
Cut the yarn and hide the tail.
Assembly and Decoration
- Attach the Details: Sew the arms and the beard to the free loops created during the 19th round of the body.
- Place the Nose: Sew the nose into the center of the beard.
- Add the Hat: Place the hat on the gnome’s head, ensuring the top of the nose is tucked neatly under the hat’s edge.
- Secure the Hat: Use simple stitches to attach the hat to the body in 2 or 3 places to keep it steady.
Your Daisy Gnome is now complete! This whimsical little character is ready to brighten up your space.
“`