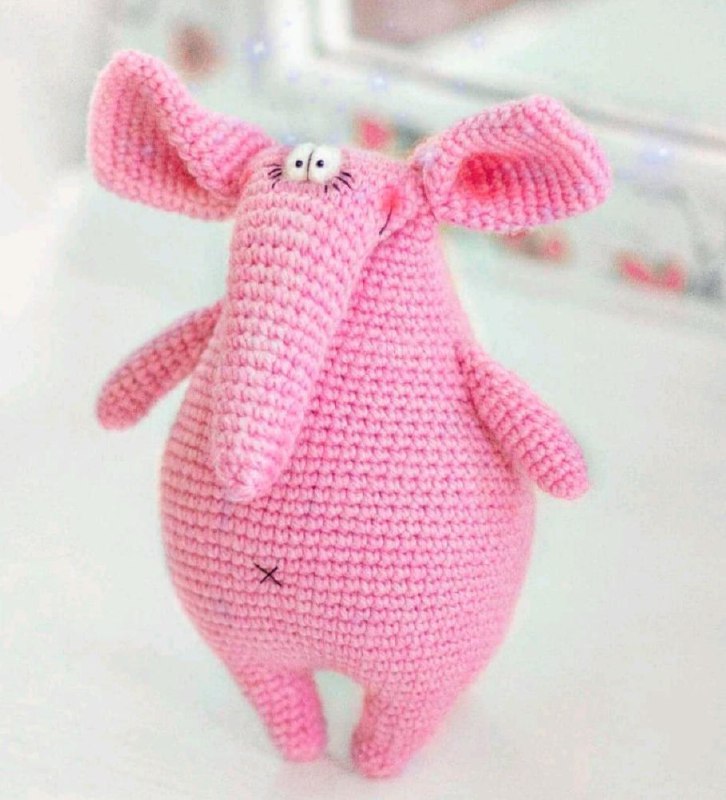
Craft Your Own Cuddly Companion: An Easy Step-by-Step Crochet Elephant Pattern
“`html
Adorable Crochet Elephant Pattern: Step-by-Step Guide
Create your own cuddly crochet elephant with this detailed, easy-to-follow pattern. This project is perfect for beginners and intermediate crocheters looking to make a unique handmade toy.
Materials Needed
- Yarn: Purple mohair yarn (approximately 200m/100g). Alize Mohair Classic or a similar mohair blend is recommended.
- Hook: 2.0mm to 2.5mm crochet hook.
- Stuffing: Polyfill or fiberfill.
- Notions: Sewing needle, sewing thread.
- For the Eyes:
- Two small black beads.
- A small piece of white felt.
- Colored chalk or pastels for shading.
- (Alternatively, you can use standard plastic safety eyes).
Crochet Abbreviations (US Terms)
- MR: Magic Ring
- sc: Single crochet
- ch: Chain
- inc: Increase (two single crochet stitches in the same stitch)
- dec: Decrease (two single crochet stitches worked together)
Note: This pattern is worked in a continuous spiral. It is recommended to use a stitch marker at the beginning of each round to keep track of your count.
Step-by-Step Pattern
The Legs, Body, Head, and Trunk
The legs, body, head, and trunk are all worked as one single piece, starting with the legs.
Leg 1:
- Round 1: 6 sc in MR (6)
- Round 2: (1 sc, inc) repeat 3 times (9)
- Rounds 3-5: 9 sc (9)
- Round 6: 4 sc, inc, 4 sc (10)
- Round 7: 5 sc, inc, 4 sc (11)
- Round 8: inc, 5 sc, inc, 4 sc (13)
Set the first leg aside and repeat the instructions to create Leg 2.
Joining the Legs and Starting the Body:
- After completing the last round of Leg 2, chain 5.
- Join the two legs together by crocheting around them.
- Round 9: Work sc around both legs and the chains. Total stitch count = 36 (13 + 5 + 13 + 5).
- Round 10: 1 sc, inc, 3 sc, inc, 9 sc, inc, 9 sc, inc, 3 sc, inc, 3 sc, inc, 2 sc (42). (Total of 6 increases: 2 on the sides of the legs, 2 on the bridges, and 2 on the inner sides of the legs).
- Rounds 11-14: Repeat the increase pattern from Round 10 (6 increases per round) until you have 66 stitches.
- Rounds 15-27: 66 sc for 13 rounds.
- Round 28 and beyond: Decrease 2 stitches on the sides of the body in each round until 38 stitches remain.
- Continuing the Body: Decrease 2 stitches every other round. Begin stuffing the body firmly as you crochet.
- The Trunk: Once 14 stitches remain, work 4 rounds of 14 sc.
- Decrease 2 stitches per round for the next 2 rounds (10 stitches).
- Continue making several decreases in a row until the piece is closed.
The Arms (Make 2)
- Round 1: 6 sc in MR (6)
- Round 2: (2 sc, inc) repeat 2 times (8)
- Round 3: (3 sc, inc) repeat 2 times (10)
- Rounds 4-10: 10 sc (10)
- Stuff the arm lightly.
- Final Round: (1 sc, dec) repeat to the end of the round.
- Leave a long yarn tail for sewing.
The Tail
- Round 1: 6 sc in MR (6)
- Round 2: (2 sc, inc) repeat 2 times (8)
- Round 3: (3 sc, inc) repeat 2 times (10)
- Rounds 4-11: 10 sc (10)
- Stuff very firmly, as the tail will help the elephant balance and stand.
- Leave a long yarn tail for sewing.
The Ears (Make 2)
- Chain 12.
- Round 1: Starting in the 2nd chain from the hook: 9 sc along one side, 3 sc in the last chain, 8 sc along the opposite side of the chain, and 2 sc in the final chain (22).
- Rounds 2-12: 22 sc (22).
- Leave a long yarn tail for sewing.
Assembly and Finishing
Structuring the Body
Identify the front and back of the body. Since more increases were made on one side, that side will be thicker; this should be the front/belly area.
Adding the Eyes and Ears
- Creating the Eye Sockets: Around the 40th round (counting up from the bottom bridge), use a needle and thread to pull the fabric tight, creating a cinched area for the eyes.
- Ears: Fold the ears in half and sew them at the base. Attach them to the head at the level of the eye cinching.
- Eyes: Cut a 2cm circle from white felt. Sew closely around the edge and pull the thread tight to create a small ball. Sew these into the cinched eye areas and use colored chalk to add shading for a realistic look.
- Eye Details: Sew small black beads for pupils. Use black embroidery thread to stitch a divider between the eyes, add eyebrows, and a small smile.
Final Touches
- Arms: Sew the arms slightly below the ears.
- Tail: Sew the tail to the bottom of the body. Adjust the position to ensure the elephant is stable.
- Belly Button: Embroider a small “X” on the belly for a cute belly button.
Pro Tip: Making it Stand
If you want your elephant to stand upright, simply bend the body at the line between the eyes and ears and sew the bottom section firmly to create a seated or standing posture.
“`