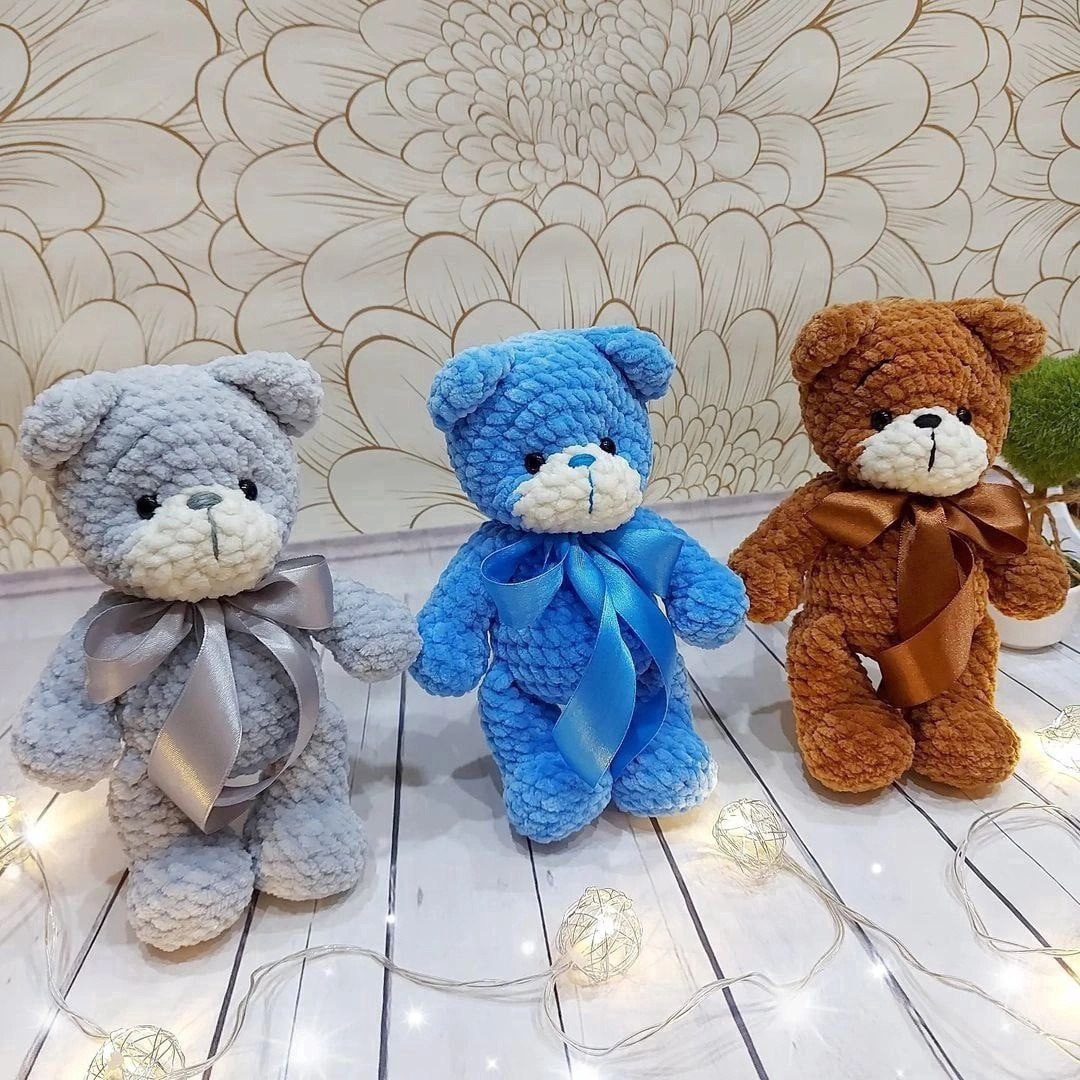
Crochet Plush Teddy Bear Tutorial: Make Your Own Adorable Amigurumi Friend
There is nothing quite as heartwarming as a handmade teddy bear. Whether you are looking to create a unique nursery decoration, a comforting gift for a newborn, or a cuddly companion for a child, this crochet plush teddy bear is the perfect project. This pattern uses soft, chenille-style yarn to create a bear that is incredibly squishy and huggable.
If you are an amigurumi enthusiast, you will love the texture of this bear. The chunky yarn makes the stitches pop, and the simple construction makes it an excellent project for intermediate beginners or those looking to practice working with velvet or blanket yarns. Grab your favorite color of plush yarn, and let’s get started on making your new best friend!
Materials and Abbreviations
Before we dive into the stitches, let’s make sure you have everything you need on your crochet hook. Because we are working with plush yarn, tension is key to ensuring your stuffing doesn’t peek through the stitches.
Materials Needed:
- Plush Yarn: A medium-weight chenille or “blanket” style yarn in your choice of color (plus a small amount of a contrasting color for the muzzle).
- Embroidery Thread: A small amount of black or dark brown thread for the nose and eyebrows.
- Crochet Hook: A US size 7 (4.5mm) hook. You may want to adjust this based on your yarn weight to ensure tight stitches.
- Safety Eyes: 9mm (approximately 3/8 inch) safety eyes.
- Stuffing: High-quality polyester fiberfill.
- Ribbon: A decorative satin ribbon to tie around the bear’s neck.
- Tools: A tapestry needle, scissors, and stitch markers.
Abbreviations (US Terms):
- MR: Magic Ring
- Sc: Single Crochet
- Inc: Increase (2 sc in one stitch)
- Dec: Decrease (sc 2 stitches together)
- Hdc: Half Double Crochet
- Sl st: Slip Stitch
- St(s): Stitch(es)
- BLO: Back Loops Only
Step-by-Step Instructions
The Ears (Make 2)
The ears are worked as flat pieces and then joined to create a soft, rounded shape.
- MR, 6 sc in ring (6)
- 6 inc (12)
- 12 sc (12)
Do not stuff the ears. Fold the circle in half so the open ends meet, and sc through both layers to sew the edge shut.
The Head
The head is the most important part for giving your bear its personality. Note the color change instructions for the muzzle!
- MR, 6 sc in ring (6)
- 6 inc (12)
- (1 sc, inc) x 6 (18)
- (2 sc, inc) x 6 (24)
Muzzle Color Change: Switch to your contrasting color for the muzzle.
- 6 sc, 6 inc, 6 sc (24)
- 6 sc, (1 sc, inc) x 6, 6 sc (30)
- (1 sc, inc) x 6, 18 sc (36)
- 36 sc (36)
- 36 sc (36)
- 36 sc (36)
Attaching Ears: During round 11, you will work the ears directly into the head.
- 10 sc, [6 sc + ear], 4 sc, [6 sc + ear], 10 sc (36)
- 36 sc (36)
- (4 sc, dec) x 6 (30)
- (3 sc, dec) x 6 (24)
- (2 sc, dec) x 6 (18)
- (1 sc, dec) x 6 (12)
- 6 dec (6)
Fasten off, leaving a long tail for sewing.
The Lower Legs (Make 2)
The lower legs create the “feet” of the bear. We will use the BLO technique to create a defined edge.
- MR, 6 sc in ring (6)
- 6 inc (12)
- (1 sc, inc) x 6 (18)
- 18 sc in BLO (18)
- 18 sc (18)
- (1 sc, dec) x 3, 9 sc (15)
- (1 sc, dec) x 3, 6 sc (12)
- 12 sc (12)
- 8-12) 12 sc (12)
- 11 sc, fold the piece in half and sc through both layers for 6 sc (6)
Fasten off, leaving a tail for sewing.
The Upper Legs (Make 2)
- MR, 6 sc in ring (6)
- 6 inc (12)
- 3-4) 12 sc (12)
- (1 sc, dec) x 3 (9)
- 6-12) 9 sc (9)
Fasten off, leaving a tail for sewing.
The Body
The body is worked in one piece and serves as the anchor for all the limbs.
- MR, 6 sc in ring (6)
- 6 inc (12)
- (1 sc, inc) x 6 (18)
- (2 sc, inc) x 9 (27)
- (3 sc, inc) x 9 (36)
Attaching Limbs: In round 6, we attach the legs and create a bump for the front.
- 6 sc (with lower leg attached), 12 sc, 6 sc (with lower leg attached), 4 sc, 5 hdc in one stitch, 3 sc (36)
- 36 sc (36)
- 36 sc (36)
- (2 sc, dec) x 6 (27)
- 27 sc (27)
- (1 sc, dec) x 6 (18)
- 18 sc (18)
- 12-13) 18 sc (18)
- (4 sc, dec) x 3 (15)
- 4 sc (with upper leg attached), 4 sc, 4 sc (with upper leg attached), 3 sc, 1 sl st (to close)
Stuff the body firmly before finishing the last round.
Finishing
Now comes the magical part: assembly and facial features!
Assembly Guide
- Attach the Head: Using a tapestry needle and a long tail of yarn, sew the head to the top of the body. Ensure it is centered and stable.
- Attach the Upper Legs: Sew the upper legs to the sides of the body near the bottom, slightly angled outward to give the bear a seated position.
- Safety Eyes: Insert the 9mm safety eyes between rounds 7 and 8 of the head, roughly equal distance apart. Ensure the backing is secure.
- Embroidery: Use your embroidery thread to sew a small nose and gentle eyebrows. This gives your bear its unique expression.
- The Bow: Tie a beautiful satin ribbon around the bear’s neck to hide the seam where the head meets the body.
Tips for Success
Crocheting with plush yarn can be a bit different than traditional cotton or acrylic. Here are a few professional tips to ensure your teddy bear looks amazing:
- Watch Your Tension: Plush yarn is forgiving, but if you crochet too loosely, the white stuffing will show through. If this happens, try switching to a smaller crochet hook.
- Use Stitch Markers: Because plush yarn hides stitches very easily, it is nearly impossible to count by eye. Always use a stitch marker to mark the first stitch of every round.
- Stuffing Technique: When stuffing the head and body, push the fiberfill into the corners and extremities (like the base of the ears or the ends of the legs) to avoid lumps.
- Invisible Decreases: For a smoother look in amigurumi, try using the “invisible decrease” method (working only through the front loops of the next two stitches) to prevent gaps in your work.