Easy Crochet Mini Chicken Pattern: A Perfect Amigurumi Tutorial
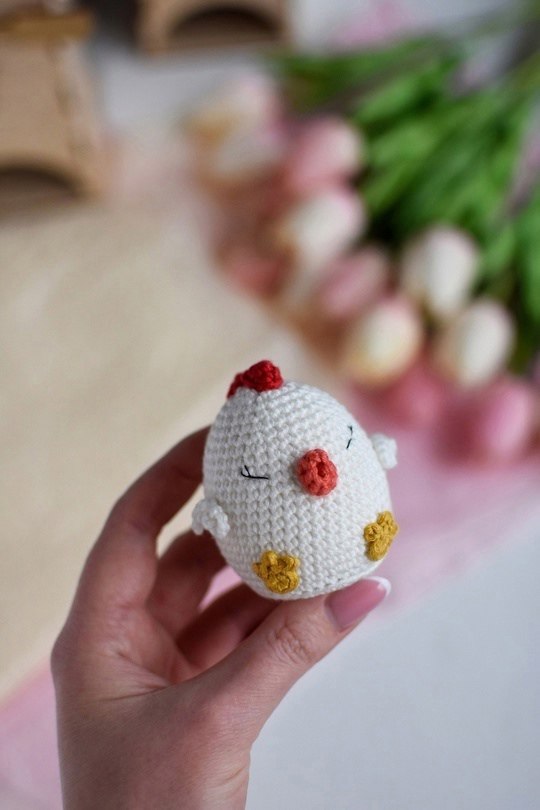
Are you looking for a quick, adorable project to brighten up your home or add a special touch to an Easter basket? This mini crochet chicken is the perfect solution! Small enough to fit in the palm of your hand—measuring approximately 2.4 inches tall—this little chick is a delightful project for beginners and experienced crocheters alike.
Amigurumi, the Japanese art of knitting or crocheting small, stuffed yarn creatures, is incredibly rewarding. This specific pattern focuses on simple shapes and basic stitches, making it an excellent way to practice your tension and shaping skills. Whether you are making a fleet of little chickens for a spring display or a tiny companion for a nursery, this tutorial will guide you through every single stitch.
Materials & Abbreviations
Before we pick up our hooks, let’s make sure you have everything you need. Because this is a miniature project, using the right yarn weight and hook size is crucial for creating a tight fabric that keeps the stuffing inside.
Required Materials
- Yarn: Cotton/Acrylic blend yarn (such as Gazzal Baby Cotton or similar). You will need four colors:
- White (for the main body)
- Mustard or Yellow (for the feet)
- Red (for the comb)
- Orange (for the beak)
- Crochet Hook: 2mm (approx. B-1) crochet hook.
- Stuffing: Polyfill or polyester fiberfill.
- Embroidery Thread: Black sewing thread for the eyes.
- Extras: Scissors, a yarn needle for sewing, and a small plastic disc (you can cut one from a recycled plastic coffee lid) to glue to the bottom for stability.
US Crochet Abbreviations
Please note that this pattern uses standard US terminology. All instructions are worked in a continuous spiral unless otherwise noted.
- MR: Magic Ring
- ch: Chain
- sc: Single crochet
- inc: Increase (2 sc in the same stitch)
- dec: Decrease (sc two stitches together)
- sl st: Slip stitch
- BLO: Back loops only
- FLO: Front loops only
Step-by-Step Instructions
The Chicken Body
We will begin with the white yarn to create the main body of our chicken.
Round 1: Create a MR and work 6 sc into it. (6)
Round 2: 6 inc. (12)
Round 3: (1 sc, inc) repeat 6 times. (18)
Round 4: (2 sc, inc) repeat 6 times. (24)
Round 5: (3 sc, inc) repeat 6 times. (30)
Round 6: (3 sc, inc) repeat 6 times. (36)
Round 7 (The Feather Detail): First, work 35 sc into the Back Loops Only (BLO). Now, we will work into the front loops to create the feather texture. For each feather: work 1 sc, chain 4, then work 4 sl st into the 2nd chain from the hook. Chain 3, then work 3 sl st into the 2nd chain from the hook. End the feather by working 1 sl st into the 36th stitch. Repeat this around to create the textured “tail” effect.
Round 8: (5 sc, inc) repeat 6 times. (42)
Rounds 9-14: Work 42 sc in each round for 6 rounds total. (42)
Pro Tip: Before moving to the next round, glue the plastic disc to the bottom of the body to help the chicken stand upright.
Round 15 (Creating the Side Wings): This round creates the side protrusions. 12 sc, chain 10, sl st into the 1st ch of the chain, 8 ch, sl st into the 1st ch of the chain, 18 sc, 8 ch, sl st into the 1st ch of the chain, 10 ch, sl st into the 1st ch of the chain, 12 sc. (42)
Rounds 16-17: Work 42 sc in each round. (42)
Round 18: (5 sc, dec) repeat 6 times. (36)
Rounds 19-20: Work 36 sc in each round. (36)
Round 21: (4 sc, dec) repeat 6 times. (30)
Round 22: Work 30 sc. (30)
Round 23: (3 sc, dec) repeat 6 times. (24)
Round 24: Work 24 sc. (24)
Round 25: (2 sc, dec) repeat 6 times. (18)
Stuffing: Generously stuff the body with polyfill. Make sure to push the stuffing into the small crevices created by the wing loops.
Round 26: (1 sc, dec) repeat 6 times. (12)
Fasten off, leaving a long tail. Pull the hole closed by working through the front loops only, weave the tail through the remaining stitches, and hide the end inside the body.
Making the Details
The Comb (Red Yarn)
You will need to make two small pieces for the comb.
Detail 1 (Small): 6 sc in a MR. Round 2: 1 inc, 5 sc. (7). Fasten off, leaving a tail for sewing.
Detail 2 (Large): 6 sc in a MR. Round 2: (1 inc, 2 sc) repeat 2 times. (8). Fasten off, leaving a tail for sewing.
The Beak (Orange Yarn)
Beak: 6 sc in a MR. Round 2: (1 inc, 2 sc) repeat 2 times. (8). Fasten off, leaving a tail for sewing.
The Feet (Mustard Yarn)
Make two feet.
Feet: 6 sc in a MR. Round 2: Chain 2, sl st into the 2nd ch from the hook, sl st into the base of the circle. Then, (chain 2, sl st into the 2nd ch from the hook, sl st into the next sc) repeat 2 times. Fasten off, leaving a tail for sewing.
Finishing
Assembly is where your little chicken truly comes to life! Take your time with this stage to ensure everything is symmetrical.
- Attach the Feet: Place the feet on the bottom of the body. Position them intuitively where they look most natural, and sew them firmly to the body, securing each little “toe.”
- Attach the Comb: Take the smaller red piece and sew it to the front of the head. Sew the larger red piece just behind it on the top of the head.
- Attach the Beak: Sew the orange beak to the center of the face, just below where the comb will sit.
- Embroider the Eyes: Using your black sewing thread, mark the placement of the eyes with a needle. Embroider two small lines to create sleeping or “cute” eyes. I recommend each eye being approximately 3 sc long for the best look.
Tips for Success
To make your crochet chicken look professional and polished, keep these tips in mind:
Use the Invisible Decrease: When working the decrease rounds (Rounds 18-26), use the “invisible decrease” technique. Instead of inserting your hook into the top loops of two stitches, insert it into the front loops only of the next two stitches. This prevents large gaps from forming in your amigurumi.
Watch Your Tension: Since this is a small project, any loose stitches will be very obvious. Try to maintain a consistent, tight tension. If you find your stitches are too loose, consider dropping down a hook size.
Perfect Stuffing: It is tempting to overstuff, but be careful! Overstuffing can cause the stitches to stretch and create holes. Stuff the chicken firmly but evenly so it maintains its rounded shape without distorting the crochet fabric.
Symmetry is Key: Before you sew the eyes or the beak, use sewing pins to hold them in place. This allows you to step back and check if the chicken looks “right” before you commit to the permanent stitches.