Adorable Crochet Pumpkin Amigurumi: A Step-by-Step Pattern for Beginners
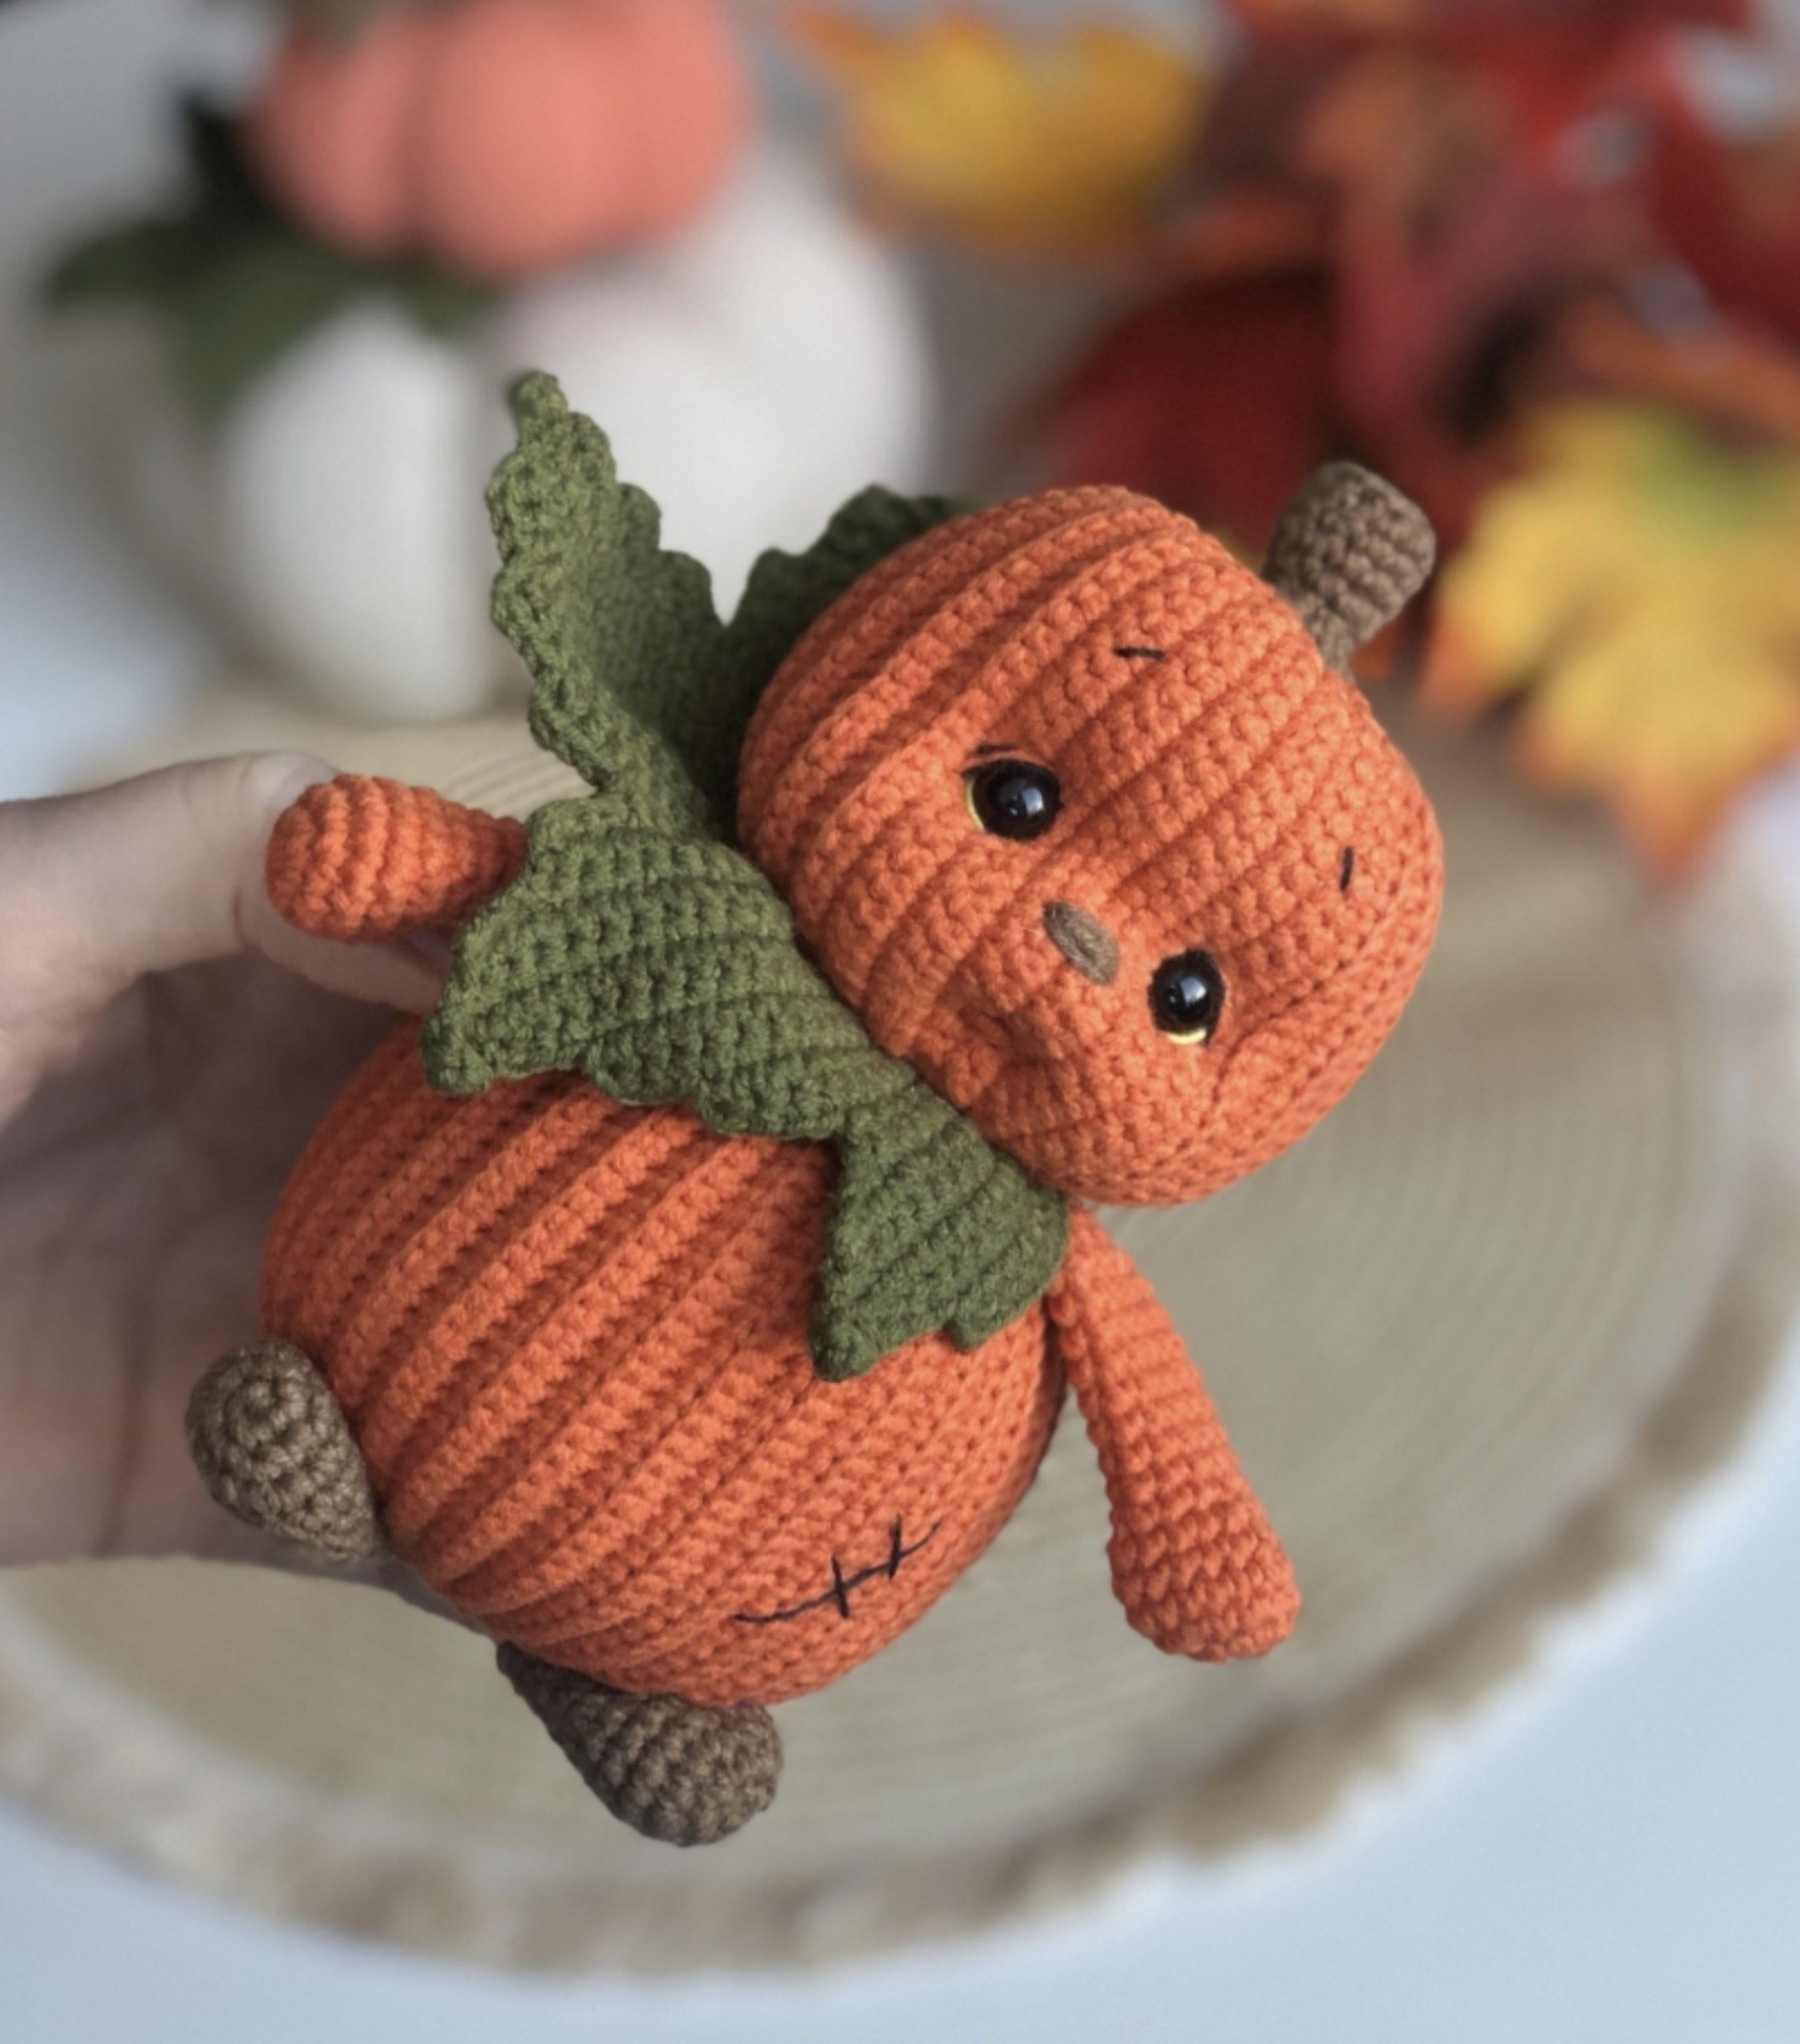
There is nothing quite like the cozy feeling of autumn! As the leaves turn gold and the air gets crisp, it is the perfect time to grab your crochet hook and whip up some seasonal decor. Today, I am sharing a pattern for this incredibly cute, little pumpkin character. With its big, expressive eyes and tiny leaf hat, this little guy is perfect for a Thanksgiving centerpiece, a fall-themed nursery, or a sweet gift for a friend.
This pattern is designed to be beginner-friendly, though it does require some attention to detail, especially when we get to the shaping of the face. Don’t worry, though—I’ll walk you through every single stitch to ensure your pumpkin turns out just as adorable as the one in the photos!
Materials & Abbreviations
Before we dive into the stitches, let’s make sure you have everything you need on your craft table. To achieve the look in the tutorial, I recommend using a fine cotton or cotton-blend yarn.
What You’ll Need
- Yarn: Medium weight (approx. 176 yards per 50g/1.7oz skein). You will need:
- Terracotta (Main body color) – about half a skein.
- Khaki or Olive Green (for the leaf).
- Brown (for the stem, nose, and feet).
- Black (for the eyes and eyebrows) – you can use embroidery floss or a single strand of black yarn.
- Light Yellow or White (for the eye highlights).
- Crochet Hook: 1.5mm (recommended) or 1.7mm. Using a smaller hook helps keep the stitches tight so the stuffing doesn’t peek through.
- Safety Eyes: 8mm.
- Stuffing: Polyester fiberfill (poly-fill).
- Tools: A long metal needle with a large eye, a stitch marker (or contrast thread), scissors, and a few sewing pins to hold parts in place.
Abbreviations (US Terms)
- MR: Magic Ring
- ch: Chain
- sc: Single Crochet
- hdc: Half Double Crochet
- sl st: Slip Stitch
- inc: Increase (2 sc in one stitch)
- dec: Decrease (sc 2 stitches together)
- BLO: Back Loop Only
- ch-sp: Chain space
- (…) x N: Repeat the instructions inside the parentheses N times
Step-by-Step Instructions
The Arms (Make 2)
Use Terracotta yarn. Note: These are not stuffed.
Round 1: Make a MR and work 6 sc into the ring. (6)
Round 2: 6 inc. (12)
Round 3: (1 sc, 1 inc) repeat 6 times. (18)
Rounds 4-5: 18 sc. (2 rounds total)
Round 6: (4 sc, 1 dec) repeat 3 times. (15)
Round 7: (3 sc, 1 dec) repeat 3 times. (12)
Rounds 8-16: 12 sc. (9 rounds total)
Fasten off, leaving a long tail for sewing. To finish, fold the arm in half and work 5 sc through both layers to close the end.
The Legs (Make 2)
Use Terracotta yarn. Note: These are not stuffed.
Round 1: Make a MR and work 6 sc into the ring. (6)
Round 2: 6 inc. (12)
Round 3: (1 sc, 1 inc) repeat 6 times. (18)
Rounds 4-6: 18 sc. (3 rounds total)
Round 7: (4 sc, 1 dec) repeat 3 times. (15)
Round 8: 15 sc.
Round 9: (4 sc, 1 dec) repeat 3 times. (12)
Rounds 10-11: 12 sc. (2 rounds total)
Round 12: 6 dec. (6)
Fasten off, leaving a long tail for sewing. Do not stuff the legs.
The Head
Use Terracotta yarn. IMPORTANT: For this part, we are working in rows (turning the work after each row), not in a continuous spiral.
Creating the Base Shape
Row 1: Ch 26. Starting from the 2nd ch from the hook, work 25 sc into the Back Loops Only (BLO). (25)
Rows 2-20: 25 sc in BLO. (19 rows total)
Rows 21-33: 25 sc (work through both loops normally). (13 rows total)
Rows 34-53: 25 sc in BLO. (20 rows total)
Once you finish the rows, fold the piece in half and sew the edges together using the remaining loops from the starting chain and the final row. Turn the head right-side out.
Shaping and Eye Placement
Now we will work in a spiral to close the head.
Round 1: Work 26 sc around, but to create a textured, vertical look, pull the stitch through the second vertical row (the “valley” of the zig-zag). (26)
Round 2: (1 sc, 1 dec) repeat 8 times, then 2 sc. (18)
Round 3: (1 sc, 1 dec) repeat 6 times. (12)
Round 4: 6 dec. (6)
Eye Placement: Before closing the second side, find rows 21-23 on your piece. Insert your safety eyes between stitches 12 and 13. Aim to have about 8 horizontal rows of space between the eyes. Once the eyes are secure, finish closing the head with stuffing. To get that “baby face” look, use a needle and yarn to pull the stuffing inward slightly below the eyes to create little cheeks.
The Body
Use Terracotta yarn. Worked in rows.
Row 1: Ch 31. Starting from the 2nd ch from the hook, work 30 sc in BLO. (30)
Rows 2-64: 30 sc in BLO. (63 rows total)
Fold the piece in half and sew the sides together, catching the remaining loops from the starting chain. Turn right-side out and stuff firmly.
Closing the Body: Now work in a spiral to close the ends.
Round 1: 32 sc around, pulling through the second vertical row for texture. (32)
Round 2: (2 sc, 1 dec) repeat 8 times. (24)
Round 3: (2 sc, 1 dec) repeat 6 times. (18)
Round 4: (1 sc, 1 dec) repeat 6 times. (12)
Round 5: 6 dec. (6)
Fasten off and sew the second end closed similarly.
The Stem
Use Brown yarn.
Round 1: MR, 6 sc. (6)
Round 2: 6 inc. (12)
Round 3: (1 sc, 1 inc) repeat 6 times. (18)
Rounds 4-5: 18 sc. (2 rounds total)
Round 6: (4 sc, 1 dec) repeat 3 times. (15)
Round 7: (3 sc, 1 dec) repeat 3 times. (12)
Rounds 8-16: 12 sc. (9 rounds total)
Fasten off and sew to the top center of the head.
The Leaf
Use Khaki yarn. The leaf consists of a central part and two side fragments.
Central Part
Worked in rows (turning work). Do NOT make chain loops at the start of rows.
Row 1: Ch 16. Starting from the 2nd ch from hook, work 15 sc in BLO. Ch 4, turn. Work 13 sc into the remaining loops of the chain. (Total stitches: 15 + 4 + 13 = 32)
Row 2: 13 sc, 2 sc in the ring created by the ch-4, ch 4, turn, 2 sc in the ring, 12 sc. (Total: 33)
Row 3: 14 sc, 2 sc in ring, ch 4, turn, 2 sc in ring, 12 sc. (Total: 34)
Row 4: 14 sc, 2 sc in ring, ch 4, turn, 2 sc in ring, 13 sc. (Total: 35)
Row 5: 15 sc, 2 sc in ring, ch 4, turn, 2 sc in ring, 13 sc. (Total: 37)
Row 6: 15 sc, 2 sc in ring, ch 4, turn, 2 sc in ring, 14 sc. (Total: 38)
Row 7: 15 sc, 2 sc in ring, ch 4, turn, 2 sc in ring, 14 sc, ch 4. (Total: 41)
Follow the pattern for Fragment #1 and Fragment #2 (adding the scalloped edges) to complete the leaf shape. For the second fragment, you will work in a mirrored fashion to ensure the leaf is symmetrical.
Finishing
Assembly Guide
- Legs: Use pins to position the legs at the bottom of the body. Sew them on securely so the body stays upright and doesn’t tip over.
- Leaf: Tack the leaf to the center of the top of the body.
- Head: Attach the head to the top of the leaf. As you sew the head to the body, thread your needle through the leaf as well to secure everything together.
- Arms: Position the arms on the sides of the body, ensuring they are level with the leaf. Sew them underneath the leaf for a clean look.
- Stem: Sew the brown stem to the very top of the head.
- Details: Use black yarn to add a small mouth and eyebrows. You can also add a tiny brown nose using a few stitches of brown yarn. Finally, add the light yellow/white highlights to the eyes to make them pop!
Tips for Success
- Tension is Key: If your stitches are too loose, the stuffing will show. If they are too tight, your hands might tire quickly. Aim for a consistent, firm tension.
- The “Baby Face” Trick: The most important part of the character is the expression. Don’t be afraid to use your fingers to press the stuffing inward while you are sewing the head to create those cute, chubby cheeks.
- Hide Your Ends: When you finish a piece, weave the yarn tails deep into the stuffing and use your needle to “tuck” them away so they don’t poke out later.
- Use Pins: When assembling, always use sewing pins to hold the parts in place before you start sewing. This prevents you from having to “un-sew” mistakes later!