How to Crochet a Cute Plush Monkey Amigurumi: A Beginner-Friendly Tutorial
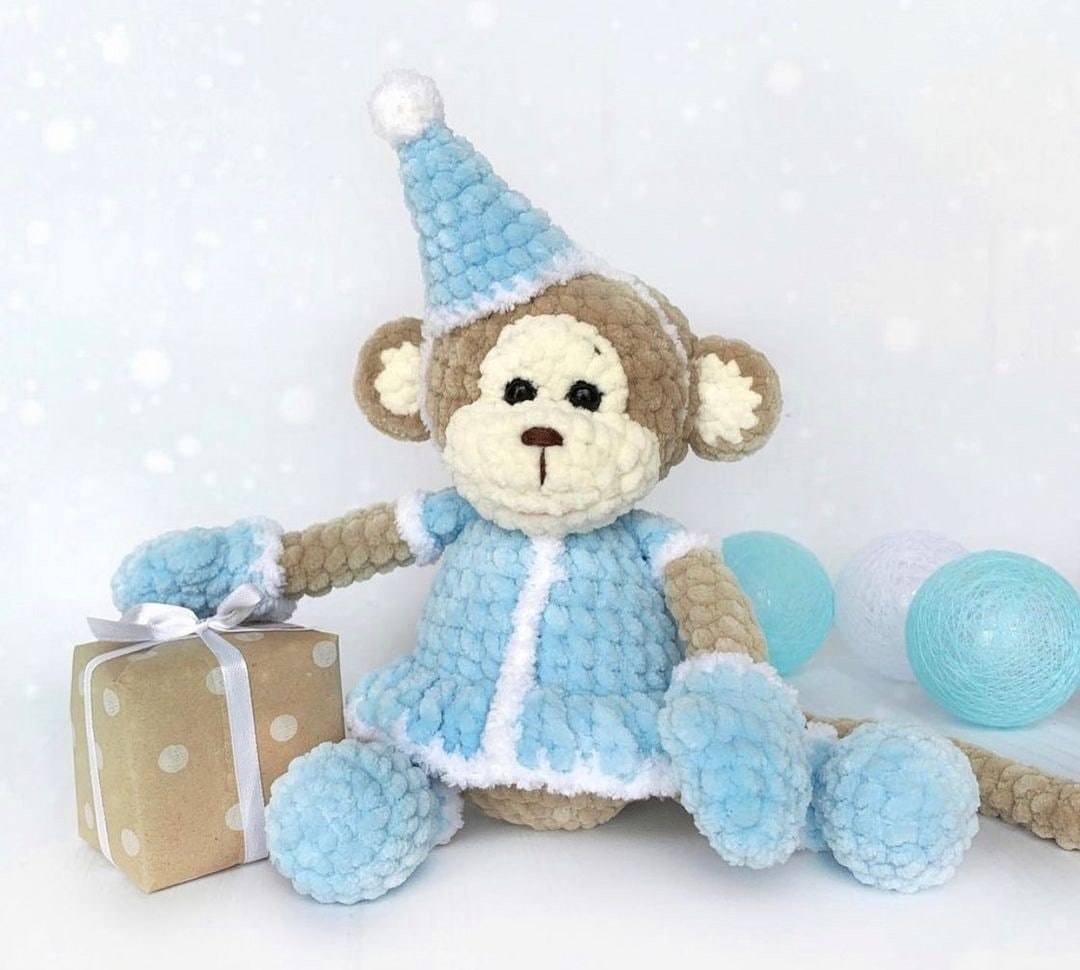
Are you looking for your next adorable amigurumi project? This charming little monkey, dressed in a cozy blue outfit and a festive party hat, is the perfect addition to your plushie collection! Whether you are making a gift for a little one or adding to your own shelf of handmade friends, this monkey is sure to bring a smile to everyone’s face.
This pattern is designed to be worked in a continuous spiral, which is the standard for amigurumi to ensure there are no visible gaps. We will be working from the bottom up, building this character piece by piece. Don’t worry if you’re a beginner; just take it one stitch at a time, and you’ll have a cuddly companion in no time!
Materials & Abbreviations
To achieve the soft, velvety texture seen in the photos, I highly recommend using a chenille or velvet-style yarn. This makes the finished toy incredibly huggable.
Materials Needed
- Yarn: Velvet/Chenille yarn in Tan (body), Light Blue (outfit and hat), White (trim and pom-pom), and Cream/Milk (face).
- Crochet Hooks: 3.5mm (main body and limbs), 1.75mm (fine trim/details), and 1.5mm (pom-pom).
- Stuffing: High-quality polyester fiberfill.
- Eyes: Safety eyes (standard size for amigurumi).
- Extras: Sewing needle, matching sewing thread (tan), dental floss (for face shaping), and embroidery floss (brown for the nose and pink for the mouth).
US Crochet Abbreviations
- ch: chain
- sl st: slip stitch
- MR: magic ring
- sc: single crochet
- dc: double crochet
- inc: increase (2 sc in one stitch)
- dec: decrease (sc 2 together)
- BLO: back loop only
- FLO: front loop only
- (X): number of single crochets in a round
- (X Rnds): number of rounds
Step-by-Step Instructions
Arms (Make 2)
We will start by making the mittens in blue, then switch to tan for the arm, and finish with white trim.
The Mittens
Using 3.5mm hook and light blue yarn:
- R1: 6 sc in 2nd ch from hook (6)
- R2: (1 sc, inc) * 3 (9)
- R3: (2 sc, inc) * 3 (12)
- R4: 12 sc (12)
- R5: 4 sc, 3 dc in one stitch (this creates the finger), 7 sc (12)
- R6: 12 sc (12)
Do not cut the yarn. Join the tan yarn:
- R7 (BLO): (2 sc, dec) * 3 (9)
- R8: 9 sc (9)
Switch back to blue yarn to finish the mitten:
- R7 (FLO): 12 sc (12)
- R8: 12 sc (12) + sl st
Fasten off, hide the ends, and stuff the mitten approximately up to Round 7.
The Arms (Tan Section)
Continue with tan yarn:
- R9: 7 sc, dec (8)
- R10-14: 8 sc (8)
Switch to blue for the sleeves:
- R15 (BLO): 8 sc (8)
- R16-18: 8 sc (8)
Extra: 1 sc + sl st. Fold the piece and sew across with 4 sc to close. To add the white trim, join white yarn to R15 and working in the FLO, work 8 sc. Fasten off.
Legs (Make 2)
Using 3.5mm hook and light blue yarn for the boots:
- R1: 6 sc in 2nd ch from hook (6)
- R2: 6 inc (12)
- R3: (1 sc, inc) * 6 (18)
- R4-5: 18 sc (18)
- R6: (1 sc, dec) * 4, 6 sc (14)
- R7: (2 sc, dec) * 2, 6 sc (12)
- R8: 12 sc (12)
Join tan yarn:
- R9 (BLO): (4 sc, dec) * 2 (10)
- R10-12: 10 sc (10)
Switch back to blue for the front of the boot:
- R9 (FLO): 12 sc (12)
- R10: 12 sc (12) + sl st
Add white trim to the R11 (FLO) with 12 sc + sl st. Stuff the boot up to Round 9. Continue the leg in tan yarn:
- R13-17: 10 sc (10)
Extra: 3 sc + sl st. Fold and sew across with 5 sc to close. Fasten off.
Tail (Make 1)
Using 3.5mm hook and tan yarn:
- R1: 5 sc in 2nd ch from hook (5)
- R2-30: 5 sc (5) + sl st
Do not stuff. Fold and sew across with 2 sc to close. Fasten off.
The Body
Using 4mm hook and tan yarn:
- R1: 6 sc in 2nd ch from hook (6)
- R2: 6 inc (12)
- R3: (1 sc, inc) * 6 (18)
- R4: (2 sc, inc) * 6 (24)
- R5: (3 sc, inc) * 6 (30)
R6 (Joining limbs): 4 sc, 5 sc with a leg, 10 sc, 5 sc with the second leg, 4 sc, 2 sc with the tail (30 total)
Switch to blue yarn for the dress:
- R8: 30 sc (30)
- R9 (BLO): 30 sc (30)
- R10-11: 30 sc (30)
Adding Ruffles to R9 (FLO): Join extra white yarn to R9. Working in the front loops, [ch 4, (1 dc, ch 1, 1 dc) in the same stitch, ch 1, 1 dc]—repeat this pattern around the entire round. Join with a sl st and fasten off.
- R12: 30 sc (30)
- R13: (4 sc, dec) * 5 (25)
- R14: 25 sc (25)
- R15: (3 sc, dec) * 5 (20)
R16 (Joining arms): 3 sc, 4 sc with an arm, 6 sc, 4 sc with the second arm, 3 sc (20 total)
Add white trim using a 1.75mm hook: join white yarn to the center of the neckline and work a vertical stripe of sc downwards, and also trim the bottom of the skirt. Stuff the body firmly and evenly. Switch to tan yarn for the neck:
- R18: (1 sc, dec) * 5 (10)
The Head
Using 4mm hook and tan yarn:
- R19: 10 inc (20)
- R20: (3 sc, inc) * 5 (25)
- R21: (4 sc, inc) * 5 (30)
- R22: (4 sc, inc) * 6 (36)
- R23-25: 36 sc (36)
- R26: (4 sc, dec) * 6 (30)
- R27: 30 sc (30)
Stuff the neck and the bottom part of the head firmly.
- R28: (3 sc, dec) * 6 (24)
- R29: (2 sc, dec) * 6 (18)
- R30: (1 sc, dec) * 6 (12)
- R31: 6 dec (6)
Fasten off and hide the yarn end.
The Muzzle (Face)
Using 3.5mm hook and cream/milk yarn. This consists of two parts.
Part 1
- Foundation: ch 5
- R1: In 2nd ch from hook, work 1 inc, 2 sc, 2 inc in one stitch. Now, working on the other side of the chain: 2 sc, 1 inc (12)
- R2: (1 sc, inc, 3 sc, inc) * 2 (16)
- R3: (inc * 2, 6 sc) * 2 (20)
- R4: ((1 sc, inc) * 2, 6 sc) * 2 (24) + sl st
Fasten off.
Part 2
- R1: 6 sc in 2nd ch from hook (6)
- R2: (1 sc, inc) * 3 (9)
- R3: (2 sc, inc) * 3 (12)
Fasten off.
Ears (Make 2)
Using 3.5mm hook. Each ear has two layers: one cream and one tan.
- Cream Layer R1: 6 sc (6)
- Cream Layer R2: (1 sc, inc) * 3 (9). Fasten off.
- Tan Layer R1: 6 sc (6)
- Tan Layer R2: (1 sc, inc) * 3 (9). Do not fasten off.
Place the layers together and crochet through both: 9 sc + sl st. Fasten off.
The Hat & Pom-pom
Using 3.5mm hook and blue yarn for the hat:
- R1: 6 sc (6)
- R2: 6 inc (12)
- R3: (2 sc, inc) * 3 (15)
- R4: (3 sc, inc) * 3 (18)
- R5: (4 sc, inc) * 3 (21)
- R6: 21 sc (21) + sl st
Add white trim (R7) with 21 sc + sl st. To attach, crochet a chain of about 30 (or length needed to fit the head) and secure to the opposite side of the hat.
Using 1.5mm hook and white yarn for the pom-pom:
- R1: 6 sc (6)
- R2: 6 inc (12)
- R3-4: 12 sc (12)
- R5: 6 dec (6)
Stuff lightly, fasten off, leaving a tail for sewing to the hat.
Finishing
The finishing stage is what truly brings your monkey to life! I recommend pinning all pieces in place before sewing them permanently.
Assembly Guide
- Safety Eyes: Attach the safety eyes to Part 2 of the muzzle (around Round 2).
- Muzzle to Head: Sew Part 2 to the head (between Rounds 23-27).
- Muzzle Detail: Sew Part 1 over Part 2, slightly overlapping it (between Rounds 20-23).
- Face Shaping (Pro Tip): To give the monkey a realistic snout, use dental floss. Insert the needle into the center of the neck, pull it through the muzzle at a specific point, and repeat in a triangular pattern. Pull the floss tight to “sculpt” the face.
- Ears: Sew the ears to the head (around Rounds 23-25).
- Nose: Use brown embroidery floss to stitch a nose (about 10-12 small stitches with one vertical stitch).
- Mouth: Use pink embroidery floss to stitch a small mouth using a tambour stitch.
- Brows: Optionally, stitch small eyebrows for extra personality!
Tips for Success
Tension is Key: Since we are using velvet yarn, try not to pull your stitches too tight, but ensure they are tight enough that the stuffing doesn’t peek through.
Color Changes: When changing colors, always try to change at the very beginning of the new round to keep the color transitions looking clean.
Stitch Markers: Amigurumi is worked in a spiral, so using a stitch marker is essential to keep track of where your rounds begin!
Customization: Feel free to change the colors! A pink monkey in a yellow dress or a brown monkey in a green outfit would look absolutely wonderful.