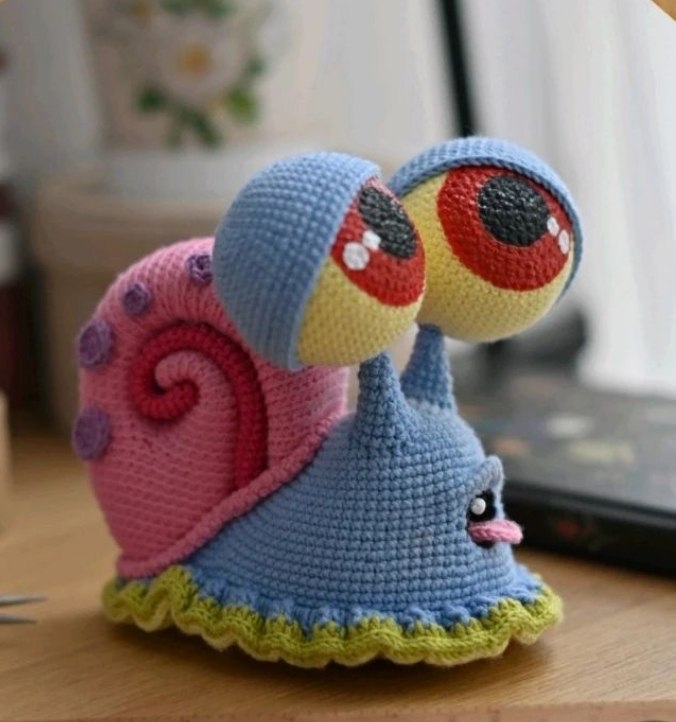
Cute Crochet Snail Amigurumi Pattern: A Step-by-Step Tutorial
Are you looking for a whimsical, adorable project to brighten up your home or create a unique gift for a friend? This crochet snail amigurumi is the perfect project! With its big, expressive eyes and colorful, swirling shell, this little snail is full of personality. Whether you are a beginner looking to practice your shaping or an intermediate crocheter wanting to try something unique, this pattern is designed to be fun and accessible.
In this tutorial, we will walk you through every single step, from crafting the sturdy body and the colorful shell to assembling the tiny details like the tongue and the “tooth.” By the end, you will have a charming little snail that stands about 5.5 inches tall!
Materials & Abbreviations
To ensure your snail turns out just like the one in the photos, I recommend using a cotton-blend yarn for great stitch definition. Here is everything you will need to gather before you begin.
Yarn Requirements
You will need a cotton/acrylic blend yarn (such as Yarn Art Baby Cotton) in the following colors:
- Blue: For the main body and tentacles.
- Light Yellow: For the sole of the foot.
- Lime Green: For the decorative trim around the base.
- Bright Pink: For the second part of the shell.
- Soft Pink: For the shell (Part 1) and the tongue.
- Purple: For the decorative spots on the shell.
- Eye Colors: You can either use Black, Red, and Light Yellow yarn (Option 1) OR use a Light Yellow yarn and fabric paint (Option 2).
Tools & Notions
- Crochet Hook: 2mm (US size D/3 or similar).
- Stuffing: Polyfill or hollowfiber to give your snail its shape.
- Wire: 1/16-inch (1.2mm) gauge wire, approximately 18 inches long, for the internal structure.
- Needle: A long, blunt-tipped tapestry needle for sewing.
- Scissors: For trimming yarn.
- Stitch Markers: At least 4 markers to keep track of your rounds.
- Pins: Sewing pins for holding pieces in place during assembly.
- Adhesives: Super glue (for small details) and a hot glue gun (for the sole and shell).
- Decoration: One 4mm white bead (to act as a tiny tooth) and fabric paint (if choosing Option 2 for the eyes).
- Base Material: A piece of thick cardboard or a plastic lid (like a container lid) to create the rigid bottom of the sole.
US Crochet Abbreviations
Please ensure you are familiar with these standard US terms before starting:
- MR: Magic Ring
- sc: Single crochet
- hdc: Half double crochet
- dc: Double crochet
- ch: Chain
- sl st: Slip stitch
- inc: Increase (2 sc in one stitch)
- 3sc inc: 3 sc in one stitch
- dec: Decrease (2 sc together)
- sc3tog: Decrease 3 sc together
- ch-sp: Chain space
Step-by-Step Instructions
The Body (Blue Yarn)
We begin by crocheting the main body. This piece will house the internal wire to help the snail stand and hold its shape. Use blue yarn and place a stitch marker at the start of every round.
Note on the “Offset Stitch”: In amigurumi, your stitch marker can sometimes shift. To keep your rounds perfectly circular, if you notice the marker moving, simply work one extra single crochet at the end of the round and move your marker one stitch over.
- 6 sc in MR (6)
- 6 inc (12)
- (1 sc, inc) * 6 (18)
- (2 sc, inc) * 6 (24)
- (3 sc, inc) * 6 (30)
- 2 sc, inc, (4 sc, inc) * 5, 2 sc (36)
- (5 sc, inc) * 6 (42)
- 8 sc, inc, 6 sc, inc, 10 sc, inc, 6 sc, inc, 8 sc (46)
- 1 sc, inc, 18 sc, inc, 4 sc, inc, 18 sc, inc, 1 sc (50)
- 1 sc, inc, 3 sc, inc, 38 sc, inc, 3 sc, inc, 1 sc (54)
- 54 sc (54)
- 2 sc, inc, 3 sc, inc, 40 sc, inc, 3 sc, inc, 2 sc (58)
- 26 sc, in front loops only: 1 sc, inc, 2 sc, inc, 1 sc, in back loops only: 26 sc (60)
- 5 sc, inc, 23 sc, 2 inc, 23 sc, inc, 5 sc (64)
- 2 sc, inc, 26 sc, sc3tog, 26 sc, inc, 2 sc (62)
- 9 sc, inc, 18 sc, [work 6 sc together with the 6 half-loops from round 12], 18 sc, inc, 9 sc (64)
Important: Do not use offset stitches between rounds 13 and 20.
Now, we create the mouth opening using the chains created in previous rounds:
- 4 sc, inc, 23 sc, 15 ch, skip 8 sc from the previous row, 23 sc, inc, 4 sc (73)
- 8 sc, inc, 19 sc, inc, 15 ch, skip the 15-ch chain from round 17, inc, 19 sc, inc, 8 sc (77)
- 3 sc, inc, 18 sc, inc, 7 sc, inc, 5 ch, skip the 15-ch chain from round 18, inc, 7 sc, inc, 18 sc, inc, 3 sc (73)
- 34 sc, then working into the 5-ch space from round 19: 2 sc, inc, 2 sc, 27 sc—do not finish the round completely.
Creating the Mouth: Switch to black yarn. Work 5 rounds of 19 sc. Then, (1 sc, dec) * 6, 1 sc (13). Finally, sc3tog, 1 sc (7). Fasten off, leaving a long tail. Stuff the mouth area slightly and push it inward to create a recessed look. Place the chains from rounds 17 and 18 over the top and bottom of the mouth opening to define the edges.
Completing the Body: Return to the blue yarn. Using the remaining unworked stitches from round 19 and 20, work the remaining rounds to complete the body. Ensure you follow the specific increases and decreases outlined in the pattern to reach the final stitch count of 92 sc. Once complete, fasten off and weave in your ends.
The Tentacles (Blue Yarn)
The tentacles will be worked around the wire frame for stability.
- Attach blue yarn to the body about 0.5 inches away from where the wire protrudes. Work 18 sc around the wire (18).
- (4 sc, dec) * 3 (15)
- 15 sc (15)
- (3 sc, dec) * 3 (12)
- 12 sc (12)
- (2 sc, dec) * 3 (9)
- 9 sc (9)
- (1 sc, dec) * 3 (6)
- 6 sc (6)
Fasten off, leaving a long tail for sewing. Repeat for the second tentacle.
The Sole (Light Yellow Yarn)
The sole is worked in rows (not rounds) to create a flat, foot-like shape.
- Ch 7, starting in 2nd ch from hook: inc, 4 sc, inc (8), ch 1, turn.
- inc, 6 sc, inc (10), ch 1, turn.
- inc, 8 sc, inc (12), ch 1, turn.
- inc, 10 sc, inc (14), ch 1, turn.
- inc, 12 sc, inc (16), ch 1, turn.
- 16 sc (16), ch 1, turn.
- inc, 14 sc, inc (18), ch 1, turn.
- Rounds 8-22: 18 sc (15 rows), ch 1, turn.
- dec, 14 sc, dec (16), ch 1, turn.
- Rounds 24-26: 16 sc (3 rows), ch 1, turn.
- dec, 12 sc, dec (14), ch 1, turn.
- 14 sc (14), ch 1, turn.
- dec, 10 sc, dec (12), ch 1, turn.
- 12 sc (12), ch 1, turn.
- dec, 8 sc, dec (10), ch 1, turn.
- dec, 6 sc, dec (8), ch 1, turn.
- 8 sc (8), ch 1, turn.
- dec, 4 sc, dec (6), ch 1, turn.
- dec, 2 sc, dec (4), ch 1, turn.
Do not fasten off. Trace this shape onto your cardboard or plastic lid, cut it out, and glue it to the underside of this yellow piece to create a firm base.
The Shell (Pink and Bright Pink Yarn)
The shell is made of two parts joined together to create volume.
Shell Part 1 (Soft Pink)
- Ch 7, starting in 2nd ch from hook: inc, 4 sc, 4 sc in last ch, 4 sc on other side of chain, inc (16).
- 2 inc, 4 sc, 4 inc, 4 sc, 2 inc (24)
- (1 sc, inc) * 2, 4 sc, (1 sc, inc) * 4, 4 sc, (1 sc, inc) * 2 (32)
- 3 sc, 3sc inc, 8 sc, 3sc inc, 6 sc, 3sc inc, 8 sc, 3sc inc, 3 sc (40)
- Work all subsequent rounds through the back loops only.
- Follow the pattern rounds to create the shape, including the specific decreases and increases to reach the desired size.
Once Part 1 is complete, fold it in half and sew the edges together using 10 sl st. This creates the hollow interior for the shell.
Shell Part 2 (Bright Pink)
This is a long strip that will be glued to Part 1 to give the shell its signature spiral look. Follow the instructions to crochet a long, slightly tapered rectangle. Once finished, glue this strip onto the center of Part 1 in a spiral fashion.
Decoration: Crochet small purple circles (6 sc in MR, then 6 inc) and sew them onto the shell as decorative spots.
The Eyes (Two Options)
You can customize your snail’s expression using one of these two methods:
- Option 1 (Color Change): Crochet the eyes in rounds, changing from black to red to light yellow. Use a slip stitch at the end of each color change and a chain to create a smooth transition.
- Option 2 (Fabric Paint): Crochet the eyes entirely in light yellow yarn. Once finished, use fabric paint to hand-draw the black pupil, the red iris, and tiny white highlights for a “sparkle” effect.
Finishing
Assembly
- Attach the Sole: Use the yarn left from the sole to join it to the body. Use stitch markers (M1, M2, M3, M4) to ensure you are joining the correct points. Work sc around the edge, joining the foot to the base of the body.
- Add the Shell: Secure the shell to the back of the body. You may need to use pins to hold it in place before final sewing or gluing.
- Add the Details: Sew the eyes onto the head area (near the tentacles). Sew the tiny white bead into the mouth to act as a tooth, and sew the pink tongue inside the mouth.
- Hide the Seams: Use a small “tube” of pink crochet (4 sc in MR, then work rounds) to cover the seam where the shell meets the body. Glue this tube in place for a professional look.
Tips for Success
- Stuffing: When stuffing the body and the shell, don’t overstuff! You want the snail to be firm but still have enough “give” to be slightly bendable and cute.
- Wire Safety: Ensure the ends of your wire are tucked deeply into the stuffing and secured so they don’t poke through the crochet fabric.
- Smooth Transitions: When changing colors for the eyes, working a slip stitch and a chain helps prevent a harsh line, making the iris look more natural.
- Glue Control: When using hot glue for the sole or shell, use small amounts to avoid messy residue on your beautiful crochet work.