How to Crochet a Cute Amigurumi Lion Cub Pattern
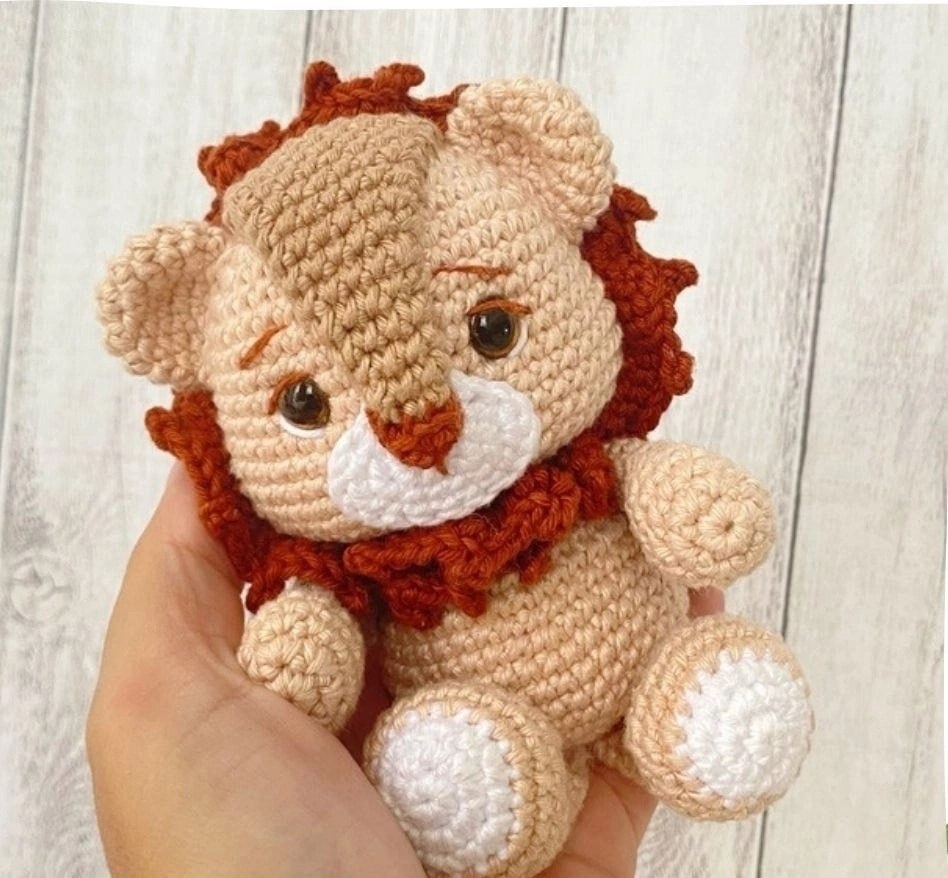
Welcome to this adorable amigurumi tutorial! If you are looking for a project that is both sweet and satisfying to complete, this little lion cub is the perfect choice. This pattern creates a small, palm-sized lion that is ideal for nursery decor, a keychain, or a precious gift for a little one. The combination of the soft cream-colored body and the textured, ruffled mane makes this lion stand out, even for a beginner-level crocheter.
This tutorial is designed to be thorough and easy to follow. We will walk through the creation of the head, the body, the tiny limbs, and that iconic lion mane. By the time you finish, you will have a charming little friend ready to go on adventures!
Materials and Abbreviations
Before we pick up our hooks, let’s make sure you have everything you need. Since this is a small amigurumi, using a smaller hook will ensure your stitches are tight, which prevents the stuffing from peeking through.
Materials Needed
- Yarn: Medium weight (worsted or aran) in the following colors:
- Cream or Almond (main body color)
- White (muzzle and paw accents)
- Brown (muzzle base and tail tip)
- Rust or Dark Orange (mane)
- Crochet Hook: 2 mm (or the size needed to achieve a very tight tension)
- Safety Eyes: 8 mm
- Stuffing: Polyester fiberfill
- Extras: Scissors, sewing needle, and stitch markers
Note: The finished lion cub will be approximately 5 inches tall.
Abbreviations (US Terms)
- MR: Magic Ring
- sc: Single crochet
- inc: Increase (2 sc in one stitch)
- dec: Decrease (sc 2 together)
- ch: Chain
- sl st: Slip stitch
- BLO: Back loop only
- FLO: Front loop only
- Picot: ch 3, sc in the first ch
Step-by-Step Instructions
Head and Body
We will work in continuous rounds for the head and body. Use a stitch marker to keep track of your starting point.
Using Cream yarn:
- R1: 6 sc in MR (6)
- R2: 6 inc (12)
- R3: (1 sc, 1 inc) x 6 (18)
- R4: (2 sc, 1 inc) x 6 (24)
- R5: (3 sc, 1 inc) x 6 (30)
- R6: (4 sc, 1 inc) x 6 (36)
- R7: (5 sc, 1 inc) x 6 (42)
- R8: (6 sc, 1 inc) x 6 (48)
- R9–13: 48 sc
- R14: 11 sc, 2 inc, 22 sc, 2 inc, 11 sc (52)
- R15–17: 52 sc
- R18: (11 sc, 1 dec) x 4 (48)
- R19: (6 sc, 1 dec) x 4 (42)
Eye Placement: Insert the 8mm safety eyes between rows 12 and 13. They should be spaced about 8 stitches apart (or 6 stitches depending on your tension). Use the increases in Row 20 as a guide to ensure the eyes are centered on the “cheeks.”
- R20: 5 sc, 1 dec (36)
- R21: 4 sc, 1 dec (30)
- R22: 3 sc, 1 dec (24). Start stuffing the head firmly.
- R23/1: 24 sl st in FLO (24)
- R23/2: 24 sc in FLO (24)
- R24: 24 sc
- R25: (3 sc, 1 inc) x 3 (30)
- R26: 30 sc
- R27: (4 sc, 1 inc) x 6 (36)
- R28–29: 36 sc
- R30: (5 sc, 1 inc) x 6 (42)
- R31–34: 42 sc
- R35: (5 sc, 1 dec) x 6 (36)
- R36: (4 sc, 1 dec) x 6 (30)
- R37: (3 sc, 1 dec) x 6 (24). Continue stuffing the body.
- R38: (2 sc, 1 dec) x 6 (18)
- R39: (1 sc, 1 dec) x 6 (12)
- R40: 6 dec (6). Fasten off and weave in the ends.
The Muzzle
The muzzle consists of two parts that are sewn together to create a 3D effect.
Muzzle Part 1 (White)
Using White yarn, ch 4. Starting from the 2nd ch from the hook:
- R1: 2 sc, 3 sc in the next st, 2 inc (9)
- R2: 1 sc, 1 inc, 1 sc, 3 sc in the next st, 4 sc, 3 sc in the next st (14)
- R3: 1 sc, 2 inc, 2 sc, 3 sc in the next st, 6 sc, 3 sc in the next st, 1 sc (20)
Sl st to close and leave a long tail for sewing.
Muzzle Part 2 (Brown and Cream)
Using Brown yarn:
- R1: 4 sc in MR (4)
- R2: 4 inc (8). Change to Cream yarn.
- R3: 8 sc in BLO (8)
- R4–5: 8 sc
- R6: (3 sc, 1 inc) x 2 (10)
- R7: 10 sc
- R8: (4 sc, 1 inc) x 2 (12)
- R9: 12 sc
- R10: (5 sc, 1 inc) x 2 (14)
- R11: 14 sc
- R12: (6 sc, 1 inc) x 2 (16)
- R13: 16 sc
- R14: (7 sc, 1 inc) x 2 (18)
- R15: 18 sc
- R16: (8 sc, 1 inc) x 2 (20)
Do not stuff this part. Fold the piece in half and sc through both sides for 10 stitches to close the cone shape.
The Mane
Using Rust/Orange yarn:
- Setup: Ch 53 (adjust this number if you want a larger or smaller mane, but ensure it is an even number).
- R1: 52 inc (104). Work into the 2nd ch from hook.
- R2: (2 sc, picot) repeat 26 times.
Fasten off and leave a long tail for sewing.
Ears (Make 2)
Using Cream yarn:
- R1: 6 sc in MR (6)
- R2: 6 inc (12)
- R3: (1 sc, 1 inc) x 6 (18)
- R4–5: 18 sc
- R6: 1 sc, 1 dec (12)
Do not stuff. Flatten the ears and leave a tail for sewing.
Front Paws (Make 2)
Using Cream yarn:
- R1: 6 sc in MR (6)
- R2: 6 inc (12)
- R3: (3 sc, 1 inc) x 3 (15)
- R4–5: 15 sc
- R6: 1 sc, 1 dec (10)
- R7–12: 10 sc
Stuff only the very tip of the paws. Fold in half and sc through both sides for 5 stitches to close. Leave a tail for sewing.
Back Paws (Make 2)
Start with White yarn:
- R1: 6 sc in MR (6)
- R2: 6 inc (12)
- R3: (1 sc, 1 inc) x 6 (18)
Change to Cream yarn.
- R4: (2 sc, 1 inc) x 6 (24)
- R5–7: 24 sc
- R8: 1 sc, 6 dec, 11 sc (18)
- R9: 4 dec, 10 sc (14)
- R10–12: 14 sc
Stuff only the base of the paws. Fold in half and sc through both sides for 7 stitches to close. Leave a tail for sewing.
The Tail
Start with Brown yarn:
- R1: 4 sc in MR (4)
- R2: (1 sc, 1 inc) x 2 (6)
- R3: (2 sc, 1 inc) x 2 (8)
- R4: (3 sc, 1 inc) x 2 (10)
- R5: 10 sc
- R6: 5 dec (5). Change to Cream yarn.
- R7–12: 5 sc in BLO
Fasten off and leave a tail for sewing.
Finishing and Assembly
This is the most important part! Careful assembly will bring your lion to life. We recommend using stitch markers or pins to hold pieces in place before sewing.
- Muzzle: Sew Muzzle Part 1 onto the head between rows 13 and 19. Then, sew Muzzle Part 2 directly on top of Part 1. The second part should sit centered between the magic ring and the middle of the first part.
- Detailing: Use a needle and thread to embroider a straight line from the tip of the nose downward for one row.
- Ears: Sew the ears onto the head between rows 6 and 11. They should be sewn close to the muzzle.
- Mane: Sew the mane all the way around the head, positioning it behind the ears. It should fit snugly against the muzzle and the ears.
- Front Paws: Sew these onto the body between rows 24 and 28, pointing towards the ears.
- Back Paws: Sew these onto the bottom of the body between rows 34 and 36.
- Tail: Sew the tail to the center of the back between rows 31 and 32.
Tips for Success
Tension is Key: Because amigurumi is worked in rounds, keeping your tension even is vital. If you find your stitches are too loose, try dropping down half a hook size.
Stuffing Technique: When stuffing the head and body, push the fiberfill into the corners so you don’t end up with lumps. However, be careful not to overstuff the neck area, or the head might wobble!
Safety First: If you are making this for a baby or a small child, please consider embroidering the eyes instead of using plastic safety eyes to prevent any choking hazards.
Customization: Don’t be afraid to get creative! You can change the colors of the mane or the paws to make your lion unique. A pink mane or blue paws can make for a very colorful character.
Congratulations! Your adorable lion cub is finished and ready to meet the world!