Crochet Love Gnome Amigurumi Pattern: A Cute Valentine’s DIY Tutorial
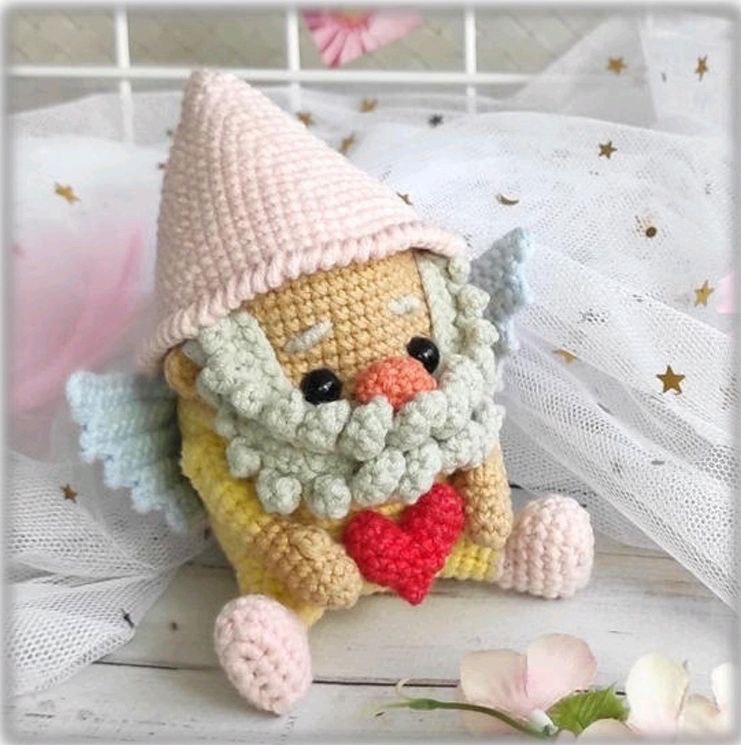
Are you looking for the perfect, heartfelt handmade gift for a loved one? Or perhaps you want to add a touch of whimsical charm to your home decor this Valentine’s Day? Look no further! This adorable Love Gnome is a sweet, beginner-friendly amigurumi project that is sure to melt hearts. With its tiny wings, cozy hat, and a bright red heart, this little fellow is the ultimate symbol of affection.
In this detailed tutorial, we will walk you through every single stitch to create your very own crochet gnome. Whether you are a seasoned pro or just picking up a crochet hook for the first time, this guide is designed to help you succeed. Grab your yarn, find a cozy spot, and let’s get crafting!
Introduction
This Love Gnome is designed to be a small, collectible piece of art. Once finished, the gnome will stand approximately 3.75 inches tall (including the hat), making it the perfect size to sit on a desk, a bookshelf, or even as a centerpiece for a Valentine’s brunch. The pattern uses a combination of standard single crochet and more textured stitches like bobbles and clusters to give the gnome its unique, tactile personality.
The project is broken down into several small components: the head and body, the beard, the nose, the arms, the legs, the ears, the wings, the heart, and the iconic pointy hat. By mastering these small parts, you will build a character that looks professional and high-quality.
Materials & Abbreviations
Before we dive into the stitches, let’s make sure you have everything you need on your crafting table.
Materials Needed
- Yarn: A sport-weight cotton yarn (such as YarnArt Jeans) works best for a clean, defined look. You will need the following colors:
- Light Gray (for the beard and eyebrows)
- Beige (for the head, arms, and ears)
- Orange (for the nose)
- Light Yellow (for the body, arms, and legs)
- Light Pink (for the hat and feet)
- Light Blue (for the wings)
- Red (for the heart)
- Crochet Hook: 2.25 mm (size B) or a size appropriate for your chosen yarn to ensure tight stitches.
- Safety Eyes: One pair of 7 mm black safety eyes.
- Stuffing: High-quality polyester fiberfill.
- Weight: 2 oz (50-60g) of poly-pellets or glass beads to give the gnome a satisfying weight.
- Tools: A long embroidery needle, scissors, stitch markers, and pins.
- Optional: Fabric glue for securing the hat.
Abbreviations (US Terms)
This pattern uses standard American crochet terminology. Please ensure you are familiar with these before starting:
- rnd(s): round(s)
- mr: magic ring
- ch: chain
- sc: single crochet
- sl st: slip stitch
- hdc: half double crochet
- dc: double crochet
- inc: increase (2 sc in the same stitch)
- dec: decrease (invisible decrease is recommended for a seamless look)
- sc4tog: a cluster stitch (4 or 5 sc worked into the same space and pulled through together)
- bobble/bubble stitch: a textured stitch used for the beard and arms
- BLO: back loop only
- (…) *n: repeat the instructions within the parentheses n times
- (n): the total number of stitches at the end of the round
Step-by-Step Instructions
The Arms (Make 2)
Start with beige yarn.
Rnd 1: 6 sc in a magic ring (6)
Rnd 2: (inc, sc, inc) repeat 2 times (10)
Rnd 3-4: sc in each stitch around (10)
Rnd 5: 4 sc, bobble stitch, 5 sc (10)
Rnd 6: sc in each stitch around (10). Place a tiny bit of stuffing in the hand only.
Rnd 7: (3 sc, dec) repeat 2 times (8). Change color to light yellow.
Rnd 8-14: sc in each stitch around (8)
Rnd 15: (2 sc, inc, 2 sc, inc, inc) (11). Attach yarn to the other side of the chain to complete the oval shape. Fasten off, leaving a long tail for sewing.
The Nose
Start with orange yarn.
Rnd 1: 6 sc in a magic ring (6)
Rnd 2: (inc, sc) repeat 3 times (9)
Rnd 3-4: sc in each stitch around (9). Stuff the nose lightly.
Rnd 5: (sc, dec) repeat 3 times (6). Fasten off, leaving a long tail. Use your needle to close the hole completely.
The Beard
The beard is created in two parts: a base and textured strands. This gives the gnome its “fluffy” look.
The Base: Use light gray yarn.
Rnd 1: 7 sc, 3 inc, 7 sc, 3 inc, 7 sc (27)
Rnd 2: To create the strands, you will work small loops. For each strand (N), start from the 2nd chain from the hook: (N-1) sc, skip 1 stitch on the base, and sl st into the next stitch. For example, “Strand 3” means you do 2 sc, skip 1, then sl st. Repeat this to create 13-15 strands of varying lengths to create a natural, uneven look.
Rnd 3: In the remaining stitches: 8 sc, inc 3, 9 sc, inc 3, 8 sc (31). Turn your work.
Rnd 4: (Strand 3) * 3, then single strands for 4, 5, 6, 7, 8, 7, 6, 5, 4, then (Strand 3) * 3. This will give you 15 strands total. Fasten off.
The Body and Head
Start with light yellow yarn.
Rnd 1: 6 sc in a magic ring (6)
Rnd 2: 6 inc (12)
Rnd 3: (sc, inc) repeat 6 times (18)
Rnd 4: (sc, inc, sc) repeat 6 times (24)
Rnd 5: (3 sc, inc) repeat 6 times (30)
Rnd 6: (2 sc, inc, 2 sc) repeat 6 times (36)
Rnd 7: (5 sc, inc) repeat 6 times (42)
Rnd 8: BLO: (13 sc, inc) repeat 3 times (45)
Rnd 9: (7 sc, inc, 7 sc) repeat 3 times (48)
Rnd 10: (15 sc, inc) repeat 3 times (51)
Rnd 11: (8 sc, inc, 8 sc) repeat 3 times (54)
Rnd 12-21: sc in each stitch around (54). At the end of Rnd 21, change color to beige.
Rnd 22: (8 sc, dec, 8 sc) repeat 3 times (51)
Rnd 23-24: sc in each stitch around (51)
Rnd 25: (15 sc, dec) repeat 3 times (48)
Rnd 26-27: sc in each stitch around (48)
Rnd 28: (14 sc, dec) repeat 3 times (45)
Rnd 29: sc in each stitch around (45)
Rnd 30: 13 sc, 2 sc through the left side of the beard and head together, 15 sc, 2 sc through the right side of the beard and head together, 13 sc (45). Note: This incorporates the beard base into the head structure.
Eye Placement: Place the safety eyes between rounds 24 and 25, leaving 7 stitches (5 visible stitches) between them.
Rnd 31: (13 sc, dec) repeat 3 times (42)
Rnd 32-33: sc in each stitch around (42)
Rnd 34: (5 sc, dec) repeat 6 times (36)
Stuffing Note: Add your 2 oz of weight to the bottom of the body now, then fill the rest with fiberfill.
Rnd 35: (2 sc, dec, 2 sc) repeat 6 times (30)
Rnd 36: (3 sc, dec) repeat 6 times (24)
Rnd 37: (sc, dec, sc) repeat 6 times (18)
Rnd 38: (sc, dec) repeat 6 times (12)
Rnd 39: 6 sc (6). Fasten off and close the hole using your needle.
The Ears (Make 2)
Use beige yarn.
Rnd 1: In a magic ring: 2 ch, 5 dc (6). Fasten off, leaving a long tail for sewing.
The Legs (Make 2)
Start with light pink yarn.
Rnd 1: Ch 11. Starting from the 2nd ch from hook: 1 pr, 2 sc, 4 sc in the last ch, then work on the other side of the chain: 3 sc (11)
Rnd 2: (2 inc, 2 sc, 4 inc, 2 sc, inc) (18)
Rnd 3-4: sc in each stitch around (18)
Rnd 5: (dec, 4 sc, 4 dec, 4 sc) (13)
Rnd 6: 5 sc, 4 sc4tog, 4 sc (10). Change color to light yellow.
Rnd 7-8: sc in each stitch around (10)
Rnd 9: (inc, 4 sc) * 2 (12)
Rnd 10: (2 sc, inc) * 4 (16)
Rnd 11: 8 sc, 4 inc, 4 sc (20). Fasten off, leaving a long tail. Stuff the legs firmly.
The Heart
Use red yarn.
Rnd 1: 6 sc in a magic ring (6)
Rnd 2: (inc, sc) repeat 3 times (9)
Rnd 3: sc in each stitch around (9). Sl st to join and cut the yarn.
Create a second identical piece: Do not join or cut the yarn. Instead, join the two pieces together at Rnd 4: 4 sc, dec, 3 sc on the first piece, then 4 sc, dec, 3 sc on the second piece (16). Continue with (sc, dec, sc) * 4 (12), then (sc, dec) * 4 (8), then (sc, dec) * 4 (4). Fasten off and close.
The Hat
Use light pink yarn.
Rnd 1: 6 sc in a magic ring (6)
Rnd 2: (sc, inc) repeat 3 times (9)
Rnd 3: (sc, inc, sc) repeat 3 times (12)
Rnd 4: (3 sc, inc) repeat 3 times (15)
Rnd 5: (2 sc, inc, 2 sc) repeat 3 times (18)
Rnd 6: (5 sc, inc) repeat 3 times (21)
Rnd 7: (3 sc, inc, 3 sc) repeat 3 times (24)
Rnd 8: (7 sc, inc) repeat 3 times (27)
Rnd 9: (4 sc, inc, 4 sc) repeat 3 times (30)
Rnd 10: (9 sc, inc) repeat 3 times (33)
Rnd 11: (5 sc, inc, 5 sc) repeat 3 times (36)
Rnd 12: (11 sc, inc) repeat 3 times (39)
Rnd 13: (6 sc, inc, 6 sc) repeat 3 times (42)
Rnd 14: (13 sc, inc) repeat 3 times (45)
Rnd 15: (7 sc, inc, 7 sc) repeat 3 times (48)
Rnd 16: (15 sc, inc) repeat 3 times (51)
Rnd 17: (8 sc, inc, 8 sc) repeat 3 times (54)
Rnd 18: (17 sc, inc) repeat 3 times (57)
Rnd 19: (9 sc, inc, 9 sc) repeat 3 times (60)
Rnd 20: (19 sc, inc) repeat 3 times (63). Sl st to join.
Rnd 21: sc in each stitch around (63). For the textured finish, use the cluster stitch: insert hook, yarn over, pull through, yarn over, pull through 2 loops. Repeat this for a textured look.
Fasten off, leaving a long tail. You can sew the hat to the head or use a tiny bit of glue for a permanent hold.
The Wings (Make 2)
Use light blue yarn. This part is worked in rows rather than rounds.
Foundation: Ch 20. Starting from the 2nd ch from the hook:
Row 1: 19 sc (19)
Row 2: 17 sc (17)
Row 3: 16 sc (16)
Row 4: 14 sc (14)
Row 5: 13 sc (13)
Row 6: 11 sc (11)
Row 7: 11 sc, sc in the 4th row stitch, sc in the 2nd row stitch (13)
Row 8: 11 sc (11)
Row 9: 11 sc, 2 sc along the side, sl st into the first ch (14). Fasten off.
Finishing
Now comes the magic! Assembly is where your gnome truly comes to life. Use pins to position everything before sewing to ensure perfect symmetry.
- The Beard: Sew the beard base to the head just below the eyes.
- The Nose: Sew the orange nose centered between the eyes, partially overlapping the beard.
- The Ears: Pin the ears to the sides of the head between rounds 24 and 27, tucked just behind the beard.
- The Legs: Sew the legs to the bottom of the body between rounds 8 and 13.
- The Arms: Sew the arms to the sides of the body, just below where the ears are located.
- The Wings: Pin the wings to the back of the body. For a more 3D look, don’t pin them perfectly flat; give them a slight outward curve.
- The Heart: Finally, sew the little red heart onto the arms of the gnome.
- The Hat: Place the hat on the head. Ensure it covers the back of the head.
Tips
- Steam Blocking: For professional-looking wings, lightly steam them with an iron (be careful not to melt the yarn!) to help them hold their shape.
- Stuffing is Key: Don’t be afraid to stuff! A well-stuffed amigurumi holds its shape much better and looks more premium. However, make sure to stuff the arms and legs evenly so they don’t look lopsided.
- Weight Placement: When adding the weight beads, ensure they are at the very bottom of the body. This lowers the center of gravity and helps the gnome sit upright. If your beads are very small, consider sewing them into a tiny scrap of fabric first to prevent them from poking through the stitches.
- Symmetry: Always double-check that the eyes, ears, and arms are even. A little bit of trial and error with pins will save you a lot of frustration!