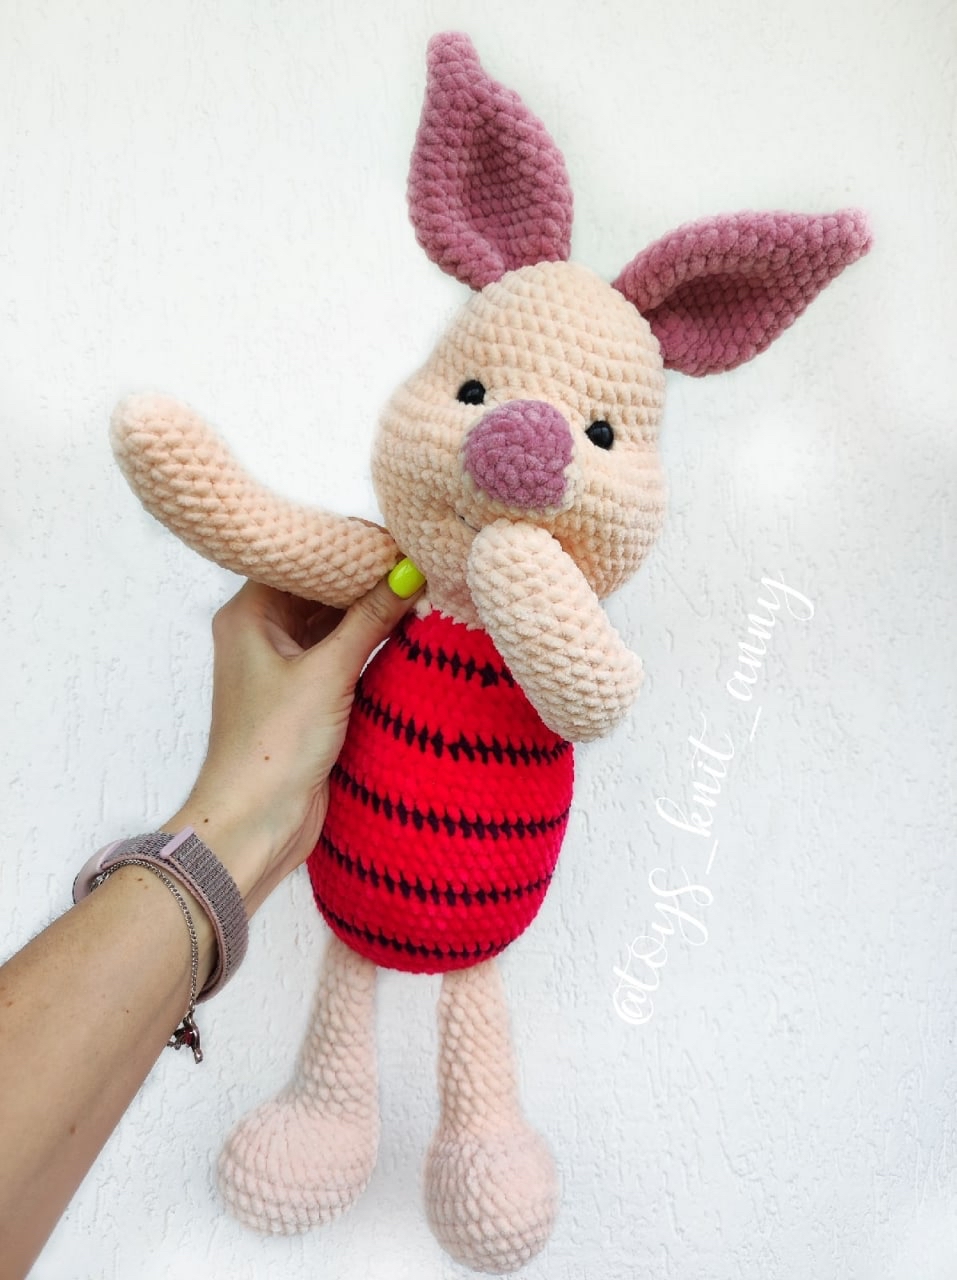
How to Crochet an Adorable Amigurumi Pig: A Step-by-Step Beginner’s Guide
If you are looking for your next cozy crochet project, look no further! This adorable, chubby amigurumi pig is the perfect addition to your handmade collection. Whether you are looking to create a unique gift for a child or simply want to treat yourself to a new plushie friend, this pattern is designed to be fun, engaging, and rewarding. Using soft, velvet-style chenille yarn, this little piggie turns out incredibly huggable and sweet.
In this tutorial, we will walk through the process of creating every part of this character—from the expressive face and oversized ears to the striped body. This guide is written with beginners in mind, using standard US crochet terms, making it easy to follow along even if you are just starting your amigurumi journey.
Materials & Abbreviations
To ensure your pig turns out looking exactly like the photos, I recommend using velvet or chenille-style yarn. This gives the toy that signature “marshmallow” feel.
Yarn Requirements
- Main Body Color (Cream/Peach): Approximately 1.5 skeins of velvet yarn (such as YarnArt Dolce 779 or Himalaya Dolphin 353).
- Secondary Body Color (Pink/Red): Approximately 0.5 skein of velvet yarn (such as YarnArt Dolce 759 or Himalaya Dolphin 314).
- Stripe Color (Dark Pink/Black): A small amount of velvet yarn (such as Himalaya Dolphin 310).
- Accent Color (Dark Pink): A small amount of velvet yarn (such as YarnArt Dolce 769) for the nose and ears.
Tools & Notions
- Crochet Hook: 4.5 mm (standard for this yarn weight).
- Safety Eyes: 12 mm.
- Stuffing: Polyfill or holofiber.
- Embroidery Thread: Black thread for the mouth.
- Other: Scissors and a large tapestry needle for sewing and face sculpting.
US Crochet Abbreviations
- MR: Magic Ring
- ch: Chain
- sc: Single crochet
- inc: Increase (2 sc in one stitch)
- dec: Decrease (2 sc together)
- sl st: Slip stitch
Note: Please remember to stuff all pieces as you work!
Step-by-Step Instructions
The Head
Using the Main Body Color.
- R1: 6 sc in MR (6)
- R2: 6 inc (12)
- R3: (1 sc, inc) x 6 (18)
- R4: (2 sc, inc) x 6 (24)
- R5: (3 sc, inc) x 6 (30)
- R6: (4 sc, inc) x 6 (36)
- R7: 36 sc
- R8: (5 sc, inc) x 6 (42)
- R9-12: 42 sc (4 rounds)
Creating the Cheeks
Starting from the next round, we will create the “bulge” for the cheeks to give the face character.
- R13: 6 sc, (inc, 1 sc) x 2, 5 inc (cheek section), (1 sc, inc) x 3 (snout area), 1 sc, 5 inc (cheek section), (1 sc, inc) x 2, 11 sc (59)
- R14: 6 sc, (2 sc, inc) x 2, (1 sc, inc) x 5 (cheek), (2 sc, inc) x 3, 1 sc, (1 sc, inc) x 5 (cheek), (2 sc, inc) x 2, 11 sc (76)
- R15: 76 sc
- R16: 6 sc, (2 sc, dec) x 2, (1 sc, dec) x 5 (cheek), (2 sc, dec) x 3, 1 sc, (1 sc, dec) x 5 (cheek), (2 sc, dec) x 2, 11 sc (59)
- R17: 59 sc
- R18: 10 sc, dec, 9 sc, dec, 7 sc, dec, 10 sc, dec, 13 sc, dec (54)
- R19: 54 sc
- R20: (7 sc, dec) x 6 (48)
- R21: 48 sc
- R22: (6 sc, dec) x 6 (42)
- R23: 42 sc
- R24: (5 sc, dec) x 6 (36)
- R25: (4 sc, dec) x 6 (30)
- R26: (3 sc, dec) x 6 (24)
- R27: 24 sc, sl st.
Leave a long tail for sewing. Insert the 12mm safety eyes between rounds 11 and 12, approximately 5-6 sc apart. Stuff the head firmly.
The Ears
Using the Accent Color (Dark Pink). Do not stuff.
- R1: 6 sc in MR (6)
- R2: 6 sc (6)
- R3: (1 sc, inc) x 3 (9)
- R4: (2 sc, inc) x 3 (12)
- R5: (3 sc, inc) x 3 (15)
- R6: (4 sc, inc) x 3 (18)
- R7: (5 sc, inc) x 3 (21)
- R8: (6 sc, inc) x 3 (24)
- R9: (7 sc, inc) x 3 (27)
- R10-12: 27 sc (3 rounds)
- R13: (7 sc, dec) x 3 (24)
- R14: (6 sc, dec) x 3 (21)
- R15: (5 sc, dec) x 3 (18)
- R16: (4 sc, dec) x 3 (15), sl st.
Leave a tail for sewing. Attach the ears to the head between rounds 3 and 6.
The Nose (Snout)
Using the Accent Color (Dark Pink).
- R1: 6 sc in MR (6)
- R2: 6 inc (12)
- R3: (3 sc, 3 sc in one stitch) x 3 (18)
Switch to the Main Body Color for rounds 4 and 5: 18 sc (2 rounds). Leave a tail for sewing. Sew the nose between rounds 12/13 and 17/18 of the head.
The Body
Use the Secondary Color (Pink/Red) for the main body and the Stripe Color (Dark Pink/Black) for the stripes.
- R1: 6 sc in MR (6)
- R2: 6 inc (12)
- R3: (1 sc, inc) x 6 (18)
- R4: (2 sc, inc) x 6 (24)
- R5: (3 sc, inc) x 6 (30)
- R6: (4 sc, inc) x 6 (36)
- R7: (5 sc, inc) x 6 (42)
- R8: (6 sc, inc) x 6 (48)
- R9: (7 sc, inc) x 6 (54)
- R10: Stripe Color (54 sc)
- R11-14: Secondary Color (54 sc for 4 rounds)
- R15: Stripe Color (54 sc)
- R16-19: Secondary Color (54 sc for 4 rounds)
- R20: Stripe Color (54 sc)
- R21-22: Secondary Color (54 sc for 2 rounds)
- R23: (7 sc, dec) x 2, 7 sc, dec, 1 sc, dec, (7 sc, dec) x 2, 6 sc (48)
- R24: 48 sc
- R25: Stripe Color (48 sc)
- R26: (6 sc, dec) x 6 (42)
- R27: 42 sc
- R28: (5 sc, dec) x 6 (36)
- R29: 36 sc
- R30: Stripe Color (4 sc, dec) x 6 (30)
- R31: Secondary Color (30 sc)
- R32: (3 sc, dec) x 6 (24)
- R33: 24 sc, sl st.
Leave a tail. Stuff the body very firmly.
The Arms
Using the Main Body Color.
- R1: 6 sc in MR (6)
- R2: 6 inc (12)
- R3: (3 sc, inc) x 3 (15)
- R4-19: 15 sc (16 rounds)
- R20: (3 sc, dec) x 3 (12)
- R21: 12 sc
- R22: (2 sc, dec) x 3 (9)
- R23: 9 sc.
Stuff the bottom of the arms firmly and the tops lightly. Fold the arm in half and crochet through both sides: 5 sc. Leave a tail. Sew the arms to the last round of the body.
The Legs
Using the Main Body Color.
Start by making a chain of 7. Starting from the 2nd chain from the hook: 5 sc, 3 sc in the last stitch. On the other side of the chain: 4 sc, 1 inc (14).
- R2: inc, 4 sc, 3 inc, 4 sc, 2 inc (20)
- R3: 1 sc, inc, 4 sc, (1 sc, inc) x 3, 4 sc, (1 sc, inc) x 2 (26)
- R4: 2 sc, inc, 4 sc, (2 sc, inc) x 3, 4 sc, (2 sc, inc) x 2 (32)
- R5-7: 32 sc (3 rounds)
- R8: 9 sc, 6 dec, 11 sc (26)
- R9: 4 sc, dec, 3 sc, 3 dec, 3 sc, dec, 6 sc (21)
- R10: 5 sc, 6 dec, 4 sc (15)
- R11-14: 15 sc (4 rounds)
- R15: (3 sc, dec) x 3 (12)
- R16-18: 12 sc (3 rounds)
- R19: (2 sc, dec) x 3 (9)
- R20-21: 9 sc (2 rounds)
- R22: dec, 7 sc (8).
Stuff the foot and the bottom 1/3 of the leg firmly. Do not stuff the top part. Fold the leg in half and sew the sides together with 4 sc. Sew the legs to the body between rounds 5 and 6.
Finishing
Face Sculpting (The Secret to the Look!)
To give your pig that adorable, expressive look, you need to “sculpt” the face using a needle and thread. This is what brings the character to life!
- Mouth Corners: Move 2 rows down from the nose. Using a needle and thread, pull the stuffing inward at the corners of the mouth. The distance between these two indentations should be about 8 sc.
- Between the Eyes: You can also create a slight indentation between the eyes to give the face more depth. Pull the thread inward about 5-6 sc apart.
- The Mouth: Use your black embroidery thread to sew a simple, cute mouth in two strands.
Assembly
Once all pieces are sculpted and the eyes are in place, sew the head, ears, nose, arms, and legs onto the body as instructed. Ensure your tension is even so the stuffing doesn’t show through the velvet yarn.
Tips for Success
- Tension is Key: When working with velvet yarn, it can be easy to lose your stitches. Use stitch markers religiously!
- Consistent Stuffing: For amigurumi, “firm” is usually better than “soft” to ensure the shape holds over time, especially for the body and feet.
- Sculpting with Care: When pulling thread through the head to create indentations, don’t pull *too* hard, or you might distort the shape of the head entirely. Small, controlled pulls are best.
- Safety First: If this is for a very small child, consider embroidering the eyes instead of using plastic safety eyes for extra safety.