DIY Crochet Plush Frog Pattern: A Cute Amigurumi Tutorial
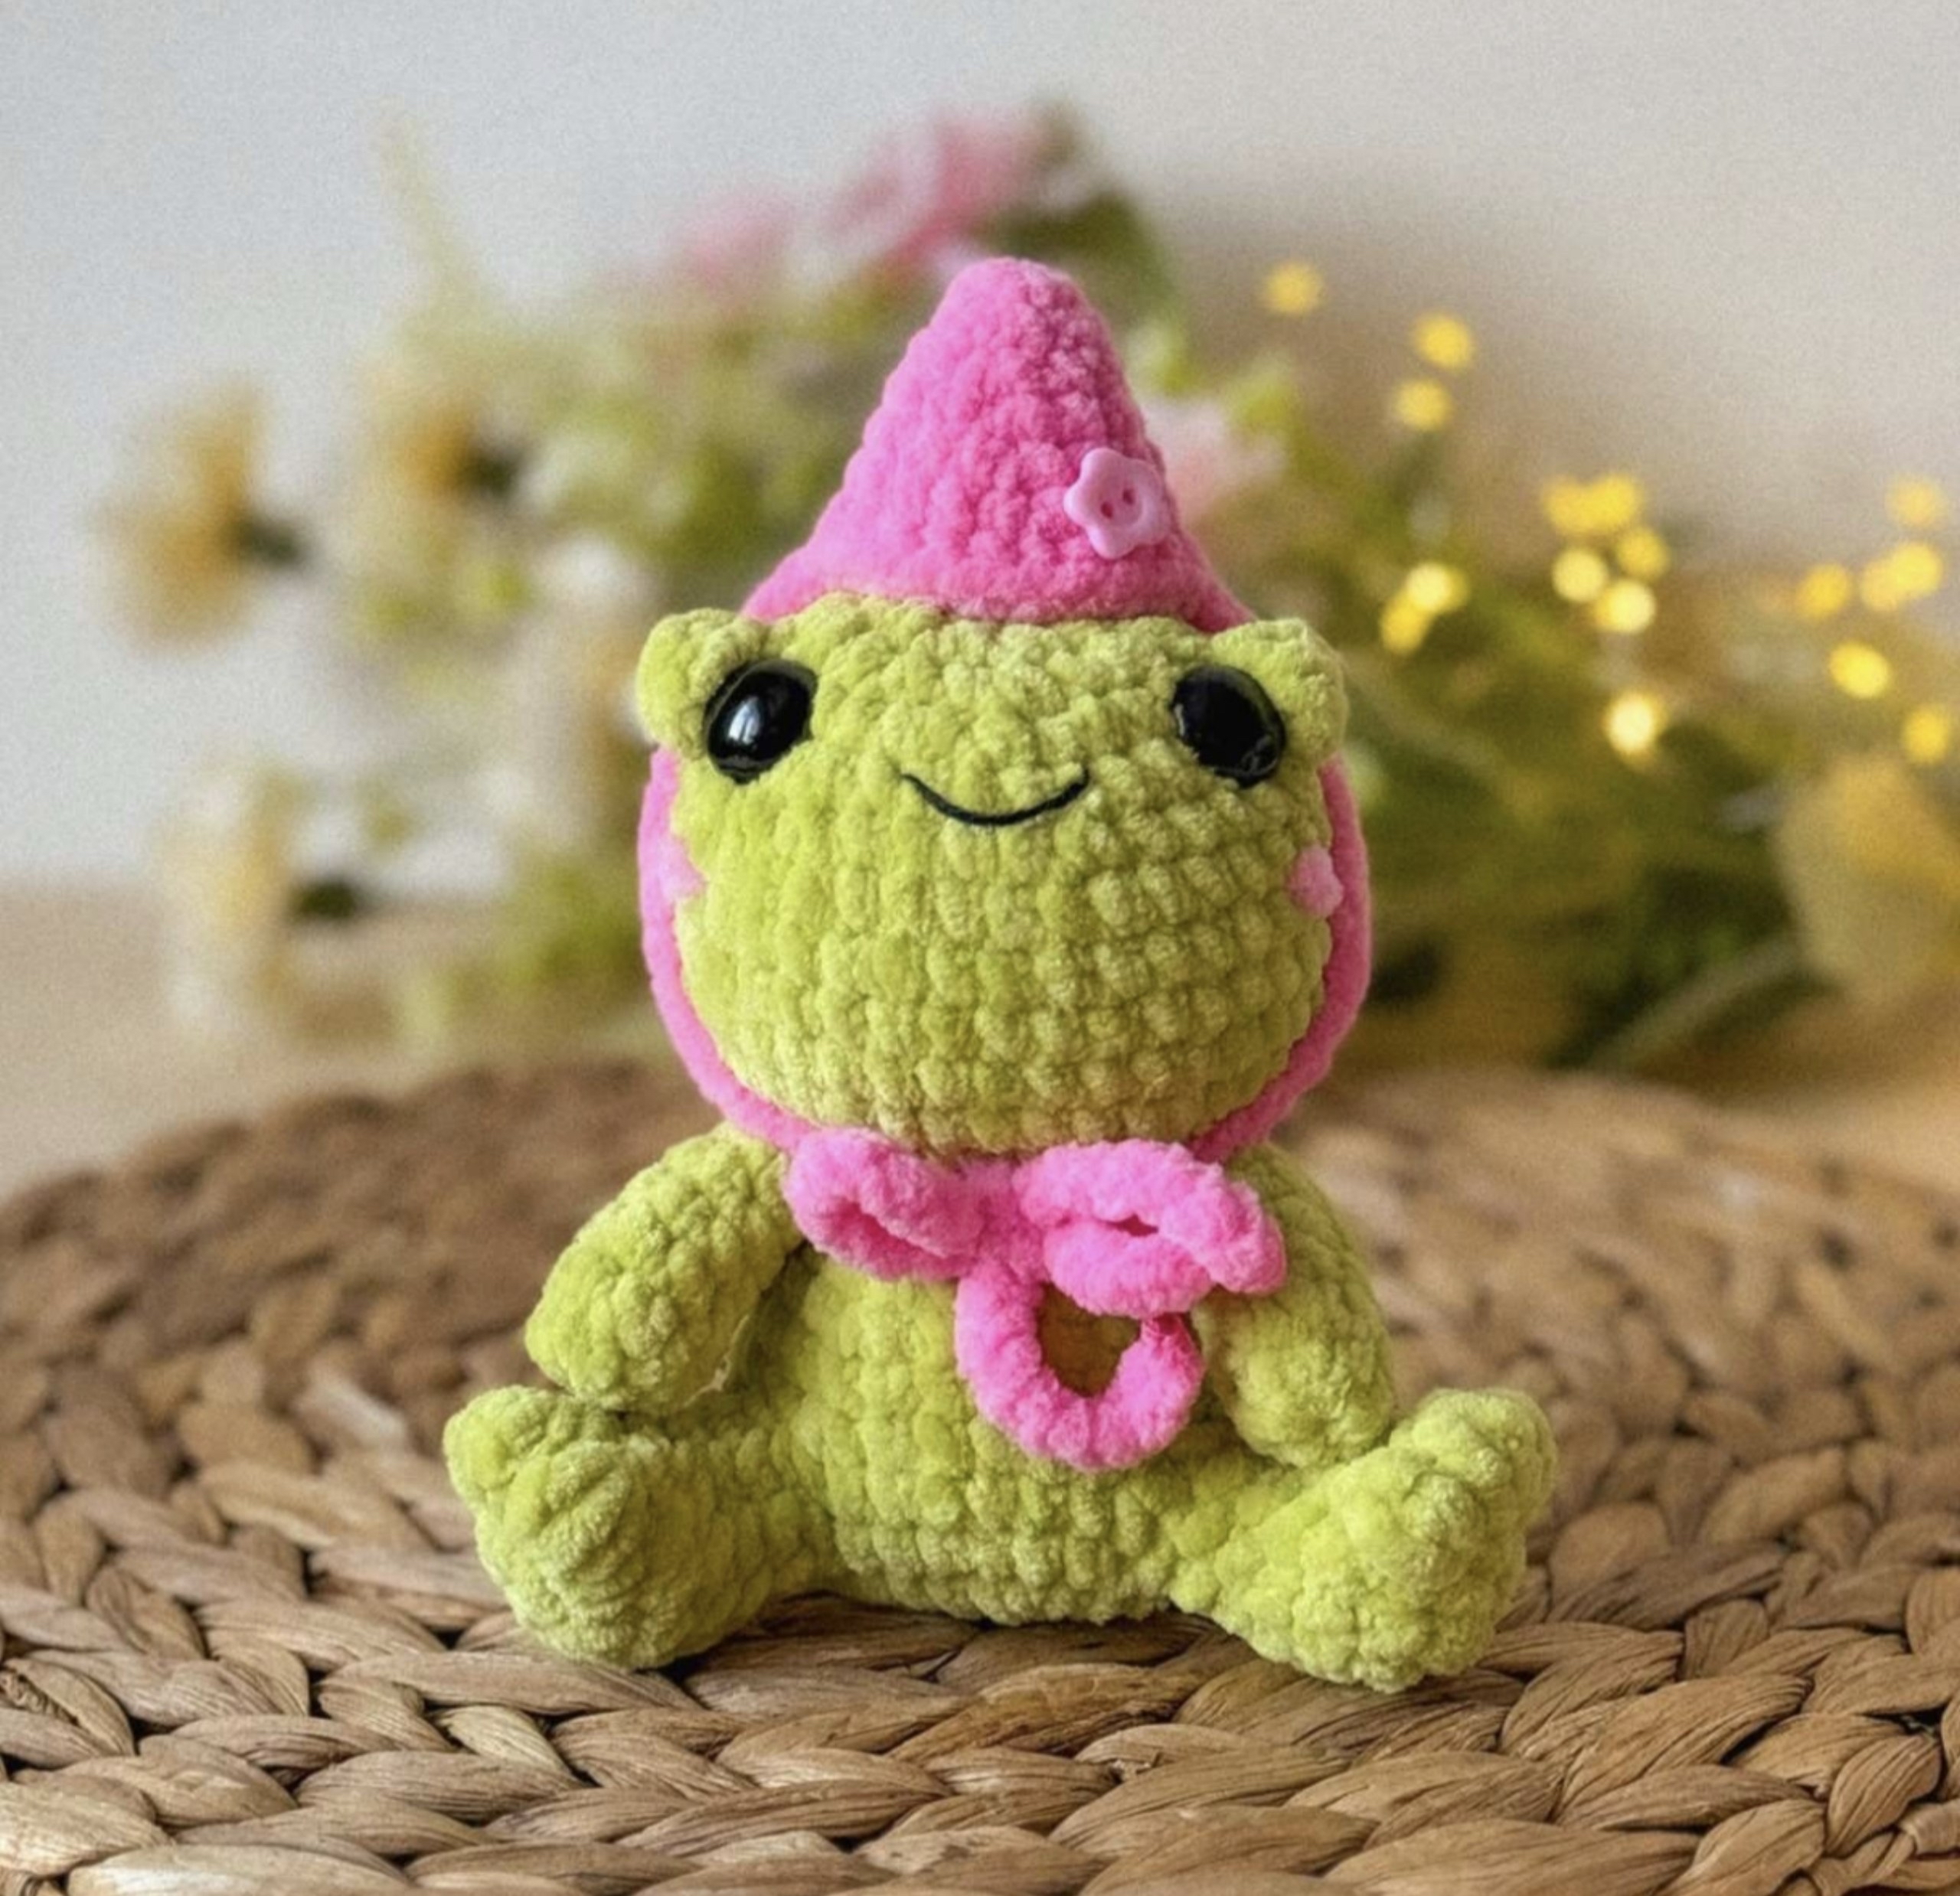
Are you looking for your next adorable crochet project? There is nothing quite as charming as a squishy, round amigurumi animal to brighten up a nursery or decorate a desk. Today, we are diving into a detailed tutorial for creating a delightful plush frog wearing a festive party hat! This little green friend is incredibly soft, perfect for cuddling, and uses velvet-style plush yarn to give it that high-end, boutique look.
This pattern is designed to be beginner-friendly, focusing on basic stitches while introducing some fun textures like bobble stitches. By the end of this tutorial, you will have a little frog approximately 5 inches tall, ready to party!
Introduction
This crochet plush frog is a wonderful project for anyone looking to practice working with chenille or “plush” yarns. Because these yarns are thicker and fluffier than standard cotton, they tend to hide stitch definition, which is actually great for making seamless-looking toys! We will be working in continuous rounds to create a smooth, professional finish. This pattern is structured so that the limbs are worked directly into the body, reducing the amount of sewing required later on.
Materials & Abbreviations
Materials Needed
- Plush Yarn (Green): Approximately 1.6 oz (45g) of a chenille-style yarn (e.g., YarnArt Dolce in color #799).
- Plush Yarn (Pink): A small amount of pink chenille yarn for the party hat (e.g., Wolans Bunny Baby #06).
- Crochet Hook: 3.5 mm (US size E/4) or a size that produces a tight tension.
- Safety Eyes: 14 mm black safety eyes.
- Stuffing: High-quality polyester fiberfill.
- Embroidery Floss: Black for the mouth and pink for the rosy cheeks.
- Other Tools: Scissors, a large-eye tapestry needle, a stitch marker, and a crochet marker.
US Crochet Abbreviations
All measurements are in inches unless otherwise noted. Work in continuous rounds unless stated otherwise.
- MR: Magic Ring
- ch: Chain
- sl st: Slip stitch
- sc: Single crochet
- inc: Increase (2 sc in one stitch)
- dec: Decrease (sc 2 together)
- hdc: Half double crochet
- dc: Double crochet
- tr: Treble crochet
- st(s): Stitch(es)
- BLO: Back loops only
- FLO: Front loops only
Note: For the “Bobble Stitch” used in this pattern, work 3 dc into the same stitch, then slip stitch into the base of those stitches to secure them.
Step-by-Step Instructions
Making the Legs (Make 2)
The legs feature a unique textured “bobble” that creates the look of little froggy toes.
- Round 1: 8 sc in a MR (8)
- Round 2: 2 inc, [Bobble stitch (3 dc into one stitch, then sl st to the base), sl st into the base of the bobble] x 3, 2 inc, 1 sc (12)
- Round 3: 5 sc, (skip the loop left over from the slip stitch, 1 sc) x 2, skip the next loop, 5 sc (12). Tip: Skipping these loops is what gives the foot its shape!
- Round 4: 3 sc, 3 dec, 3 sc (9)
- Rounds 5-6: 9 sc (9)
Fasten off, leaving a long tail for sewing. Stuff the legs firmly, shaping them so they have a flat heel and a flat sole. Pull the bobbles outward to make them prominent. Repeat for the second leg.
Making the Arms (Make 2)
The arms are worked as flat tubes and will be joined to the body later.
- Round 1: 8 sc in a MR (8)
- Rounds 2-6: 8 sc (8)
Do not stuff the arms. Instead, fold the two sides of the tube together and work 3 sc through both layers to close the arm. Fasten off, leaving a long tail.
Crafting the Body
The body is the foundation of your frog. When working with plush yarn, we recommend using a chain loop instead of a magic ring for a more secure start.
- Round 1: Ch 2, then work the required number of sc into the second ch from the hook to form a ring (8).
- Round 2: 8 inc (16)
- Round 3: (1 sc, 1 inc) x 8 (24)
- Round 4: (2 sc, 1 inc) x 8 (32)
Attaching the Legs
We will now join the legs to the body in Rounds 5 and 6. Ensure the “toes” of the legs are pointing upward.
- Round 5: 8 sc along the body. Pick up the first leg: count 2 stitches from the last stitch of the leg, then work 5 sc through both the leg and the body. Continue with 6 sc along the body. Pick up the second leg: work 5 sc through both the leg and the body, then finish with 8 sc along the body (32).
- Round 6: 8 sc, 1 dec (joining body and leg), 2 sc along the leg, 1 dec (joining leg and body), 6 sc along the body, 1 dec (joining body and leg), 2 sc along the leg, 1 dec (joining leg and body), 8 sc. Add 1 extra stitch to ensure your marker stays centered on the back (30).
Important: Stuff the legs completely so they sit straight and parallel to the floor.
Attaching the Arms
- Round 7: (4 sc, 1 dec) x 5 (25)
- Round 8: 25 sc (25)
- Round 9: (3 sc, 1 dec) x 5 (20)
- Round 10: 20 sc (20)
- Round 11: 3 sc along the body. Place the first arm against the body and work 1 sc through only the very first loop of the arm and the body. Continue 3 sc, 1 dec, 2 sc, 1 dec, 3 sc. Now, join the second arm by working 1 sc through only the very last loop of the arm and the body. Finish with 3 sc along the body (18).
- Round 12: 4 sc along the body, 2 sc through the remaining loops of the first arm, 3 dec, 2 sc through the remaining loops of the second arm, and 4 sc along the body (15).
Stuff the body firmly, but make sure the bottom remains flat so the frog can sit upright.
Shaping the Head
- Round 13: 15 inc in the Front Loops Only (30)
- Round 14: 6 sc, [(inc, 1 sc) x 2, inc, 8 sc, (inc, 1 sc) x 2, inc, 6 sc] (36)
- Rounds 15-19: 36 sc (36)
- Round 20: (4 sc, 1 dec) x 6, plus 2 offset stitches to ensure the marker is centered (30).
- Round 21: 7 sc, Bobble stitch (4 tr into one stitch, sl st to base), 13 sc, Bobble stitch, 8 sc (30). Tip: Place these bobbles above the arms on the sides of the head.
- Round 22: (3 sc, 1 dec) x 6 (24)
- Round 23: (1 sc, 1 dec) x 8 (16)
Insert the 14 mm safety eyes approximately two rows below the bobble stitches. Stuff the head firmly.
The Festive Party Hat
We will work the hat from the top down.
- Round 1: 6 sc in a MR (6)
- Round 2: (1 sc, 1 inc) x 3 (9)
- Round 3: (2 sc, 1 inc) x 3 (12)
- Round 4: (3 sc, 1 inc) x 3 (15)
- Round 5: (4 sc, 1 inc) x 3 (18)
- Round 6: (5 sc, 1 inc) x 3 (21)
- Round 7: 21 sc (21)
Sl st in the next stitch and ch 40. Fasten off. To create the second tie, count 11 stitches from the first tie, join with a sl st, and ch another 40. Fasten off and carefully trim/seal the ends of the yarn ties.
Finishing
Now it’s time to bring your frog to life! Follow these steps to complete the character:
- The Mouth: Using black embroidery floss, stitch a small, happy smile. If you want the smile to hold its shape, you can apply a tiny amount of fabric glue to the thread.
- The Cheeks: Use pink embroidery floss to stitch two small, rosy lines or circles just below the eyes.
- The Hat Decoration: You can sew a small button or a tiny crocheted flower onto the pink hat to add extra personality.
Tips
- Maintain Symmetry: When attaching the legs and arms, always check that they are even on both sides. If your limbs are naturally angled differently, you may need to adjust your stitch counts slightly to keep the frog looking balanced.
- Tension Control: Plush yarn can be tricky. If you find your stitches are too loose, try using a slightly smaller hook to ensure the stuffing doesn’t peek through.
- Sitting Upright: To ensure your frog sits perfectly, make sure the bottom of the body is stuffed firmly but stays flat.
- Color Play: Don’t be afraid to get creative! You can make the party hat multi-colored by changing yarn colors every round for a rainbow effect.