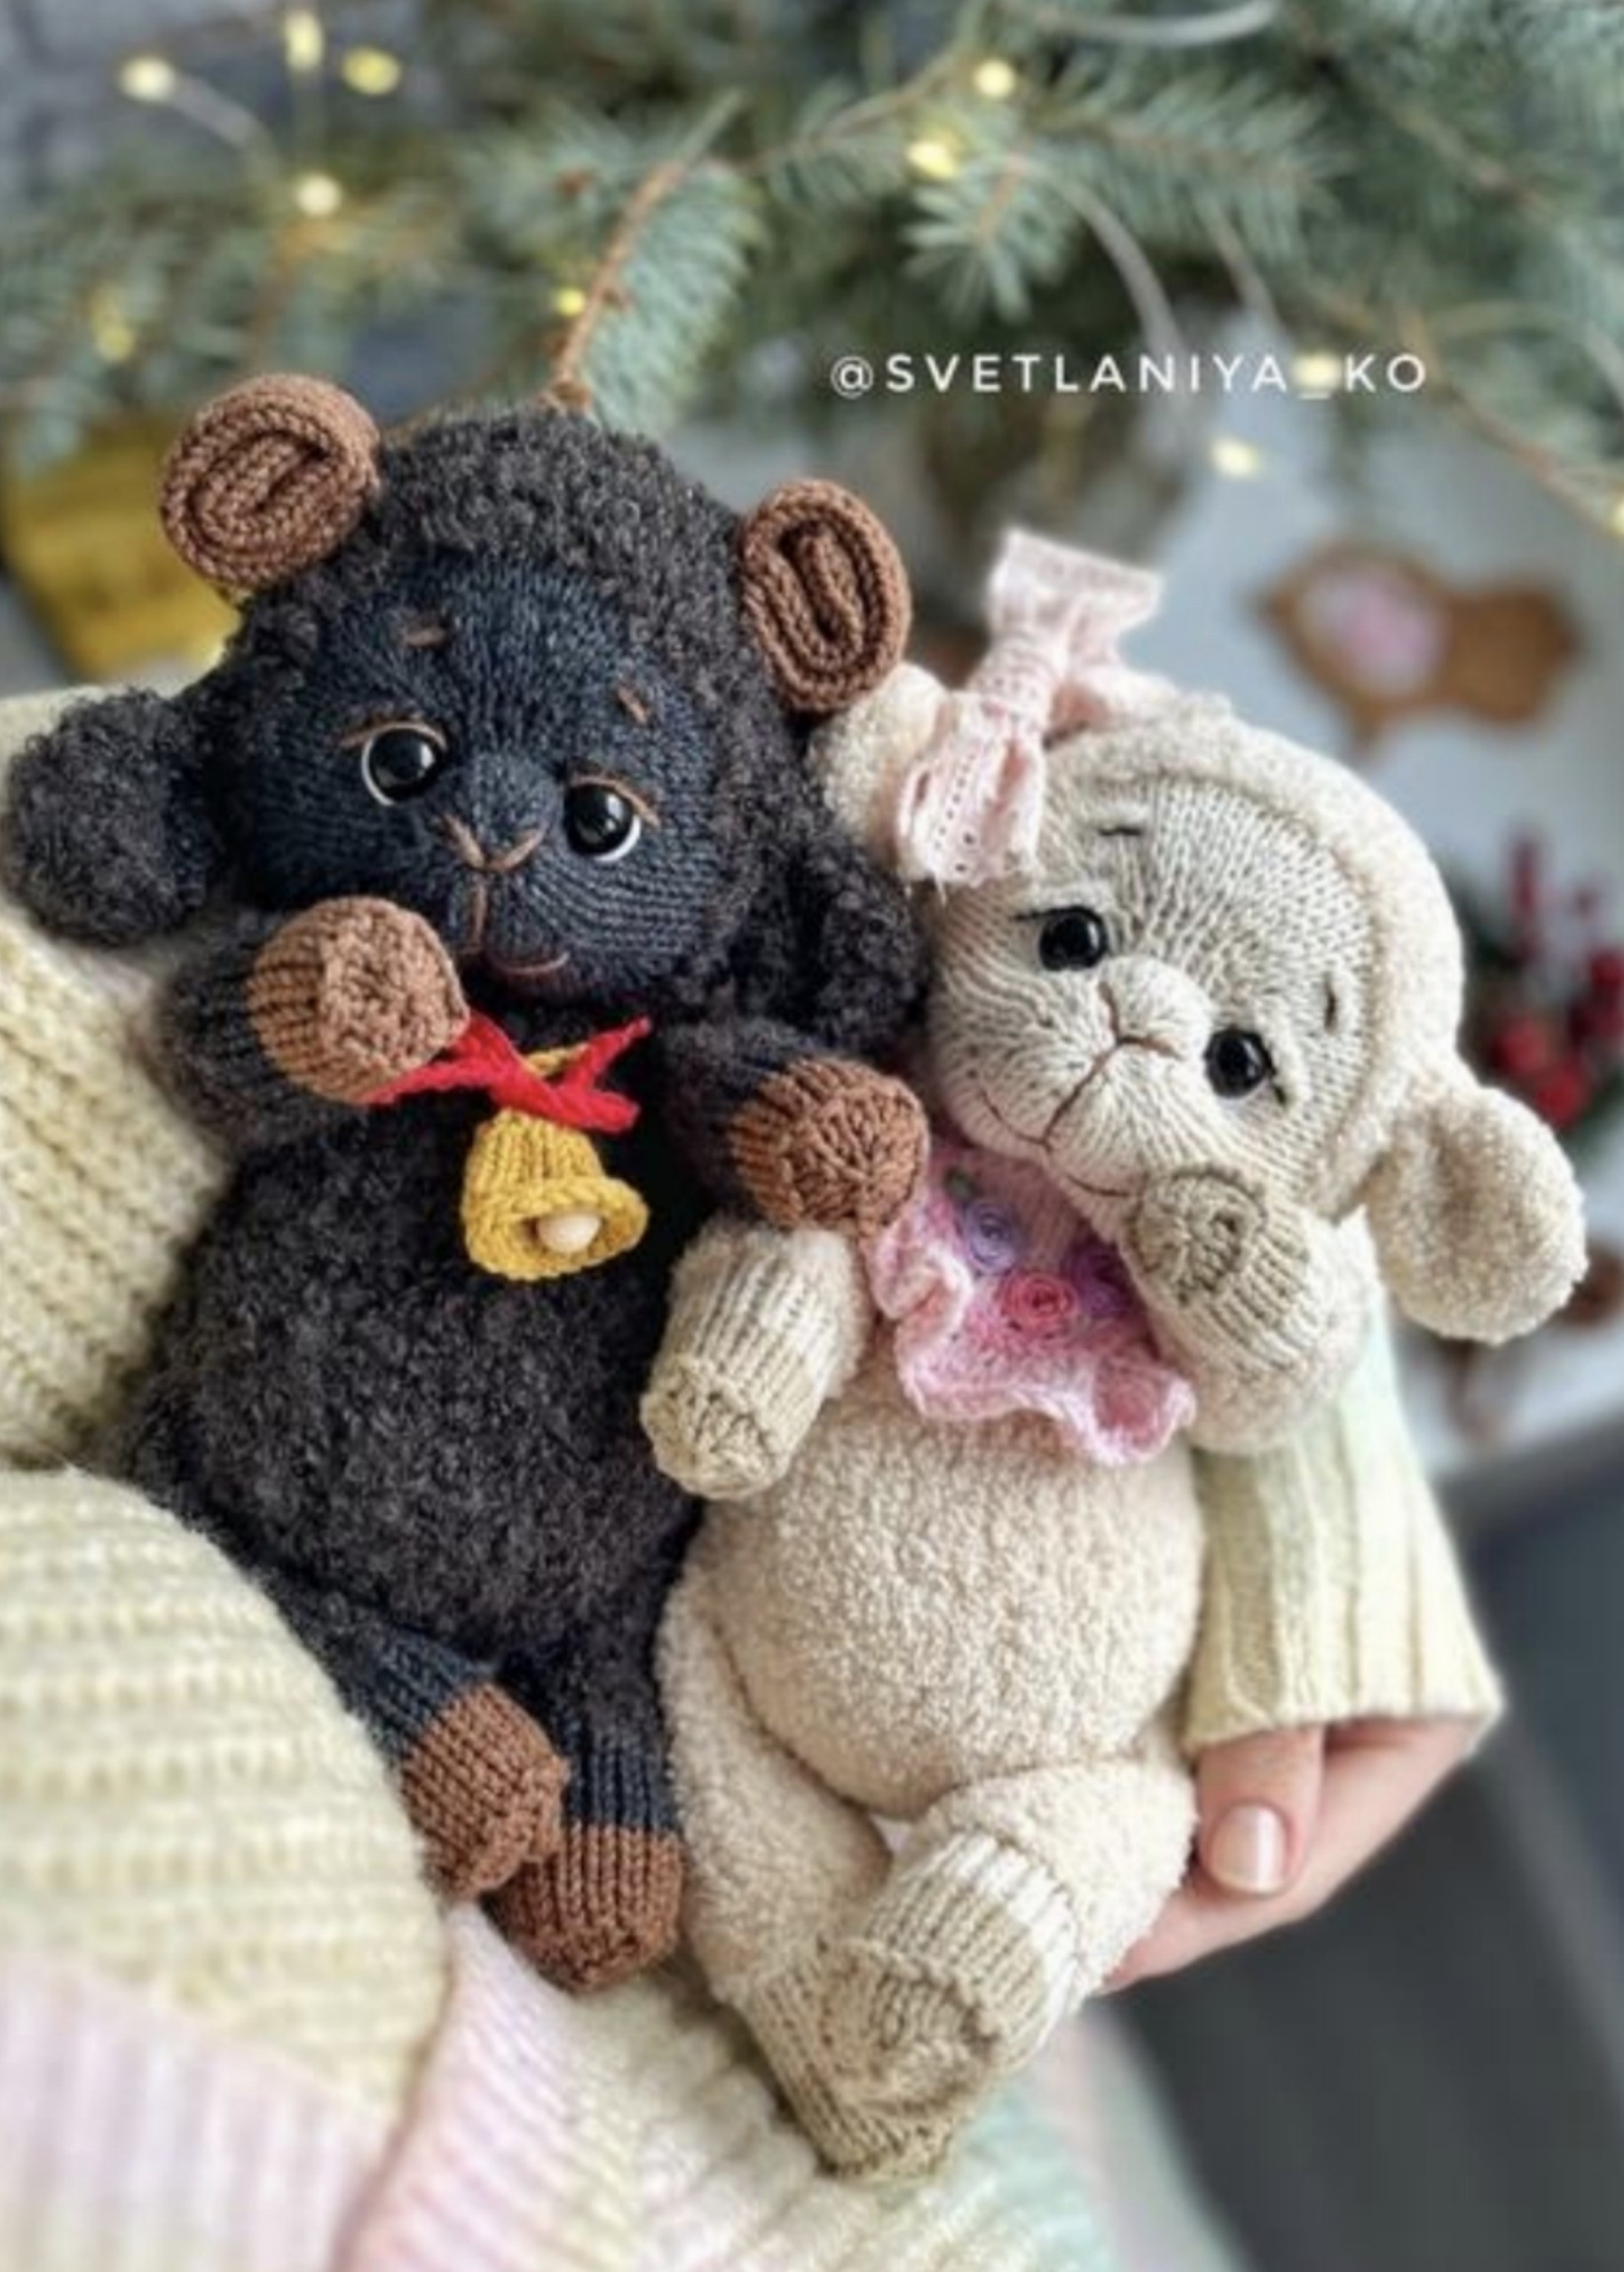
Adorable Knitted and Crocheted Sheep Pattern: A Complete DIY Tutorial
There is nothing quite as charming as a handmade stuffed animal to brighten up a nursery or to give as a heartfelt gift. If you are looking for a project that combines the soft, cozy texture of knitting with the intricate details of crochet, this sheep pattern is perfect for you. This tutorial will guide you through creating two adorable characters: a sweet, light-colored little lamb and a slightly more rugged, dark-colored ram. Whether you are making a nursery centerpiece or a whimsical companion for a child, these sheep are designed to be as durable as they are cute.
This pattern is a wonderful way to practice shaping, increasing, and decreasing in knitting, while also utilizing your crochet skills for the adorable accessories. By the end of this project, you will have a professional-looking, high-quality stuffed animal that looks like it came straight from a boutique toy shop.
Materials & Abbreviations
To achieve the beautiful textures seen in the photos, I recommend using a mix of cotton and specialty textured yarns. You can substitute these with any yarn you have on hand, but remember to adjust your needle and hook sizes accordingly to maintain a tight, even tension.
Recommended Yarn
- Main Body (Light Sheep): YarnArt Jeans (Colors 5 and 48) and Alize Softy Baby (Color 62).
- Main Body (Dark Sheep): YarnArt Jeans (Colors 28 and 40) and Alize Softy Baby (Color 60).
- Muzzle/Face: Cotton yarn in light beige or cream (e.g., Artland Fiesta or YarnArt Jeans colors 03, 05, or 07).
- Textured Accents: Artland Boucle (Black) or any high-texture “fuzzy” yarn. If using thin boucle, work with 2 strands held together.
- Accessories: Cotton yarn in various colors (pink, brown, white, or black) for the bib, bell, and facial embroidery.
Tools & Notions
- Knitting Needles: Double-pointed needles (DPNs) or circular needles, size #2 (2.5mm).
- Crochet Hook: Size #2 (2.5mm).
- Safety Eyes: 12mm safety eyes.
- Stuffing: High-quality polyester fiberfill.
- Notions: Long upholstery needle (for facial shaping), standard sewing needle, scissors, stitch markers, and tapestry needle.
Abbreviations (US Terms)
Knitting Terms:
- k: knit
- p: purl
- inc: increase (working 2 stitches from one)
- dec: decrease (knit 2 stitches together)
- ssk/sk2p: left-leaning/right-leaning decreases
- edge st: edge stitch
Crochet Terms:
- ch: chain
- sc: single crochet
- sl st: slip stitch
Step-by-Step Instructions
The Head
We begin the head using cotton yarn to create a smooth muzzle area. Cast on 9 stitches, leaving a long tail of approximately 6 to 8 inches for sewing later. Distribute the stitches across 3 needles (3 stitches per needle) and begin knitting in the round.
Round 1: 9 inc (18 sts)
Round 2: 18 k (18 sts)
Round 3: (2 k, inc) repeat 6 times (24 sts)
Round 4: 24 k (24 sts)
Round 5: (3 k, inc) repeat 2 times; dec, 4 k, dec; (inc, 3 k) repeat 2 times (26 sts)
Round 6: 26 k (26 sts)
Round 7: (4 k, inc) repeat 2 times; dec, 2 k, dec; (inc, 4 k) repeat 2 times (28 sts)
In the next round, place two stitch markers where the eyes will eventually be located. For a professional look, ensure your increases are worked tightly to avoid gaps.
Round 8: 10 k, MARKER, 8 k, MARKER, 10 k (28 sts)
Round 9: (5 k, inc) repeat 2 times; inc, 2 k, inc; (inc, 5 k) repeat 2 times (34 sts)
Round 10: 34 k (34 sts)
Round 11: (6 k, inc) repeat 2 times; 6 inc; (inc, 6 k) repeat 2 times (44 sts)
Round 12: 44 k (44 sts)
Round 13: (7 k, inc) repeat 2 times; (1 k, inc) repeat 6 times; (inc, 7 k) repeat 2 times (54 sts)
Round 14: 54 k (54 sts)
Round 15: (8 k, inc) repeat 6 times (60 sts)
Rounds 16-17: 60 k (60 sts)
At this stage, use your long needle to pull the foundation edge tight using the tail you left at the start. Secure the yarn inside the head. Insert your safety eyes into the positions marked in Round 8. Switch from the cotton yarn to your textured/fuzzy yarn. Fasten off the cotton yarn securely on the inside.
Rounds 18-32: 60 k (60 sts)
Round 33: (8 k, dec) repeat 6 times (54 sts)
Rounds 34-35: 54 k (54 sts)
Round 36: (7 k, dec) repeat 6 times (48 sts)
Rounds 37-38: 48 k (48 sts)
Round 39: (6 k, dec) repeat 6 times (42 sts)
Round 40: 42 k (42 sts)
Round 41: (5 k, dec) repeat 6 times (36 sts)
Round 42: (4 k, dec) repeat 6 times (30 sts)
Round 43: (3 k, dec) repeat 6 times (24 sts)
Round 44: (2 k, dec) repeat 6 times (18 sts)
Round 45: (1 k, dec) repeat 6 times (12 sts)
Cut the yarn, leaving a 6-inch tail. Use a needle to thread the remaining stitches onto the yarn, pull tight to close the head, and stuff the head firmly, paying extra attention to the nose area to create a rounded shape. Roll the head between your palms to distribute the stuffing evenly.
Shaping the Face
To give your sheep its signature expression, you will perform some “eye pulling.” Using yarn that matches the muzzle color:
- Insert the needle into the base of the left eye.
- Bring the needle out below the eye.
- Pass the needle behind the eye to the other side.
- Pull the thread to create a slight indentation, then knot and hide the yarn.
- Repeat for the right eye.
Finally, use embroidery to add the white of the eyes, eyelashes, and a small “v” shape for the nose and mouth. For extra dimension, you can embroider the eyebrows using your fuzzy yarn.
The Ears (Make 2)
Ears are worked with textured yarn. Cast on 6 stitches.
Round 1: 6 inc (12 sts)
Round 2: 12 k (12 sts)
Round 3: (1 k, inc) repeat 6 times (18 sts)
Rounds 4-12: 18 k (18 sts)
Round 13: (1 k, dec) repeat 6 times (12 sts)
Rounds 14-15: 12 k (12 sts)
Fasten off, leaving a 12-inch tail. Do not stuff the ears. Fold the ear in half and sew the edges together using single crochet stitches or a sewing needle. Fold it once more to create a natural shape and sew it to the sides of the head near the eye level.
The Horns (For the Dark Sheep)
Using cotton yarn, cast on 6 stitches.
Round 1: 6 inc (12 sts)
Round 2: 12 k (12 sts)
Next: Knit in pattern for about 4.3 inches (roughly 45 rounds).
Do not stuff. Fold the piece and sew the edges shut. Roll the strip into a tight spiral (like a snail shell) and sew it securely to the head between the ears. Pass a needle through the center of the spiral to ensure it stays in place.
The Body
The body is worked with textured yarn. Cast on 6 stitches, leaving a 6 to 8-inch tail. Work in the round.
Round 1: 6 inc (12 sts)
Round 2: 12 k (12 sts)
Round 3: (1 k, inc) repeat 6 times (18 sts)
Round 4: 18 k (18 sts)
Round 5: (2 k, inc) repeat 6 times (24 sts)
Round 6: 24 k (24 sts)
Round 7: (3 k, inc) repeat 6 times (30 sts)
Round 8: 30 k (30 sts)
Round 9: (4 k, inc) repeat 6 times (36 sts)
Round 10: 36 k (36 sts)
Round 11: (5 k, inc) repeat 6 times (42 sts)
Round 12: 42 k (42 sts)
Round 13: (6 k, inc) repeat 6 times (48 sts)
Round 14: 48 k (48 sts)
Round 15: (7 k, inc) repeat 6 times (54 sts)
Round 16: 54 k (54 sts)
Round 17: (8 k, inc) repeat 6 times (60 sts)
Rounds 18-24: 60 k (60 sts)
Now, we shape the belly by decreasing:
Round 25: 21 k, (1 k, dec) repeat 6 times, 21 k (54 sts)
Rounds 26-28: 54 k (54 sts)
Round 29: (7 k, dec) repeat 6 times (48 sts)
Rounds 30-32: 48 k (48 sts)
Round 33: (6 k, dec) repeat 6 times (42 sts)
Rounds 34-36: 42 k (42 sts)
Round 37: (5 k, dec) repeat 6 times (36 sts)
Rounds 38-40: 36 k (36 sts)
Round 41: (4 k, dec) repeat 6 times (30 sts)
Rounds 42-44: 30 k (30 sts)
Round 45: (3 k, dec) repeat 6 times (24 sts)
Rounds 46-48: 24 k (24 sts)
Round 49: (2 k, dec) repeat 6 times (18 sts)
Rounds 50-51: 18 k (18 sts)
Fasten off, leaving a 12 to 16-inch tail. Stuff the body firmly and sew it to the head. For better symmetry, use your knitting needles to hold the head in place while sewing the body to ensure the belly faces forward.
The Legs (Make 2)
The legs are worked in two parts: the upper leg and the lower hoof.
Upper Leg
Use textured yarn. Cast on 15 stitches, leaving an 8 to 10-inch tail. Work in the round.
Rounds 1-20: 15 k (15 sts)
Rounds 21-25: Switch to muzzle-colored yarn. 15 k (15 sts)
Rounds 26-31: Switch to brown yarn. 15 k (15 sts)
Round 32: 15 p (15 sts) — Tip: Be careful not to twist the stitches here!
Round 33: (3 k, dec) repeat 3 times (12 sts)
Round 34: (2 k, dec) repeat 3 times (9 sts)
Round 35: (1 k, dec) repeat 3 times (6 sts)
Fasten off. Stuff the leg halfway to keep the bottom flat. Fold the top and sew it shut with single crochet or a needle. Sew the legs to the sides of the body at a slight angle.
Lower Leg
Use textured yarn. Cast on 15 stitches, leaving an 8 to 10-inch tail. Work in the round.
Rounds 1-2: 15 k (15 sts)
Round 3: (4 k, inc) repeat 3 times (18 sts)
Rounds 4-23: 18 k (18 sts)
Rounds 24-30: Switch to muzzle-colored yarn. 18 k (18 sts)
Rounds 31-37: Switch to brown yarn. 18 k (18 sts)
Round 38: 18 p (15 sts)
Round 39: (4 k, dec) repeat 3 times (15 sts)
Round 40: (3 k, dec) repeat 3 times (12 sts)
Round 41: (2 k, dec) repeat 3 times (9 sts)
Round 42: (1 k, dec) repeat 3 times (6 sts)
Fasten off. Stuff halfway and sew the top shut. Sew these to the bottom of the body, parallel to the upper legs.
The Tail
Using textured yarn, cast on 6 stitches. Work in the round.
Round 1: 6 inc (12 sts)
Rounds 2-3: 12 k (12 sts)
Round 4: (2 k, dec) repeat 3 times (9 sts)
Fasten off, leaving a tail. Stuff lightly and sew to the back of the body near the level of the lower legs.
Crocheted Accessories
The Bib
Use cotton yarn. Work in flat rows (turning each row).
Row 1: Cast on 14 stitches.
Row 2: kpi, 12 k, kpi (14 sts)
Row 3: kpi, 12 p, kpi (14 sts)
Row 4: kpi, 12 k, kpi (14 sts)
Row 5: kpi, 12 p, kpi (14 sts)
Row 6: kpi, 12 k, kpi (14 sts)
Row 7: kpi, 12 p, kpi (14 sts)
Row 8: kpi, dec, 8 k, dec, kpi (12 sts)
Row 9: kpi, 10 p, kpi (12 sts)
Row 10: kpi, dec, 6 k, dec, kpi (10 sts)
Row 11: kpi, 8 p, kpi (10 sts)
Row 12: kpi, dec, 4 k, dec, 1 k (8 sts)
Pick up 7 stitches along the left side and work them into the next row, then turn. Work back and forth to create the bib shape.
Final Rows: Continue increasing and decreasing to reach the desired width (approx 42 sts). Add straps by crocheting 40 chains in a contrasting color and attaching them to the bib.
The Bell
Use cotton yarn. Cast on 6 stitches. Work in the round.
Round 1: 6 inc (12 sts)
Rounds 2-6: 12 k (12 sts)
Round 7: (1 k, inc) repeat 6 times (18 sts)
Round 8: 18 k (18 sts)
Do not cut the yarn. Work a round of slip stitches (sl st) around the bottom edge to finish. Using the remaining tail, crochet a small loop (6-7 chains) to create a hanger. Attach a small bead or a tiny bell to the loop for extra charm.
Finishing
Once all parts are knitted and crocheted, it is time for assembly. Use a tapestry needle to sew the head to the body, the ears to the head, the legs to the body, and the tail to the back. When sewing, ensure you use plenty of stuffing in the joints to prevent “gaps” where the stuffing might show through. For the facial details, always hide your yarn tails deep inside the stuffing to ensure they don’t poke through the fabric during play.
Tips
- Tension is Key: When knitting the head and body, try to keep your tension consistent. If you find your stitches are too loose, switch to a slightly smaller needle size.
- Mark Your Rounds: Always use a stitch marker at the beginning of each round. This prevents you from losing count, especially when working in the round on multiple needles.
- Prevent Gaps: When working the transitions between different yarn textures or colors, pull your stitches a little tighter to avoid creating holes.
- Seamless Transitions: When changing colors in the middle of a piece, weave the tails in very carefully on the inside to ensure a clean look.
- Safety First: If you are making this for a very young child, ensure all safety eyes and small accessories (like the bell) are sewn on extremely securely, or consider using embroidered eyes instead.