Adorable Crochet Seagull Amigurumi Pattern: A Step-by-Step Tutorial
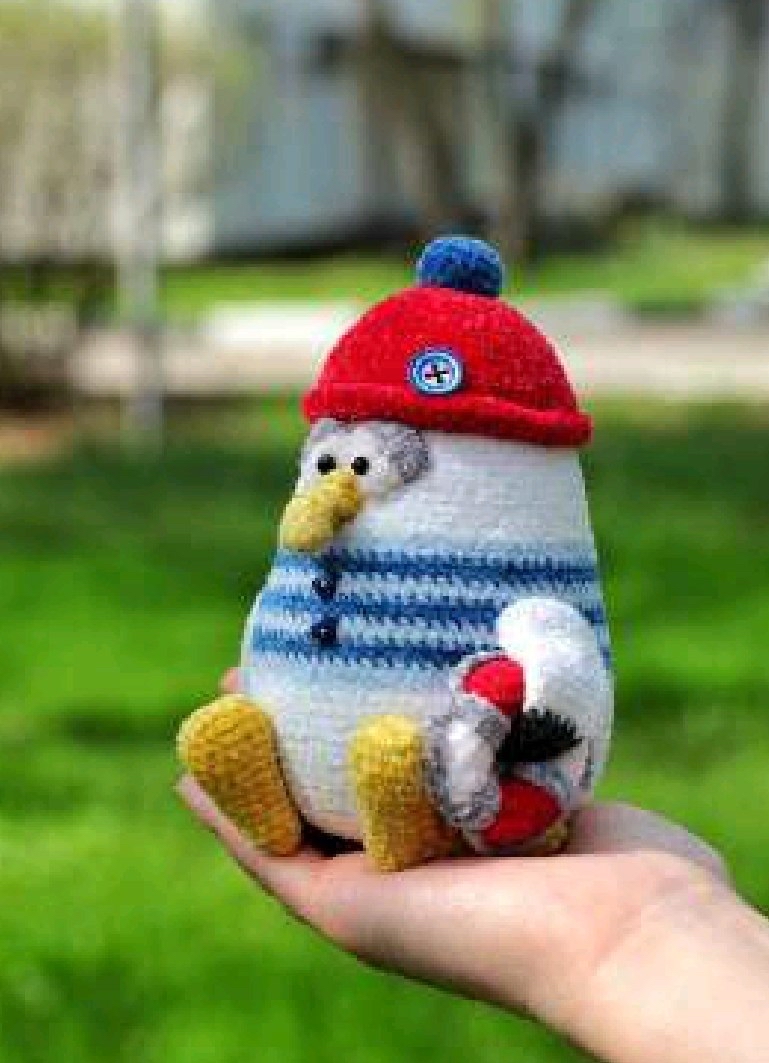
Are you looking for a charming seaside companion to brighten up your home or a cute gift for a beach lover? This adorable crochet seagull is the perfect project! Small, soft, and incredibly detailed, this little bird is designed to bring a touch of coastal magic to any nursery, shelf, or summer-themed decor. Whether you are an experienced amigurumi artist or a beginner looking for your next challenge, this detailed tutorial will guide you through every stitch to create your very own miniature seagull.
This little fellow stands approximately 4.7 inches tall, making him the perfect size for desk buddies or even as a keychain accessory. Follow along with this guide, and you’ll have a finished seagull in no time!
Materials & Abbreviations
To ensure your seagull turns out just as cute as the photos, I recommend using high-quality chenille or micro-velvet yarn. This gives the bird that incredibly soft, plush texture that makes amigurumi so lovable.
What You Will Need:
- Yarn: Micro-velvet/Chenille yarn (approx. 492 yards per 100g). You will need eight colors: White, Cream (Milk), Yellow, Light Blue, Blue, Red, Light Gray, and Dark Gray/Black.
- Crochet Hook: 1.5 mm (or the size best suited to your yarn tension).
- Stuffing: Polyfill/Hollowfiber.
- Safety Eyes: 4 mm with metal stems (2 pieces).
- Eye Accessories: Small buttons (two 0.25-inch and one 0.4-inch) or similar small embellishments.
- Wire: 0.02-inch (0.6 mm) florist wire for the beak.
- Needles: A sharp sewing needle and a larger doll needle for assembly.
- Tools: Scissors, dressmaker pins, a cone-shaped awl (or a 0.12-inch/3 mm needle), tweezers (helpful for stuffing small parts), a stitch marker, and super glue gel.
- Thread: Sewing thread matching your yarn colors.
US Crochet Abbreviations:
- ch: chain
- sc: single crochet
- sl st: slip stitch
- hdc: half double crochet
- inc: increase (2 sc in the same stitch)
- dec: decrease (sc 2 together through the front loops)
- BLO: back loops only
- MR: magic ring
- (number): the number in parentheses indicates the total stitch count at the end of the row.
Step-by-Step Instructions
Pro Tip: When changing colors, perform the color change on the last single crochet of the indicated row. To do this, pick up the new color on your hook during the final stitch (it should be on the second loop) and complete the stitch. Do not cut the yarn between color changes unless specified; instead, carry the yarn or join it as instructed to keep the piece seamless.
The Head and Body
We will work in a continuous spiral. Do not join at the end of each row unless noted.
Color: White
- Row 1: Create a magic ring and work 6 sc into it (6).
- Row 2: 6 inc (12).
- Row 3: (1 sc, inc) repeat 6 times (18).
- Row 4: (2 sc, inc) repeat 6 times (24).
- Row 5: (3 sc, inc) repeat 6 times (30).
- Row 6: (4 sc, inc) repeat 6 times (36).
- Row 7: (5 sc, inc) repeat 6 times (42).
- Row 8–9: 42 sc (2 rows).
- Row 10: (6 sc, inc) repeat 6 times (48).
- Row 11–13: 48 sc (3 rows).
- Row 14: (7 sc, inc) repeat 6 times (54).
- Row 15–18: 54 sc (4 rows).
- Row 19: (8 sc, inc) repeat 6 times (60).
- Row 20–24: 60 sc (5 rows).
- Row 25: (9 sc, inc) repeat 6 times (66).
Color Change: At the end of Row 26, switch from White to Light Blue. From here, alternate between Light Blue and Blue every 2 rows.
- Row 27: Work in BLO, 66 sc.
- Row 28–31: 66 sc (alternating Light Blue and Blue every 2 rows).
Color Change: At the end of Row 40, switch back to White.
- Row 32: (10 sc, inc) repeat 6 times (72).
- Row 33–39: 72 sc (7 rows).
- Row 40: (11 sc, inc) repeat 6 times (78).
- Row 41: Work in BLO, 78 sc.
- Row 42: 78 sc (2 rows).
Color Change: In Row 43, we begin the tail. Switch to Dark Gray or Black. To maintain the color pattern, work the 2nd sc of every row with the white yarn, and the last sc of every row with the dark yarn. Do not cut the ends; carry the yarn through.
- Row 43: 2 sc, ch 6, 5 sc working down the chain, 1 sc in the same stitch, 75 sc (84).
- Row 44: 2 sc, 4 sc along the chain, 2 inc, 4 sc, 76 sc (90).
- Row 45–47: 2 sc, 12 sc along the “tail,” 76 sc (3 rows).
- Row 48: 2 sc, 5 sc, 1 dec, 5 sc, 76 sc (89).
- Row 49: 2 sc, 3 sc, 1 dec, 1 sc, 1 dec, 3 sc, 76 sc (87).
- Row 50: 2 sc, 2 sc, 1 dec, 1 sc, 1 dec, 2 sc, 76 sc (85).
- Row 51: 2 sc, 1 sc, 1 dec, 1 sc, 1 dec, 1 sc, 76 sc (83).
- Row 52: 2 sc, 1 dec, 1 sc, 1 dec, 76 sc (81).
- Row 53: 2 sc, 1 dec, 1 sc, 76 sc (80).
Color Change: Switch back to White.
- Row 54: 3 dec, 75 sc (78).
Stuff the tail portion firmly with polyfill.
- Row 55: (4 sc, 1 dec) repeat 13 times (65).
- Row 56: (3 sc, 1 dec) repeat 13 times (52).
- Row 57: (2 sc, 1 dec) repeat 13 times (39).
- Row 58: (1 sc, 1 dec) repeat 13 times (26).
- Row 59: 13 dec (13).
- Row 60: 1 sc, 6 dec (7).
Fasten off and close the hole using a sewing needle.
The Eyes and Eyelids
Eyes (Color: Cream/Milk)
- Row 1: Ch 4. In the 2nd ch from the hook, work 1 inc, 4 sc in the last ch, and 1 inc on the other side of the chain (10).
- Row 2: (1 sc, inc) repeat 2 times, 2 sc, (inc, 1 sc) repeat 2 times (14).
- Finish with 2–3 sl st for a smooth edge.
Eyelids (Color: Light Gray)
- Row 1: Ch 2. In the 2nd ch from hook, 6 sc (6).
- Row 2: (1 sc, inc) repeat 3 times (9).
The Beak
Color: Yellow
- Row 1: Ch 3. In the 2nd ch from hook, work 1 inc, 4 sc in the last ch, and 1 inc on the other side of the chain (8).
- Row 2–5: 8 sc (4 rows).
- Row 6: sl st, in next sc work (1 sc, 1 hdc), in third sc work (1 hdc, 1 sc), 5 sl st (10).
Insert the florist wire into the beak to give it shape, then secure it with glue and sew it on.
The Hat and Pom-pom
Hat (Color: Red)
- Row 1: Ch 2, 6 sc in MR (6).
- Row 2: 6 inc (12).
- Row 3: (1 sc, inc) x 6 (18).
- Row 4: (2 sc, inc) x 6 (24).
- Row 5: (3 sc, inc) x 6 (30).
- Row 6: (4 sc, inc) x 6 (36).
- Row 7: (5 sc, inc) x 6 (42).
- Row 8: (6 sc, inc) x 6 (48).
- Row 9: 48 sc (48).
- Row 10: (7 sc, inc) x 6 (54).
- Row 11–12: 54 sc (2 rows).
- Row 13: (8 sc, inc) x 6 (60).
- Row 14–17: 60 sc (4 rows).
- Row 18: 60 sc in BLO (60).
- Row 19: 60 sc (60).
- Row 20: (9 sc, inc) x 6 (66).
- Row 21: 66 sc, 2 sl st (66).
Fasten off and sew the hat to the head.
Pom-pom (Color: Blue)
- Row 1: Ch 2, 6 sc in MR (6).
- Row 2: 6 inc (12).
- Row 3: (1 sc, inc) x 6 (18).
- Row 4–6: 18 sc (3 rows).
- Row 7: (1 sc, dec) x 6 (12).
- Row 8: 6 dec (6).
Stuff the pom-pom and sew it to the top of the hat.
The Wings
Color: White and Dark Gray
- Row 1: Ch 2, 6 sc in MR (6).
- Row 2: 6 inc (12).
- Row 3: (1 sc, inc) x 6 (18).
- Row 4: (2 sc, inc) x 6 (24).
- Row 5–8: 24 sc (4 rows).
- Row 9: (2 sc, dec) x 6 (18).
Color Change: At the end of Row 13, switch to Dark Gray.
- Row 10–13: 18 sc (4 rows).
- Row 14: (1 sc, dec) x 6 (12).
- Row 15–18: 12 sc (4 rows).
- Row 19: 6 dec (6).
Do not stuff the wings. Sew them to the body between rows 30 and 31.
The Feet
Color: Yellow
Start by working a “stop” (a flat base).
- Row 1: Ch 5. In the 2nd ch from hook, work 1 inc, 2 sc, 4 sc in the last ch. On the other side of the chain, work 2 sc, 1 inc (12).
- Row 2: 1 inc, 4 sc, 2 inc, 4 sc, 1 inc (16).
- Row 3–6: 16 sc (4 rows).
- Row 7: (1 dec, 6 sc) repeat 2 times (14).
- Row 8–9: 14 sc (2 rows).
- Row 10: (1 dec, 5 sc) repeat 2 times (12).
- Row 11: 1 sc, ch 4, skip 4 stitches from previous row, 7 sc (12).
- Row 12: 1 sc, 4 sc in the chain, 7 sc (12).
- Row 13: 6 dec (6).
Stuff the feet and sew them to the bottom of the body.
Optional: The Lifebuoy Accessory
Colors: Red, White, Light Gray
- Row 1: Ch 10, join in a ring with a sl st (10).
- Row 1–8: 10 sc (8 rows) in Red.
- Row 9–16: 10 sc (8 rows) in White.
- Row 17–24: 10 sc (8 rows) in Red.
- Row 25–32: 10 sc (8 rows) in White.
Shape the ring and sew the ends together. Use light gray yarn to wrap around the color junctions (ch 12, sl st in junction, repeat 4 times) to hide the seams.
Finishing
Assembly is where your seagull really comes to life! Follow these placement tips for a professional look:
- Eyes: Position the top edge of the eyes between rows 15 and 16 (counting from the start). Position the bottom edge between rows 22 and 23.
- Eyelids: Sew the eyelids just above the eyes.
- Beak: Secure the beak with glue and sew it firmly in place.
- Details: Sew the buttons and the hat as instructed.
- Final Touches: Check your tension and ensure all stuffing is even. If you notice any gaps, use a small amount of super glue gel to secure the safety eyes through the fabric.
Tips for Success
To ensure your amigurumi looks polished and professional, keep these tips in mind:
- Tension is Key: Try to maintain consistent tension throughout your project. If your stitches are too loose, the stuffing might show through.
- Use Stitch Markers: Since amigurumi is worked in a continuous spiral, it is very easy to lose your place. Always use a marker to identify the start of your round.
- Stuffing Method: Use your tweezers or a small tool to push the stuffing into the tiny corners of the head and tail. A well-stuffed toy holds its shape much better!
- Color Changes: When changing colors, remember to pull the new yarn through the last stitch of the previous color to avoid a visible gap or a “jump” in your work.
Happy crocheting! Your beautiful little seagull is ready to take flight!