Cute Crochet Puppy Amigurumi Pattern: A Step-by-Step Guide for Beginners
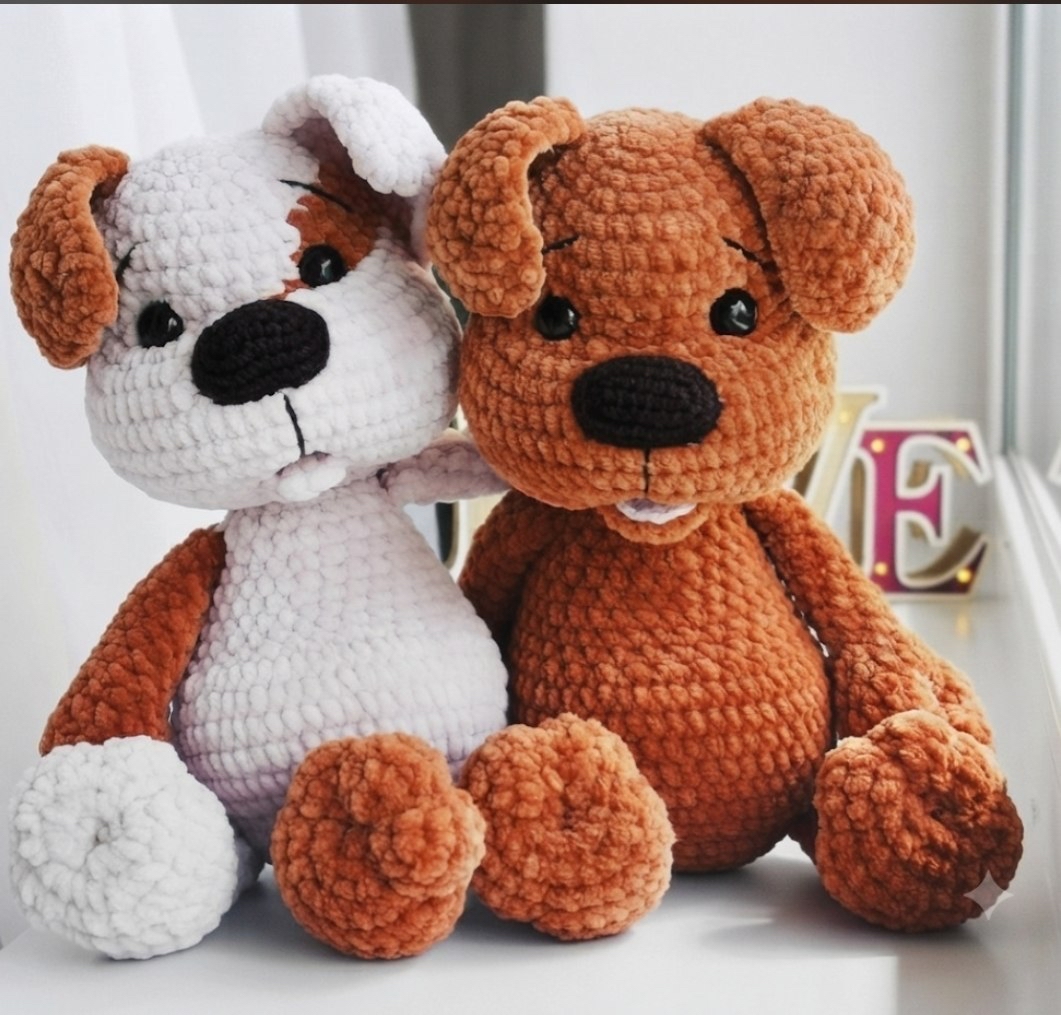
Are you looking for a heartwarming project that will result in an adorable, cuddly companion? This crochet puppy pattern is perfect for anyone wanting to create a soft, plush toy that looks just as sweet as it feels. This puppy features a charming “patch” over one eye and a tiny, cozy sweater, making it a standout piece for your amigurumi collection or a wonderful handmade gift for a little one.
This pattern is designed using chunky, velvet-style yarn, which makes the crocheting process faster and results in an incredibly soft texture. If you are a beginner, don’t be intimidated! While there are some special shaping techniques—like creating a realistic snout and defined paws—I will walk you through every single step to ensure your new puppy friend turns out perfectly.
Materials & Abbreviations
To get that signature plush look, I highly recommend using a chenille or velvet-style yarn. If you don’t have the specific brands mentioned, any bulky velvet yarn will work beautifully.
Required Materials
- Main Yarn: Chunky velvet/chenille yarn (such as Himalaya Dolphin Baby). You will need approximately 1.5 skeins of Brown and 1 skeins of Beige.
- Detail Yarn: A thinner crochet yarn (such as YarnArt Jeans) in Black (for the nose) and any color of your choice for the tiny sweater.
- Crochet Hooks:
- 3.5 mm (E) hook for the puppy body.
- 2 mm hook for the tiny sweater.
- Safety Eyes: 1/2 inch (12-15 mm) safety eyes.
- Stuffing: Polyfill or similar toy stuffing.
- Other: A yarn needle, scissors, and stitch markers.
Finished Size: Your puppy will be approximately 12 inches (30 cm) tall.
Abbreviations (US Terms)
- MR: Magic Ring
- sc: Single crochet
- dc: Double crochet
- inc: Increase (2 sc in one stitch)
- dec: Decrease (sc 2 together)
- sl st: Slip stitch
- ch: Chain
- st(s): Stitch(es)
Step-by-Step Instructions
The Legs (Make 2)
We will start by crocheting the legs. These are worked in the round.
Rnd 1: 6 sc in MR (6)
Rnd 2: 6 inc (12)
Rnd 3: (1 sc, inc) * 6 (18)
Rnd 4: (2 sc, inc) * 6 (24)
Rnd 5: (3 sc, inc) * 6 (30)
Rnd 6: 30 sc (30)
Place a stitch marker here—this will be the heel.
Rnd 7: 9 sc, 6 dec, 9 sc (24)
Rnd 8: 6 sc, 6 dec, 6 sc (18)
Rnd 9: (1 sc, dec) * 6 (12)
Rnd 10: 12 sc (12)
Rnds 11-18: 12 sc (8 rounds total)
Note on Paws: Stuff the leg halfway so the puppy can sit upright. Before finishing, fold the leg in half and sew through both sides using 6 sc. To create the “toes” effect, use a thin thread to pull and indent the bottom of the foot to create three distinct toe shapes.
The Tail
The tail is worked in rows rather than rounds.
Row 1: Ch 10, plus 1 ch for height. (1sc, inc) * 5, then 1 ch for height, turn. (15)
Rows 3-4: 15 sc, 1 ch for height, turn. (15)
Row 5: (1 sc, dec) * 5. (10)
Fasten off, leaving a long tail for sewing to the body.
The Arms (Make 2)
Rnd 1: 6 sc in MR (6)
Rnd 2: 6 inc (12)
Rnds 3-5: 12 sc (12)
Rnd 6: 4 sc, 2 dec, 4 sc (10)
Rnd 7: 3 sc, 2 dec, 3 sc (8)
Rnds 8-15: 8 sc (8 rounds)
Stuff halfway. Fold in half and sew through both sides with 4 sc. Ensure the decrease area is on the inside of the body.
The Body
Rnd 1: 6 sc in MR (6)
Rnd 2: 6 inc (12)
Rnd 3: (1 sc, inc) * 6 (18)
Rnd 4: (2 sc, inc) * 6 (24)
Rnd 5: (3 sc, inc) * 6 (30)
Rnd 6: (4 sc, inc) * 6 (36)
Rnd 7: This is where we attach the legs and tail. 6 sc, 6 sc joined to the first leg, 12 sc, 6 sc joined to the second leg, 4 sc, then join the tail with 2 sc. In the next round, add 2 more sc joined with the tail (total of 4 sc including the tail) (36).
Rnd 8: 2 sc with tail, 3 sc, inc, 5 sc, inc, 12 inc, (5 sc, inc) * 2 (52).
Rnds 9-14: 52 sc (6 rounds)
Rnd 15: (5 sc, dec) * 2, 12 dec, (5 sc, dec) * 2 (36).
Rnds 16-18: 36 sc (3 rounds)
Rnd 19: (4 sc, dec) * 6 (30)
Rnd 20: 30 sc (30)
Rnd 21: (3 sc, dec) * 6 (24)
Rnd 22: 24 sc (24)
Rnd 23: Attach the arms. Leave 8 sc between the arms at the front and back. Place them evenly along the sides of the body. 4 sc, 4 sc joined to the first arm, 8 sc, 4 sc joined to the second arm, and 4 sc to finish the round (24).
Rnd 24: (2 sc, dec) * 6 (18)
Stuff the body firmly, paying extra attention to the belly area to ensure a nice, round shape. Leave a long tail for sewing the head on later.
The Head
The head includes a beautiful color-change patch over the eye. To keep the patch looking clean, do not cut the yarn when changing colors; instead, pull the new color through the last loop of the previous color.
Rnd 1: 6 sc in MR (6)
Rnd 2: 6 inc (12)
Rnd 3: (1 sc, inc) * 6 (18)
Rnd 4: (2 sc, inc) * 6 (24)
Rnd 5: (3 sc, inc) * 6 (30)
Rnd 6: (4 sc, inc) * 3. Now, seamlessly change to Brown: 3 sc, inc. Change back to Beige: 3 sc, inc. Change to Brown: 4 sc, inc (36).
Rnd 7: 17 sc in Beige, change to Brown for 7 sc, change to Beige for 1 sc, then 10 sc in Brown (36).
Rnd 8: 16 sc in Beige, change to Brown for 9 sc, change to Beige for 1 sc, then 9 sc in Brown (36).
Rnd 9: 15 sc in Beige, change to Brown for 11 sc, change to Beige for 1 sc, then 8 sc in Brown (36).
Rnd 10: 13 sc, 10 inc, 13 sc (46)
Rnd 11: 13 sc, (1 sc, inc) * 10, 13 sc (56)
Rnds 12-17: 56 sc (6 rounds)
Eye Placement: Insert the safety eyes between rounds 8 and 9. The distance between the eyes should be 7 sc (from the edge of one eye to the other), which will look like about 5 sc once the head is finished.
Rnd 18: 13 sc, (1 sc, dec) * 10, 13 sc (46)
Rnd 19: 13 sc, 10 dec, 13 sc (36)
Rnd 20: (4 sc, dec) * 6 (30)
Rnd 21: (3 sc, dec) * 6 (24)
Rnd 22: (2 sc, dec) * 6 (18)
Muzzle Shaping (The “Pull” Technique): To create a realistic snout, use a thin thread matching the main color. Insert the needle into the center of row 17 from the bottom and pull it up to a point near the eye (Point 1). Re-insert into the MR and pull out 4 stitches away from Point 1 (Point 2). Return to the MR, pull to Point 1, then pull out 4 stitches away again (Point 3). Finally, pull the thread through to the bottom of the face (Point 4). Weave the thread back and forth through the face to create the snout shape, then pull both ends tight to form the muzzle. Fasten off.
Stuff the head, focusing on the muzzle area to give it shape. Do not sew the head to the body until you have finished all the facial details.
Finishing
Nose & Mouth
The Nose: Using black thin yarn, ch 6. In the 2nd ch from hook, work 1 sc. Work 3 sc in each of the next 3 chains. Work 4 sc in the last chain. Turn and work 3 sc on the opposite side of the chain, then 2 inc (22). For rounds 3 and 4, work 22 sc. Sew the nose on one row below the eyes. To hide the seam, use the same black yarn to outline the nose and pull slightly to blend it into the fur.
The Mouth: Using the main color, work 6 sc in a MR and sl st. Sew this into the center of the muzzle, right below the nose.
Ears
Rnd 1: Ch 10, plus 1 ch for height, turn. 10 sc (10)
Rnd 2: 9 sc, 1 ch, turn (9)
Rnd 3: 9 sc (9)
Rnd 4: 8 sc (8)
Rnd 5: 7 sc. Continue decreasing until only 2 sc remain. To prevent the ear from curling too much, add an increase in the three corners. Sew the ears starting from round 4 of the head, ending at eye level, curving them slightly for a cute look.
The Tiny Sweater
Use a 2 mm hook and a thin yarn for this part.
Rnd 1: Ch 32, turn. In 2nd ch from hook, work inc in every stitch (60).
Rnds 2-4: 60 dc (60).
Rnd 5 (Arms): 10 sc, skip 6 ch, 14 sc, sl st to main piece, skip 6 ch, 14 sc, 10 sc, then 12 sc (44).
Rnd 6: 2 dc, (4 dc, inc) * 8, 2 dc (52).
Rnds 7-8: 52 dc (52).
Sew the sweater onto the puppy and finish the back edges with a simple border.
Tips for Success
- Tension is Key: When changing colors for the eye patch, keep your tension loose. If you pull too tight, the patch will look pinched and uneven.
- Assembly: When sewing the head to the body, make sure you have enough stuffing in the neck area so the head doesn’t wobble.
- Detailing: Don’t rush the muzzle shaping. It’s the most important part for giving your puppy its character!