DIY Crochet Bunny Amigurumi Pattern: An Easy Tutorial for Beginners
Introduction
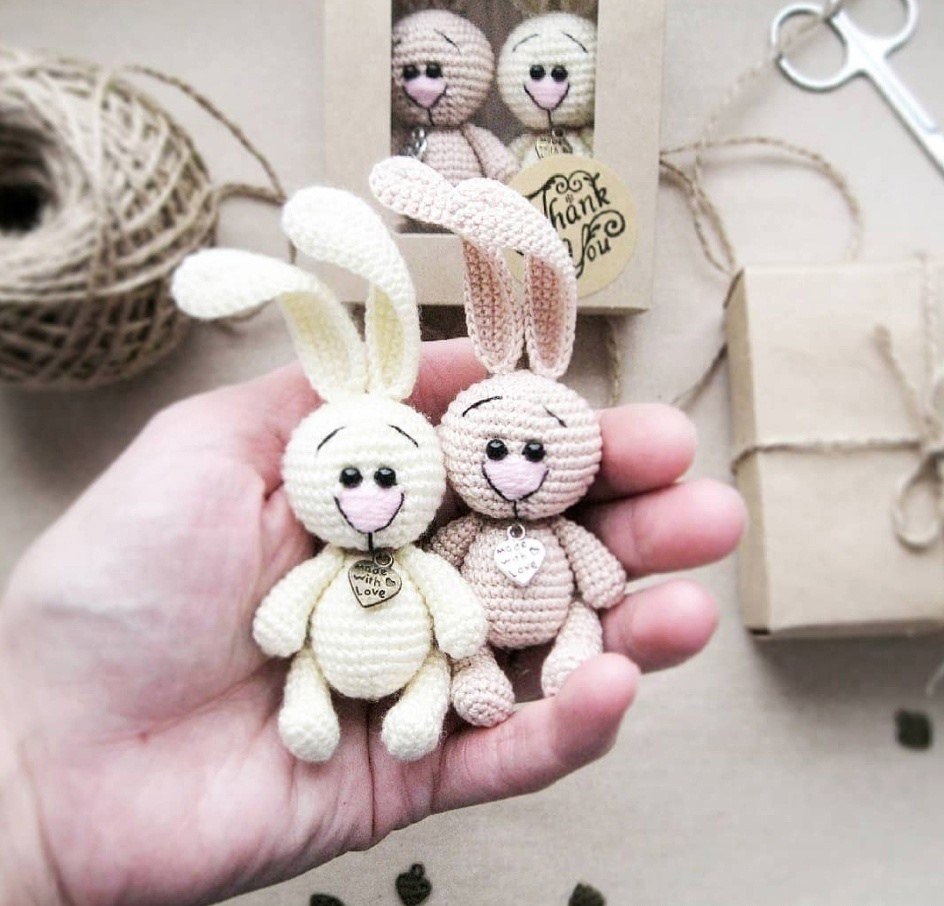
Are you looking for your next adorable crochet project? Whether you are looking to create a sweet gift for a baby shower, a charming Easter decoration, or just want to add a new friend to your amigurumi collection, this DIY Crochet Bunny is the perfect project! This pattern creates a soft, whimsical little bunny that is small enough to fit in the palm of your hand but detailed enough to look professional.
This tutorial is designed specifically with beginners in mind. We will walk through the process of creating a seamless head and body, tiny limbs, and those iconic long ears. One of the coolest features of this bunny is the “moveable limb” technique, which allows you to pose your little friend for the cutest photos. Grab your favorite yarn and a cup of tea, and let’s get stitching!
Materials and Tools
To ensure your bunny turns out looking just like the pictures, I recommend using a smooth, non-splitting yarn. For a project of this size, a cotton or a cotton-blend yarn works beautifully as it provides excellent stitch definition.
- Yarn: Worsted weight (Medium/4) or DK weight (Light/3) yarn. You will need your main color (white, cream, or grey) and a small amount of pink for the nose.
- Crochet Hook: A 3.25mm (D) or 3.5mm (E) hook is ideal to keep your stitches tight so the stuffing doesn’t show through.
- Safety Eyes: 6mm to 8mm black safety eyes (or black beads if you prefer).
- Stuffing: High-quality polyester fiberfill.
- Embroidery Needle: A blunt-tipped tapestry needle for sewing pieces together and detailing the face.
- Scissors: For trimming your yarn ends.
- Stitch Marker: Highly recommended to keep track of your rounds.
Crochet Abbreviations (US Terms)
This pattern uses standard US crochet terminology. Please ensure you are using US terms to avoid confusion with stitch heights!
- MR: Magic Ring (or Magic Circle)
- Ch: Chain
- Sc: Single Crochet
- Inc: Increase (2 sc in the same stitch)
- Dec: Decrease (2 sc worked together, preferably using the invisible decrease method)
- St(s): Stitch(es)
- Rnd: Round
Step-by-Step Pattern Instructions
The Head and Body (One Piece)
To keep the bunny looking clean and seamless, we will crochet the head and the body as one continuous piece. This prevents a bulky seam at the neck.
- Rnd 1: Create a MR and work 6 sc into the ring. (6)
- Rnd 2: Inc in every st around. (12)
- Rnd 3: [1 sc, inc] repeat 6 times. (18)
- Rnd 4: [2 sc, inc] repeat 6 times. (24)
- Rnd 5: [3 sc, inc] repeat 6 times. (30)
- Rnd 6: [4 sc, inc] repeat 6 times. (36)
- Rnd 7: [5 sc, inc] repeat 6 times. (42)
- Rnds 8–12: Sc in each st around. (42)
- Rnd 13: [5 sc, dec] repeat 6 times. (36)
- Rnd 14: [4 sc, dec] repeat 6 times. (30)
- Rnd 15: [3 sc, dec] repeat 6 times. (24)
- Rnd 16: [2 sc, dec] repeat 6 times. (18)
- Rnd 17: [1 sc, dec] repeat 6 times. (12)
- Rnd 18: Sc in each st around. (12)
Now, we begin increasing to form the belly and bottom of the body.
- Rnd 19: [1 sc, inc] repeat 6 times. (18)
- Rnd 20: Sc in each st around. (18)
- Rnd 21: [2 sc, inc] repeat 6 times. (24)
- Rnd 22: Sc in each st around. (24)
- Rnd 23: [3 sc, inc] repeat 6 times. (30)
- Rnds 24–29: Sc in each st around. (30)
- Rnd 30: [3 sc, dec] repeat 6 times. (24)
- Rnd 31: [2 sc, dec] repeat 6 times. (18)
- Rnd 32: [1 sc, dec] repeat 6 times. (12)
- Rnd 33: Dec 6 times. (6)
Fasten off, leaving a long tail for sewing. Use your needle to pull the tail through the remaining stitches to close the hole completely. Stuff the head and body firmly with fiberfill.
The Front Legs (Make 2)
The front legs are simple, small tubes that add a touch of cuteness to the bunny’s pose.
- Rnd 1: Create a MR and work 6 sc into the ring. (6)
- Rnd 2: Inc in every st around. (12)
- Rnd 3: Sc in each st around. (12)
- Rnd 4: [Dec] repeat 2 times, then 10 sc. (10)
- Rnds 5–13: Sc in each st around. (10)
- Rnd 14: Dec 5 times. (5)
Fasten off, leaving a tail for sewing. Stuff lightly and set aside.
The Back Legs (Make 2)
The back legs require an oval-shaped base to give the bunny a sitting position.
The Sole (Oval Base)
First, we create the flat bottom of the foot.
- Foundation: Ch 6.
- Row 1: Starting in the 2nd ch from hook, work 4 sc. In the very last ch, work 3 sc. Turn. (6)
- Row 2: In the first st, work 2 sc. Sc in the next 4 sts. In the last st, work 2 sc. Turn. (8)
- Row 3: Sc in each st around the oval. (Totaling approximately 18 stitches once you work around both sides of the chain).
The Leg Body
- Rnd 4: To create the “toe” shape, decrease 3 stitches at the narrow end. Work [3 sc, dec] repeat 3 times, then 9 sc. (15)
- Rnd 5: Decrease 3 stitches at the narrow end. Work [2 sc, dec] repeat 3 times, then 7 sc. (12)
- Rnds 6–13: Sc in each st around. (12)
- Rnd 14: Dec 6 times. (6)
Fasten off, leaving a long tail. Stuff firmly and set aside.
The Ears (Make 2)
The ears are worked as long ovals to give them that floppy, bunny look.
- Foundation: Ch 12.
- Row 1: Starting in the 2nd ch from hook, sc in the next 10 chs. In the last ch, work 3 sc. Turn to work on the other side of the chain. (14)
- Row 2: 2 sc in the first st, sc in next 10 sts, 2 sc in the last st. (16)
- Row 3: Sc in each st around. (16)
- Row 4: [3 sc, inc] repeat around. (approx 20)
- Rnds 5-10: Sc in each st around to reach your desired length.
Fasten off, leaving a tail for sewing. Do not stuff the ears; they look best when they are flat and floppy.
The Tiny Tail
- Rnd 1: Create a MR and work 6 sc into the ring. (6)
- Rnd 2: Inc in every st around. (12)
- Rnd 3: [1 sc, inc] repeat 6 times. (18)
- Rnd 4: Sc in each st around. (18)
Fasten off, leaving a tail. Stuff lightly.
Assembly and Finishing Touches
This is where your bunny truly comes to life! Take your time with the placement to ensure your bunny is symmetrical.
The Face
- Eyes: Insert your safety eyes between Rnds 9 and 10 of the head, about 5-7 stitches apart.
- Nose: Using your pink yarn and embroidery needle, stitch a small horizontal line or a tiny triangle just below the eyes.
- Eyebrows: Using black yarn, stitch two tiny, slightly curved lines above the eyes to give your bunny personality!
Attaching the Limbs (The “Moveable” Trick)
To make the legs moveable, we won’t just sew them to the surface. Instead, we will use a “thread attachment” technique:
- Thread a long piece of strong yarn through the base of the front leg.
- Pass that yarn through the body of the bunny at the desired attachment point.
- Bring the yarn back out through the leg and tie it off securely inside the leg.
- Repeat this for the back legs. This creates a “pivot” point that allows the legs to move slightly!
Final Details
Sew the ears to the top of the head and the tail to the back. Once everything is secure, give your bunny a little squeeze to make sure the stuffing is even.
Pro Tips for Perfect Amigurumi
To take your crochet skills to the next level, keep these tips in mind:
- Use the Invisible Decrease: Instead of a standard decrease, insert your hook into the front loops only of the next two stitches, then yarn over and pull through. This prevents gaps in your work.
- Tension is Key: Keep your tension consistent. If your stitches are too loose, the stuffing will peek through. If they are too tight, your hands might cramp.
- Work in Continuous Rounds: Use a stitch marker! In amigurumi, it is very easy to lose count of your rounds, which can lead to a lopsided bunny.
- The “Poke” Method: When stuffing, use a chopstick or a pencil to push the fiberfill into tight corners, like the neck and the ends of the legs.