How to Crochet a Cute Amigurumi Pigeon: Sazz Paloma Pattern Tutorial
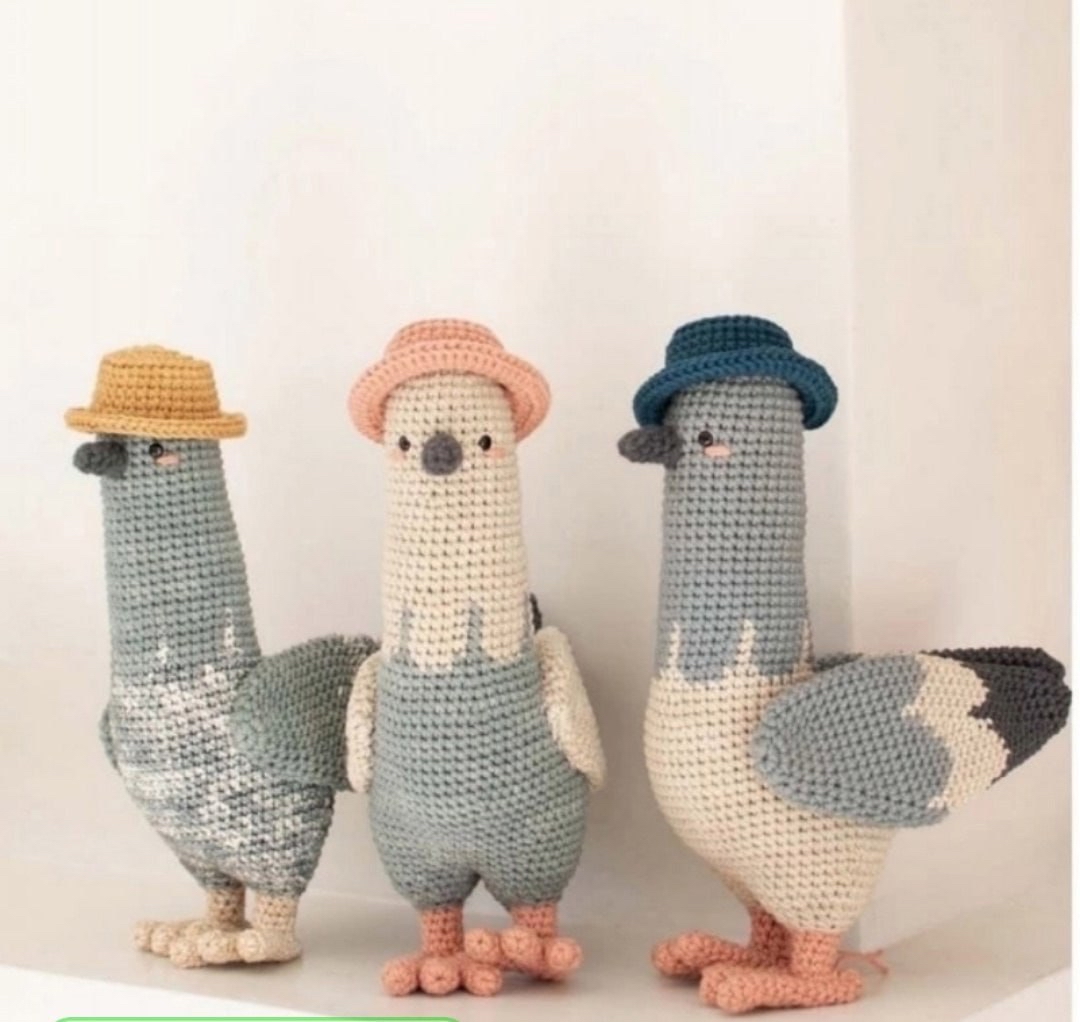
Are you looking for your next adorable amigurumi project? There is something incredibly charming about a pigeon wearing a tiny hat, and this “Sazz Paloma” crochet pigeon is the perfect project to add some personality to your shelf or to gift to a friend. This intermediate-level tutorial will guide you through creating a stylish, textured bird that is as fun to make as it is to display.
In this guide, we will walk through every step of the process, from the tiny beak to the colorful colorwork on the neck and wings. Whether you are a seasoned amigurumi artist or looking to level up your tapestry crochet skills, this pigeon project is a delightful challenge.
Introduction
This crochet pigeon stands approximately 10 inches tall when using the recommended yarn weights. It features a unique, sculptural body that combines a head and torso into one seamless piece, making it sturdy and cute. To achieve the best results, we will be using a spiral crochet technique, which means we won’t be joining rounds with a slip stitch. This creates a much smoother, professional finish for your amigurumi.
This pattern incorporates tapestry crochet (also known as Jacquard crochet) for the neck and wings. This technique allows us to change colors mid-row to create beautiful patterns. Don’t be intimidated—with a little patience, you’ll be making these colorful details look effortless!
Materials & Abbreviations
To ensure your pigeon looks just like the photos, please gather the following supplies. Using cotton yarn will give your bird a great stitch definition and help it hold its shape.
Materials Needed
- Crochet Hook: 2.75 mm (C-2)
- Yarn: Medium weight cotton yarn. You can use Worsted weight (approx. 186 yards per 3.5 oz) or DK weight (approx. 218 yards per 3.5 oz).
- Yarn Colors:
- Teal/Blue-Grey (for the main body)
- Stone/Light Grey (for colorwork)
- Dusty Rose (for the feet)
- Dark Graphite (for the beak, tail, and accents)
- Honey/Yellow (for the hat)
- Safety Eyes: 6 mm
- Stuffing: High-quality polyester fiberfill
- Tools: Tapestry needle for sewing and embroidery, and stitch markers.
Abbreviations (US Terms)
Please note that this pattern is worked in continuous rounds (spiral).
- sc: single crochet
- inc: increase (2 sc in one stitch)
- dec: decrease (sc two stitches together)
- ch: chain
- sl st: slip stitch
- st(s): stitch(es)
- rnd: round
- [ ]: The number inside the brackets indicates the total stitch count at the end of that round.
Step-by-Step Instructions
The Beak
Use Graphite yarn.
Rnd 1: Make a magic ring and work 5 sc into the ring. [5]
Rnd 2: 1 sc in each st around. [5]
Rnd 3: (1 sc, 1 inc) repeat 2 times, 1 sc. [7]
Rnd 4-5: 1 sc in each st around. [7]
Fasten off, leaving a long tail for sewing. Stuff the beak lightly.
The Head and Body
Start with Teal/Blue-Grey yarn.
Rnd 1: Make a magic ring and work 6 sc into the ring. [6]
Rnd 2: 1 inc in each st around. [12]
Rnd 3: (1 sc, 1 inc) repeat 6 times. [18]
Rnd 4: (2 sc, 1 inc) repeat 6 times. [24]
Rnd 5: (3 sc, 1 inc) repeat 6 times. [30]
Rnd 6-14: 1 sc in each st around. [30]
Rnd 15: (14 sc, 1 inc) repeat 2 times. [32]
Note: Before continuing, sew the beak between rounds 10 and 12 on the side opposite the start of your rounds, just above the round 15 increase. Place the 6mm safety eyes between rounds 10 and 11, about 2 stitches away from the beak. You can also embroider small pink cheeks below the eyes.
Rnd 16-19: 1 sc in each st around. [32]
Rnd 20: (15 sc, 1 inc) repeat 2 times. [34]
Rnd 21-24: 1 sc in each st around. [34]
Rnd 25: (16 sc, 1 inc) repeat 2 times. [36]
Continue with the colorwork neck pattern using the provided diagram.
Rnd 26-31: 1 sc in each st around. [36]
Rnd 32: Find the center point on the back of the pigeon. If it isn’t perfectly centered, you may need to adjust your stitches. Ch 11. Place a stitch marker in the first chain. Work back into the chains: 1 inc, 9 sc, 1 sc in the base st. Continue around the body: 14 sc, 1 inc, 4 sc, 1 inc, 16 sc, 1 sc in the other side of the chain, 9 sc, 1 inc. [61]
Rnd 33: 2 inc, 58 sc, 1 inc. [64]
Rnd 34: (1 sc, 1 inc) repeat 2 times, 25 sc, 1 inc, 5 sc, 1 inc, 27 sc, 1 inc. [69]
Rnd 35-36: 1 sc in each st around. [69]
Rnd 37: 4 sc, 1 dec, 59 sc, 1 dec, 2 sc. [67]
Rnd 38: 1 sc in each st around. [67]
Rnd 39: 4 sc, 1 dec, 57 sc, 1 dec, 2 sc. [65]
Rnd 40: 1 sc in each st around. [65]
Rnd 41: 4 sc, 1 dec, 55 sc, 1 dec, 2 sc. [63]
Rnd 42: 1 sc in each st around. [63]
Rnd 43: 4 sc, 1 dec, 21 sc, 1 dec, 6 sc, 1 dec, 22 sc, 1 dec, 2 sc. [59]
Rnd 44: 1 sc in each st around. [59]
Rnd 45: 4 sc, 1 dec, 19 sc, 1 dec, 6 sc, 1 dec, 20 sc, 1 dec, 2 sc. [55]
Rnd 46: 1 sc in each st around. [55]
Rnd 47: 27 sc, 1 dec, 26 sc. [54]
Rnd 48: (7 sc, 1 dec) repeat 6 times. [48]
Rnd 49: 1 sc in each st around. [48]
Rnd 50: (6 sc, 1 dec) repeat 6 times. [42]
Stuff the head and body firmly. Do not cut the yarn yet.
The Legs
Use Teal/Blue-Grey yarn first.
Identify the center point on the back of the pigeon. Mark 21 stitches for each leg. From the center, ch 6 and join with 1 sc to the 21st stitch of the previous round. This creates a base for the leg.
Rnd 1: 21 sc in the body, 6 sc in the chain (working in the back loops only). [27]
Rnd 2: (7 sc, 1 dec) repeat 3 times. [24]
Rnd 3: (1 sc, 1 dec) repeat 8 times. [16]
Rnd 4: (2 sc, 1 dec) repeat 4 times. [12]
Switch to Dusty Rose yarn.
Rnd 5: (1 sc, 1 dec) repeat 4 times. [8]
Rnd 6-9: 1 sc in each st around. [8]
Fasten off, leaving a long tail. Stuff firmly.
For the second leg, start at the first unworked stitch on the back at Round 50. Follow the same steps as the first leg, but when working the chain, work in the front loops only. Repeat the pattern from Rnd 2-9.
The Feet
Use Dusty Rose yarn. Make 2.
First, make the three toes. Rnd 1: Magic ring, 6 sc. [6]. Rnd 2-4: 1 sc in each st. [6]
Fasten off the first two toes. For the third toe, do not fasten off. Instead, insert your hook into the second toe and work 3 sc, then work 3 sc into the first toe. Then, insert your hook into the second toe again to work the remaining 3 sc, and finally, work 6 sc through the third toe. [18]
Rnd 6: 1 sc in each st around. [18]
Rnd 7: (4 sc, 1 dec) repeat 3 times. [15]
Rnd 8: 1 sc in each st around. [15]
Rnd 9: (3 sc, 1 dec) repeat 3 times. [12]
Rnd 10: 1 sc in each st around. [12]
Rnd 11: (2 sc, 1 dec) repeat 3 times. [9]
Rnd 12: 1 sc in each st around. [9]
Rnd 13: (1 sc, 1 dec) repeat 3 times. [6]
Do not stuff the feet. Fasten off, leaving a long tail. Use a tapestry needle to pull the yarn through the center of the last 6 stitches and tighten to close the hole. Sew the feet to the legs.
The Wings
Make 2. Start with Teal/Blue-Grey yarn.
Rnd 1: Magic ring, 6 sc. [6]
Rnd 2: 1 inc in each st. [12]
Rnd 3: (2 sc, 1 inc) repeat 4 times. [16]
Rnd 4: (3 sc, 1 inc) repeat 4 times. [20]
Rnd 5: (4 sc, 1 inc) repeat 4 times. [24]
Rnd 6: 1 sc in each st. [24]
Rnd 7: 11 sc, 2 inc, 11 sc. [26]
Rnd 8: 1 sc in each st. [26]
Rnd 9: 12 sc, 2 inc, 12 sc. [28]
Rnd 10: 1 sc in each st. [28]
Rnd 11: 13 sc, 2 inc, 13 sc. [30]
Rnd 12: 1 sc in each st. [30]
Rnd 13: 14 sc, 2 inc, 14 sc. [32]
Continue with colorwork patterns for the remainder of the wings using the provided diagrams.
Rnd 14-18: 1 sc in each st. [32]
Rnd 19: (6 sc, 1 dec) repeat 4 times. [28]
Rnd 20-21: 1 sc in each st. [28]
Follow the second colorwork diagram.
Rnd 22: (5 sc, 1 dec) repeat 4 times. [24]
Rnd 23-24: 1 sc in each st. [24]
Rnd 25: (4 sc, 1 dec) repeat 4 times. [20]
Rnd 26-27: 1 sc in each st. [20]
Rnd 28: (3 sc, 1 dec) repeat 4 times. [16]
Rnd 29-30: 1 sc in each st. [16]
Rnd 31: (2 sc, 1 dec) repeat 4 times. [12]
Rnd 32-33: 1 sc in each st. [12]
Rnd 34: 6 dec. [6]
Fasten off, leaving a long tail. Do not stuff the wings. Use a tapestry needle to weave through the center of the stitches and pull tight to close the hole. Flatten the wings before sewing.
The Tail
Use Graphite yarn.
Rnd 1: Magic ring, 6 sc. [6]
Rnd 2: 1 sc in each st. [6]
Rnd 3: (1 sc, 1 inc) repeat 2 times, 1 sc. [7]
Rnd 4-5: 1 sc in each st. [7]
Fasten off, leaving a long tail. Stuff lightly.
The Stylish Hat
Use Honey/Yellow yarn.
Rnd 1: Magic ring, 8 sc. [8]
Rnd 2: 1 inc in each st. [16]
Rnd 3: (1 sc, 1 inc) repeat 8 times. [24]
Rnd 4: (2 sc, 1 inc) repeat 8 times. [32]
Rnd 5: Work in the back loops only, 32 sc. [32]
Rnd 6-8: 1 sc in each st. [32]
Rnd 9: (6 sc, 1 dec) repeat 4 times. [28]
Rnd 10: 1 inc in each st. [56]
Rnd 11: 1 sc in each st. [56]
Rnd 12: Work in the front loops only, 1 sl st in each st. [56]
Fasten off and weave in ends.
Finishing
Now comes the fun part—bringing your pigeon to life! Use your tapestry needle and the long tails left from various parts to assemble your creation:
- Wings: Sew the wings to the back of the body between rounds 20 and 24.
- Tail: Sew the tail to the bottom center of the body, between rounds 34 and 35.
- Feet: Sew the feet firmly to the bottom of the legs.
- Hat: Place the hat on top of the head.
Tips
To make your amigurumi look professional, keep these tips in mind:
- Use Stitch Markers: Since you are working in a continuous spiral, it is very easy to lose track of where your round begins. Always use a marker!
- Watch Your Tension: Try to keep your stitches consistent. If you crochet too loosely, the stuffing might show through. If you crochet too tightly, it can be difficult to insert your hook.
- Tapestry Crochet Neatness: When changing colors for the neck and wings, ensure you pull the “carried” yarn along the inside of the stitches to keep the outside looking clean.
- Firm Stuffing: When stuffing the body, make sure it is firm enough to stand upright, but not so tight that it distorts the shape of the stitches.