Starry Skies Crochet Blanket Pattern: A Beginner-Friendly Galaxy Motif Tutorial
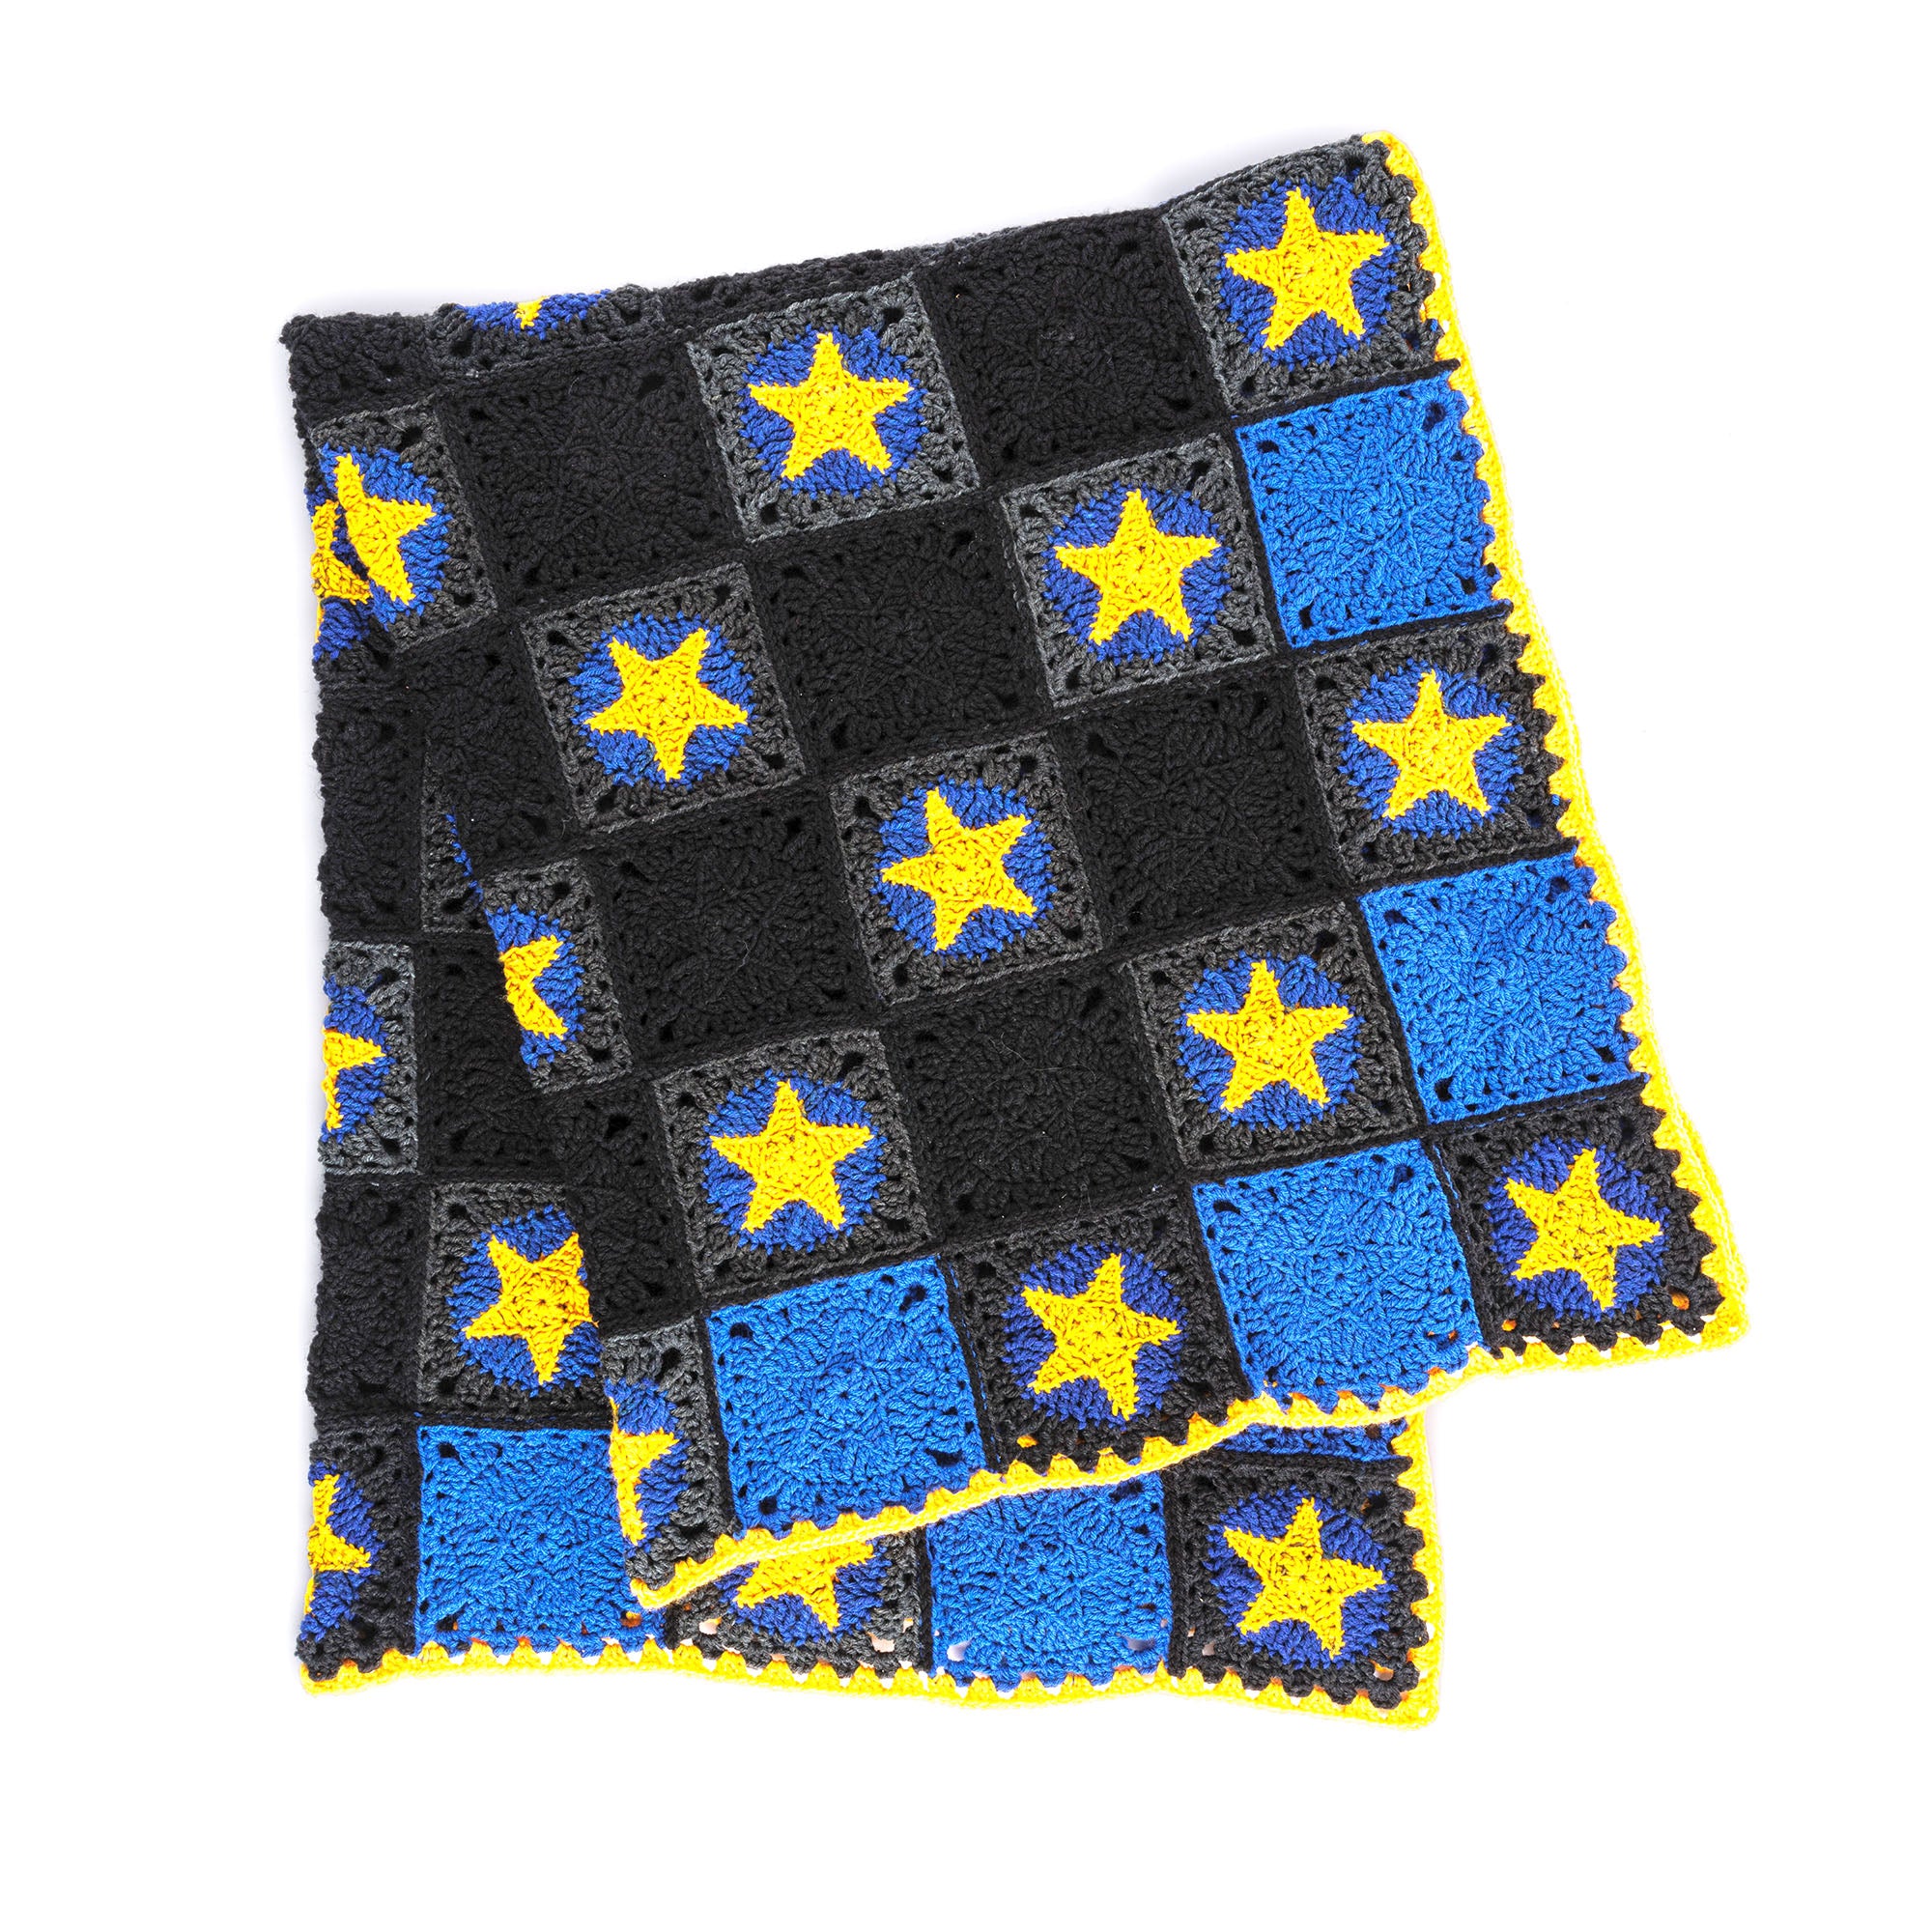
There is something incredibly soothing about looking up at a clear, midnight sky. The deep blues, twinkling stars, and vast expanses of darkness create a sense of peace and wonder. If you love that celestial aesthetic, you are going to adore this Starry Skies Crochet Blanket. This project combines colorful, star-shaped motifs with deep, moody solids to create a stunning textured blanket that looks much more complicated than it actually is!
This pattern is designed with beginners in mind. We will be working with beautiful geometric motifs that you can make while relaxing on the couch, and then joining them together to create a large, cozy throw. Whether you are looking to gift a loved one a handmade treasure or want to treat yourself to a new favorite lounge companion, this starry masterpiece is the perfect project for your crochet hook.
Materials & Abbreviations
Before we dive into the stitches, let’s make sure you have everything you need. To achieve the correct size and look, it is important to use a medium-weight yarn and maintain a consistent tension.
Yarn Requirements
You will need four different colors of medium-weight (weight 4) yarn. To ensure your blanket is large enough (approximately 55″ x 67″), please follow these quantities:
- Color A (Starry Night/Motif Color): 4 balls (You will need enough to make 50 motifs).
- Color B (Royal Blue): 2 balls or approximately 518 yards.
- Color C (Black): 3 balls or approximately 1,015 yards.
- Color D (Saffron Yellow/Edging Color): 1 ball or approximately 101 yards.
Tools
- Crochet Hook: U.S. size I/9 (5.5 mm) or the size needed to obtain gauge.
- Yarn Needle: A large, blunt needle for weaving in ends and seaming.
- Scissors.
Gauge
To ensure your blanket comes out to the intended dimensions, your gauge should be: 12 double crochet (dc) and 7.5 rows = 4 inches. Each individual motif should measure a 6-inch square.
Abbreviations (US Terms)
- Approx: Approximately
- Beg: Beginning
- Ch: Chain
- Dc: Double crochet
- Hdc: Half double crochet
- Sc: Single crochet
- Sl st: Slip stitch
- Sp(s): Space(s)
- St(s): Stitch(es)
- Tr: Treble crochet
- Tog: Together
- Yoh: Yarn over hook
- Long Tr2tog: This is a special stitch. Yarn over twice, insert hook into the indicated stitch, yarn over and pull up a loop, yarn over and pull through 2 loops, yarn over and pull through 2 loops. Repeat this entire process one more time in the same stitch.
Step-by-Step Instructions
This blanket is constructed using two types of motifs: the colorful “Star Gaze Motifs” and “Solid Motifs.” We will start by making the stars!
Crafting the Star Gaze Motifs
You will need to make 50 of these motifs using Color A. Note that each motif uses multiple colors to create the star effect. When working with pull-skeins, start with Color 1 (the shortest color rep) from the center, leaving a 4-inch tail to weave in later.
Round 1 (Color 1): Start with Color 1. Ch 4. Join with a sl st to the first ch to form a ring. Ch 3 (this counts as your first dc). Work 9 dc into the ring. Join with a sl st to the top of the starting ch-3. You should have 10 dc total.
Round 2 (Color 1): We will now create the star points. Working into the “bumps at the back of the chain” (the back loops), follow this sequence: *Ch 5. 1 sc in the 2nd ch from the hook, 1 hdc in the next ch, 1 dc in the next ch, and 1 tr in the last ch. Skip the next dc from Round 1, then sl st into the next dc. This completes one “Star Point.” Repeat from * 4 more times to complete a total of 5 star points. Ending the last rep, sl st into the top of the first dc of Round 1. Fasten off Color 1.
Round 3 (Color 2): Join Color 2. You will be working in the back loops only on both edges of the Star Points. Sl st in each of the next 2 chains. Ch 4. *1 dc in the next ch, 1 hdc in the next ch, 1 sc in the turning ch, 1 hdc in the next st, 1 dc in the next st, and 1 tr in the next st. Now, perform a Long Tr2tog over the next st and the first ch of the next Star Point. 1 tr in the next ch. Repeat from * 3 more times. Then, repeat from * to the ** mark, noting that the last leg of your Long Tr2tog will work into the same space as your first sl st. Join. Fasten off Color 2.
Round 4 (Color 3): Join Color 3. Ch 4. *2 dc in the next st. Ch 1. 1 dc in the next st, 1 hdc in the next st, 1 sc in the next st. Ch 1. 1 sc in the next st, 1 hdc in the next st, 1 dc in the next st. Ch 1. 2 dc in the next st, 1 tr in the next st. **Ch 3 (this creates your corner). 1 tr in the next st. Repeat from * twice more, then repeat from * to ** once. Join with 1 dc into the top of the ch-4.
Round 5 (Color 3): Sl st around the post of the joining dc. Ch 2. Work 3 hdc around the post of the joining dc. *(Ch 1, 3 hdc) in each ch-1 space until you reach the next ch-3 space. In the ch-3 space, work (3 hdc, ch 3, 3 hdc). Repeat from * twice more, then repeat from * to ** once. Finish by working 3 hdc around the post of the joining dc. Ch 3. Join and fasten off Color 3, leaving a 24-inch tail for seaming.
Creating Solid Motifs
To fill out the night sky, you will need to make two sets of solid-colored motifs using the same instructions as the Star Gaze Motifs, but without the color changes.
- Color B Motifs: Make 18 motifs using only Color B.
- Color C Motifs: Make 31 motifs using only Color C.
Assembling Your Blanket
Once all 99 motifs (50 star, 18 blue, 31 black) are complete, it is time to bring them together!
The Flat Slip Stitch Join: Using Color C, you will join the motifs together. We want to create a flat, professional look. Work through the back loops only of the motifs. Ensure the Right Side (RS) of every motif is facing up. A pro tip: keep your working yarn on the Wrong Side (WS) of the work so that only a neat, flat slip stitch chain is visible on the Right Side of your finished blanket.
Layout: Join the motifs into 11 horizontal strips. Each strip should consist of 9 motifs. Once your 11 strips are finished, join the strips together to form the full rectangular blanket.
Adding the Final Edging
To give the blanket a polished, framed look, we will add a bright yellow edging using Color D.
Join Color D with a sl st to any corner ch-3 space of the blanket. Ch 3 (counts as 1 dc), and work 2 dc into that same corner space. *Ch 1, 3 dc in the next ch-1 or ch-3 space. Repeat from * until you reach the next corner. In the corner ch-3 space, work (3 dc, ch 3, 3 dc). Repeat the process for the next side. As you work the “return” side of the edging, follow the pattern: **Ch 1, 3 dc in the next ch-1 or ch-3 space. Repeat from ** to the next corner. In the corner, work (3 dc, ch 3). Join with a sl st to the top of the first ch-3 and fasten off.
Finishing
The final step is the most important for a clean look: weaving in your ends! Using your yarn needle, carefully weave the long tails from your motifs and your edging into the stitches so they are completely hidden. Pull the tails tight to secure them, but don’t pull so hard that the fabric puckers.
Tips for Success
- Manage Your Color Changes: If you find you have too much yarn left at the end of a color round, pull back a few stitches and loosen your tension slightly to finish the round. If you are running low, tighten your tension slightly to stretch the color a bit further.
- Mind the Back Loops: In Round 3 and during assembly, pay close attention to “working in the back loops only.” This is what gives the blanket its beautiful texture and allows the join to lay flat.
- Count Your Stitches: When working the star points, it is easy to lose track. Periodically count your stitches to ensure you have 5 even points.
- Consistent Tension: Since this blanket is made of many individual pieces, try to keep your tension consistent so the motifs all measure roughly 6 inches. This will make assembly much easier!