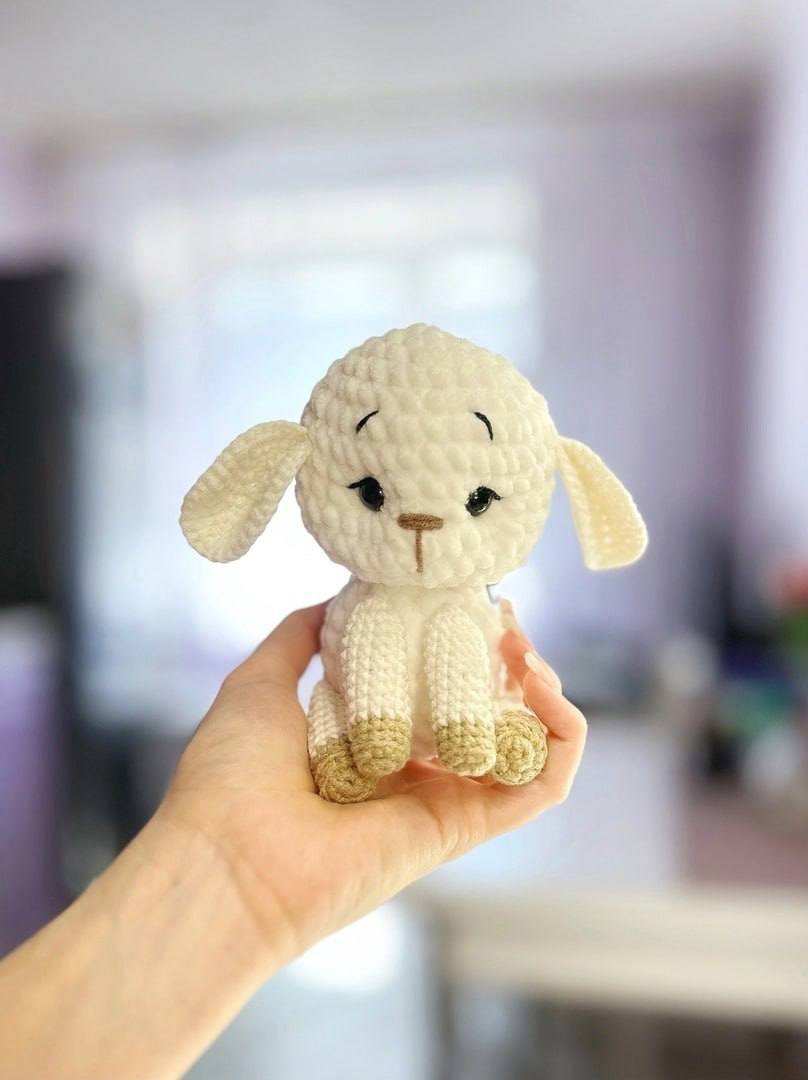
How to Crochet a Cute Amigurumi Sheep: A Step-by-Step Tutorial
There is nothing quite as heartwarming as a handmade stuffed animal, especially one as soft and sweet as this little amigurumi sheep. Whether you are looking to create a unique nursery decoration, a gentle gift for a newborn, or just a new project to relax with, this little lamb is the perfect companion. This pattern utilizes a wonderful mix of textures—using plush yarn for the cuddly body and head, and a more structured cotton yarn for the ears—to create a professional, high-quality look that is as durable as it is adorable.
This tutorial is designed to be beginner-friendly. If you are comfortable with the basic stitches, you will find this project to be a rewarding and meditative experience. Grab your hook and your favorite soft yarns, and let’s bring this little sheep to life!
Materials & Abbreviations
To ensure your sheep turns out just like the one in the photos, I recommend using a combination of yarn weights. The contrast between the thick, velvety plush yarn and the smoother cotton yarn gives the sheep its characteristic “sweet” expression and prevents the ears from becoming too floppy.
What You Will Need
- Plush Yarn (White): A thick, chenille-style plush yarn is best for the head and body to give it that signature huggable feel.
- Cotton Yarn (White and Light Tan): A medium-weight cotton or cotton-blend yarn is perfect for the ears and any decorative details.
- Crochet Hooks: You will need a 4.0 mm (approx. G/6) hook for the plush yarn and a 2.0 mm (approx. B/1) hook for the cotton yarn.
- Safety Eyes: 10 mm black safety eyes.
- Embroidery Floss: Black thread for the eyelashes and eyebrows, and a small amount of tan/brown thread for the nose.
- Stuffing: High-quality polyester fiberfill.
- Tools: A yarn needle, sharp scissors, and a stitch marker.
Abbreviations (US Terms)
Please ensure you are using US crochet terminology for this pattern. Working in amigurumi requires tight tension to ensure the stuffing does not show through the stitches.
- MR: Magic Ring (or Magic Circle)
- sc: Single crochet
- inc: Increase (2 sc in the same stitch)
- dec: Decrease (sc 2 stitches together)
- sl st: Slip stitch
- BLO: Back loop only
- St(s): Stitch(es)
Step-by-Step Instructions
Before you begin, remember that amigurumi is worked in continuous rounds. I highly recommend using a stitch marker to keep track of the first stitch of every round.
The Head
Use the white plush yarn and the 4.0 mm hook.
We start with a magic ring to ensure the top of the head is closed tightly.
- Round 1: 6 sc in MR (6)
- Round 2: 6 inc (12)
- Round 3: (1 sc, inc) repeat 6 times (18)
- Round 4: 1 sc, inc, (2 sc, inc) repeat 5 times, 1 sc (24)
- Round 5: (3 sc, inc) repeat 6 times (30)
- Round 6: 2 sc, inc, (4 sc, inc) repeat 5 times, 2 sc (36)
- Rounds 7–10: 36 sc in each round (4 rounds total)
- Round 11: 2 sc, dec, (4 sc, dec) repeat 5 times, 2 sc (30)
- Round 12: 30 sc (30)
- Round 13: (3 sc, dec) repeat 6 times (24). Stop here to begin stuffing the head firmly.
- Round 14: 1 sc, dec, (2 sc, dec) repeat 5 times, 1 sc (18)
- Round 15: (1 sc, dec) repeat 6 times (12). Join with a sl st to the first stitch.
Fasten off, leaving a long tail for sewing the head to the body later.
The Ears (Make 2)
Use the white cotton yarn and the 2.0 mm hook.
- Round 1: 6 sc in MR (6)
- Round 2: 6 inc (12)
- Round 3: (1 sc, inc) repeat 6 times (18)
- Round 4: (2 sc, inc) repeat 6 times (24)
- Round 5: (3 sc, inc) repeat 6 times (30)
- Round 6: (4 sc, inc) repeat 6 times (36)
Do not join the rounds. Instead, fold the ear in half so the open ends meet. Using your 2.0 mm hook and white yarn, slip stitch through both layers to close the edge. Fasten off, leaving a tail for sewing.
The Body
Use the white plush yarn and the 4.0 mm hook.
- Round 1: 6 sc in MR (6)
- Round 2: 6 inc (12)
- Round 3: (1 sc, inc) repeat 6 times (18)
- Round 4: 1 sc, inc, (2 sc, inc) repeat 5 times, 1 sc (24)
- Rounds 5–8: 24 sc in each round (4 rounds total)
- Round 9: 1 sc, dec, (2 sc, dec) repeat 5 times, 1 sc (18). Stuff the body firmly.
Join with a sl st and fasten off, leaving a long tail for assembly.
Finishing
This is where your sheep truly gains its personality! Take your time with the embroidery, as this is what gives the lamb its “cute” expression.
Face Details
First, insert your 10 mm safety eyes between rounds 8 and 9 of the head. Position them so there are 4 stitches between the eyes. Once the eyes are secure, we will add the facial features:
- The Nose: Using tan/brown embroidery thread, sew a small horizontal line about 2 stitches wide between rounds 9 and 10. Then, sew a small vertical line extending from the center of that line down through rounds 10 to 12.
- Eyelashes: Using black thread, add small, delicate strokes just below the outer corners of the eyes.
- Eyebrows: Using black thread, embroider two slight arches above the eyes. For the best look, place them approximately 2 stitches above the eyes (aiming for the level of rounds 5 and 6).
Assembly
- Ears: Sew the ears onto the head between rounds 7 and 8. To get the positioning right, count 5 stitches to the side of the eyes and 1 stitch upward.
- Head to Body: Using your yarn needle and the tail from the head, sew the head securely onto the top of the body.
Tips for Success
Creating amigurumi is a skill that improves with practice. Here are a few professional tips to help you achieve the best results with this pattern:
Work Tight Tension
When working with plush yarn, it is very easy for the stuffing to peek through the gaps in your stitches. To prevent this, try to keep your tension slightly tighter than you would with standard cotton yarn. If you see gaps, don’t be afraid to go back and add a few more stitches to those areas.
Master the Magic Ring
The Magic Ring is the foundation of almost all amigurumi. If you find it difficult to pull the ring tight at the end of your first round, don’t worry! It takes practice. The goal is to have no visible hole at the very top of your head or body.
Stuffing Technique
When stuffing the head and body, work in small clumps rather than one large ball. This allows you to push the stuffing into the corners and curves, ensuring the shape remains smooth and rounded rather than lumpy.
Embracing Imperfection
If your stitches aren’t perfectly even, don’t sweat it! The beauty of handmade items is their unique character. A slightly wonky ear or an asymmetrical eyebrow only adds to the charm of your little lamb.