How to Crochet Amigurumi Spring Bunnies: A Step-by-Step Beginner Tutorial
Spring is just around the corner, and there is no better way to celebrate the season of renewal than by crafting something adorable! If you are looking for your next crochet project, these charming Amigurumi Spring Bunnies are the perfect choice. Whether you want to make a pair of little friends for a nursery, a sweet Easter decoration, or a personalized gift for a loved one, these bunnies are sure to bring a smile to anyone’s face.
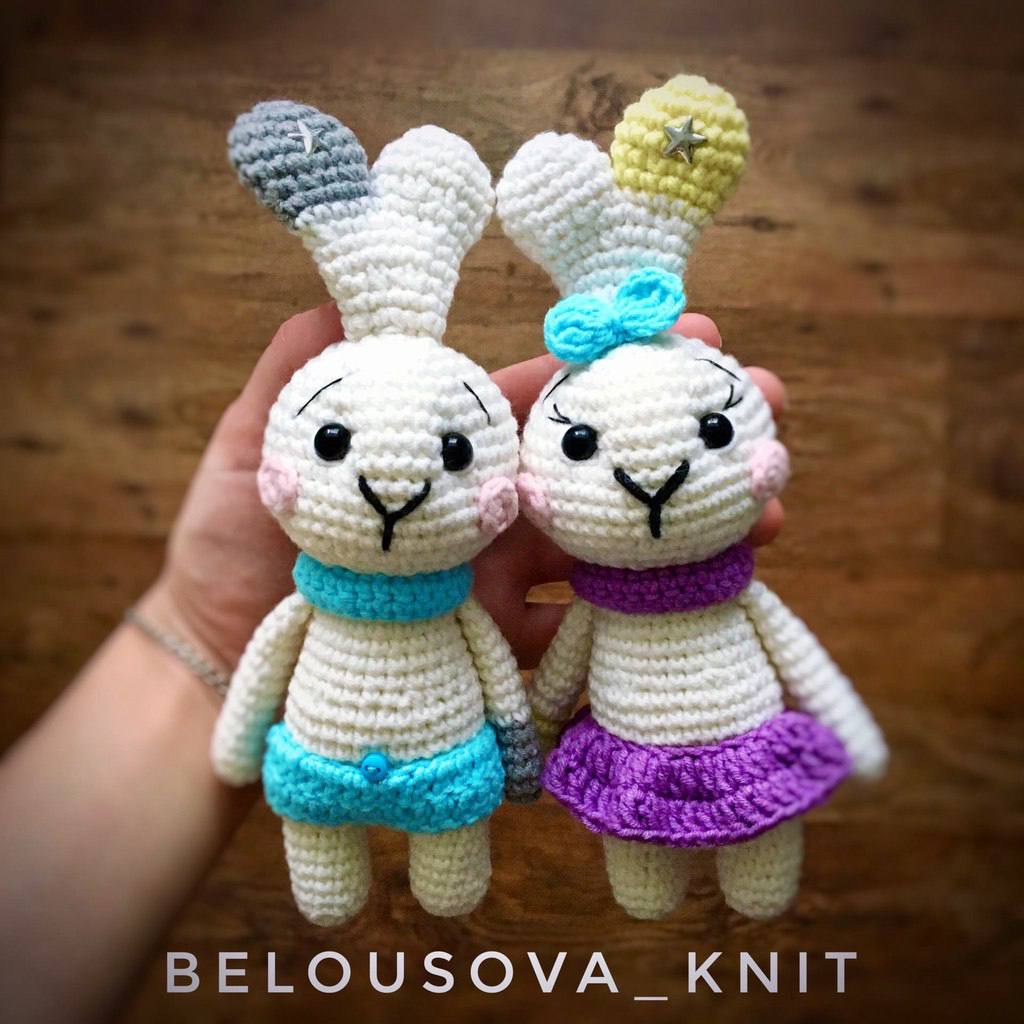
In this detailed tutorial, I will walk you through the entire process of creating these two little characters—one dressed in cute boyish pants and the other in a lovely skirt and bow. While the finished bunnies stand about 7.5 inches tall, the process is broken down into manageable steps that are beginner-friendly. Grab your hook, pick out some pastel yarns, and let’s get stitching!
Materials and Tools
To achieve the best results and ensure your bunnies have that professional, high-quality look, I recommend using a cotton or cotton-blend yarn. For this specific pattern, the following materials are needed:
- Yarn: Medium weight cotton/acrylic blend (such as YarnArt Jeans). You will need the following colors:
- White (Main color)
- Grey or Lemon Yellow (for ear accents and one arm)
- Purple (for the girl’s skirt and collar)
- Light Blue (for the boy’s pants and collar)
- Pink (for cheeks)
- Crochet Hook: A size suitable for your yarn (typically 2.0mm to 2.5mm to ensure tight stitches).
- Stuffing: Polyester fiberfill (hollofyber).
- Safety Eyes: 8mm semi-beads or safety eyes.
- Needles: A tapestry needle for sewing and a standard needle for eye tensioning.
- Thread: Black embroidery thread (for the nose, eyebrows, and eyelashes) and white thread (for eye tensioning).
- Other: Scissors and stitch markers.
Crochet Abbreviations
This pattern uses standard US crochet terminology. Please ensure you are familiar with these terms before beginning:
- MR: Magic Ring
- ch: Chain
- sc: Single Crochet
- inc: Increase (2 sc in one stitch)
- dec: Decrease (sc 2 together)
- sl st: Slip Stitch
- hdc: Half Double Crochet
- dc: Double Crochet
- tr: Treble Crochet
- FLO: Front Loop Only
- BLO: Back Loop Only
- (…) : Indicates the number of stitches in the round.
- (…) * N: Repeat the sequence inside the parentheses N times.
Step-by-Step Instructions
The Head
Using white yarn, we will create a round shape. Remember to stuff the head firmly as you work your way up.
R1: 6 sc in MR (6)
R2: 6 inc (12)
R3: (1 sc, inc) * 6 (18)
R4: 1 sc, inc, (2 sc, inc) * 5, 1 sc (24)
R5: (3 sc, inc) * 6 (30)
R6: 2 sc, inc, (4 sc, inc) * 5, 2 sc (36)
R7: (5 sc, inc) * 6 (42)
R8–13: 42 sc (6 rounds total)
R14: 5 sc, dec (36)
R15: 2 sc, dec, (4 sc, dec) * 5, 2 sc (30)
R16: (3 sc, dec) * 6 (24)
R17: 1 sc, dec, (2 sc, dec) * 5, 1 sc (18)
R18: (1 sc, dec) * 6 (12)
To close, work 2 dec, then 1 hdc. Leave a long tail to close the hole using the FLO method (see the Assembly section for details).
The Ears (Make 2)
The ears are worked in two parts and then joined together. Do not stuff the ears.
Part One (Grey or Lemon Yellow)
R1: 6 sc in MR (6)
R2: 6 inc (12)
R3: (1 sc, inc) * 6 (18)
R4–5: 18 sc (2 rounds)
R6: (1 sc, dec) * 6 (12)
R7: 12 sc (12)
Fasten off and leave a tail.
Part Two (White)
R1: 6 sc in MR (6)
R2: 6 inc (12)
R3: (1 sc, inc) * 6 (18)
R4–5: 18 sc (2 rounds)
R6: (1 sc, dec) * 6 (12)
Do not fasten off. We will now join the two parts together by crocheting around them.
Joining the Ear
Work 12 sc through the first part, then 12 sc through the second part. You should have 24 stitches total. Mark the beginning of the round.
R7: (2 sc, dec) * 6 (18)
R8–9: 18 sc (2 rounds)
R10: (1 sc, dec) * 6 (12)
R11–12: 12 sc (2 rounds)
Finish with 1 hdc, fasten off, and leave a tail for sewing.
The Legs (Make 2)
Both legs are worked in white yarn and should be stuffed.
Right Leg
R1: 6 sc in MR (6)
R2: 6 inc (12)
R3–8: 12 sc (6 rounds)
Fasten off and leave a tail.
Left Leg
R1: 6 sc in MR (6)
R2: 6 inc (12)
R3–9: 12 sc (7 rounds)
Do not fasten off; you will continue to the body.
The Body
We will build the body by joining the legs together. Using the tail from the left leg, chain 3. Work 12 sc around the right leg, 3 sc in the chain (to act as a bridge), 12 sc around the left leg, and 3 sc in the remaining chain stitches. You should have 30 stitches. Mark the start of the round.
R1–7: 30 sc (7 rounds)
R8: (4 sc, dec) * 5 (25)
R9–11: 25 sc (3 rounds)
R12: 5 sc, dec, 10 sc, dec, 6 sc (23)
R13–14: 23 sc (2 rounds)
Change color to Light Blue (for the boy) or Lemon/Purple (for the girl).
R15: (3 sc, inc) * 5, 3 sc (28)
R16–17: 28 sc (2 rounds)
Finish with 1 hdc, fasten off, and leave a tail. If making the boy, fold the blue section inward to create a “tucked” look.
The Arms (Make 2)
The arms are not stuffed. One arm is colored (Grey/Lemon) and the other is White.
Colored Arm
R1: 6 sc in MR (6)
R2: (1 sc, inc) * 3 (9)
R3–5: 9 sc (3 rounds)
Change to white yarn.
R6–13: 9 sc (8 rounds)
Fold the piece in half and crochet 4 sc through both sides to close it. Fasten off.
White Arm
Follow the same instructions as the colored arm, but use white yarn from the very beginning (R1 through R13).
The Tail
Using white yarn, stuff the tail lightly.
R1: 6 sc in MR (6)
R2: 6 inc (12)
R3: 12 sc (1 round)
R4: (2 sc, dec) * 3 (9)
Finish with 1 hdc and fasten off.
Cute Outfits
Boy’s Pants
Chain 30 and join with a sl st to form a ring.
R1: 2 ch, 29 dc, sl st (30)
R2: 2 ch, 29 dc, sl st (30)
For the gusset: Work 3 rows of 3 sc, attaching them to the center of the pants visually. Turn the pants inside out after sewing.
Girl’s Skirt
Chain 30 and join with a sl st to form a ring.
R1: 2 ch, 1 dc, (29 dc-inc), sl st (60)
R2: 2 ch, 59 dc, sl st (59)
Girl’s Bow
In an MR: 3 ch, 3 tr, 3 ch, 1 sc, 3 ch, 3 tr, 3 ch. Pull the ring tight and leave small tails. Tie the tails in the middle of the bow to secure the shape.
Finishing and Assembly
Adding the Face
This is where your bunny truly comes to life! To create a professional, soulful look, we will use a technique called eye tensioning.
Eyes and Eye Tensioning
Glue your 8mm safety eyes onto rounds 8 and 9 of the head, ensuring they are 8 sc apart. To create the eye indentation:
Using white thread, mark four points around each eye (labeled 1, 2, 3, and 4). Thread your needle and enter the head at the last row, then weave the thread through points 1, 2, 3, and 4. Repeat this process three times, pulling the thread evenly from both sides to create a soft, recessed look. Finally, exit through the last row, tie off, and hide the thread inside.
Eyelashes and Nose
Lower Eyelid (Girl version): Mark four points between rounds 5/6 and 6/7. Using white thread, weave through points 1, 2, 3, and 4 to create a soft underline.
Nose: Using black thread, mark four points. Enter at point 1, then go to 3, then 2, then 3, then 4, and finish at 3. Pull tight to create a little “Y” shape.
Eyelashes (Girl version): For extra cuteness, embroider small lashes between rounds 5/6 and 6/7 using black thread.
Eyebrows: Embroider thin lines between rounds 4/5 and 7/8. Each eyebrow should be about 3 sc wide.
Final Assembly
Now, it is time to put all your hard work together!
- Cheeks: Sew pink felt or embroidered pink stitches onto rounds 11–12, about 5 sc away from the nose.
- Ears: Sew the ears onto the top of the head between rounds 1 and 2.
- Head: Sew the head onto the body.
- Arms: Sew the arms to the sides of the body between rounds 12 and 13.
- Tail: Sew the tail to the back of the body between rounds 4 and 6.
- Clothes: Sew the pants or skirt onto the body between rounds 4 and 5. For the girl, don’t forget to attach the bow to her ears!
Tips for Success
If you are a beginner, don’t be discouraged if your first bunny looks a little different than the photos. Amigurumi is all about practice! Here are a few quick tips:
- Tension is Key: Try to keep your crochet tension consistent so your stuffing doesn’t show through the stitches.
- Use Stitch Markers: In amigurumi, it is very easy to lose count. Always use a marker to identify the start of your round.
- Stuffing: Stuff your pieces firmly but not so hard that they lose their shape. For the head and body, a firm stuff is better.
- Have Fun: The best part of crochet is the creativity. Feel free to change the colors or add even more accessories to make your bunny unique!