Adorable Mini Dwarf Baby Crochet Pattern: Free Amigurumi Tutorial
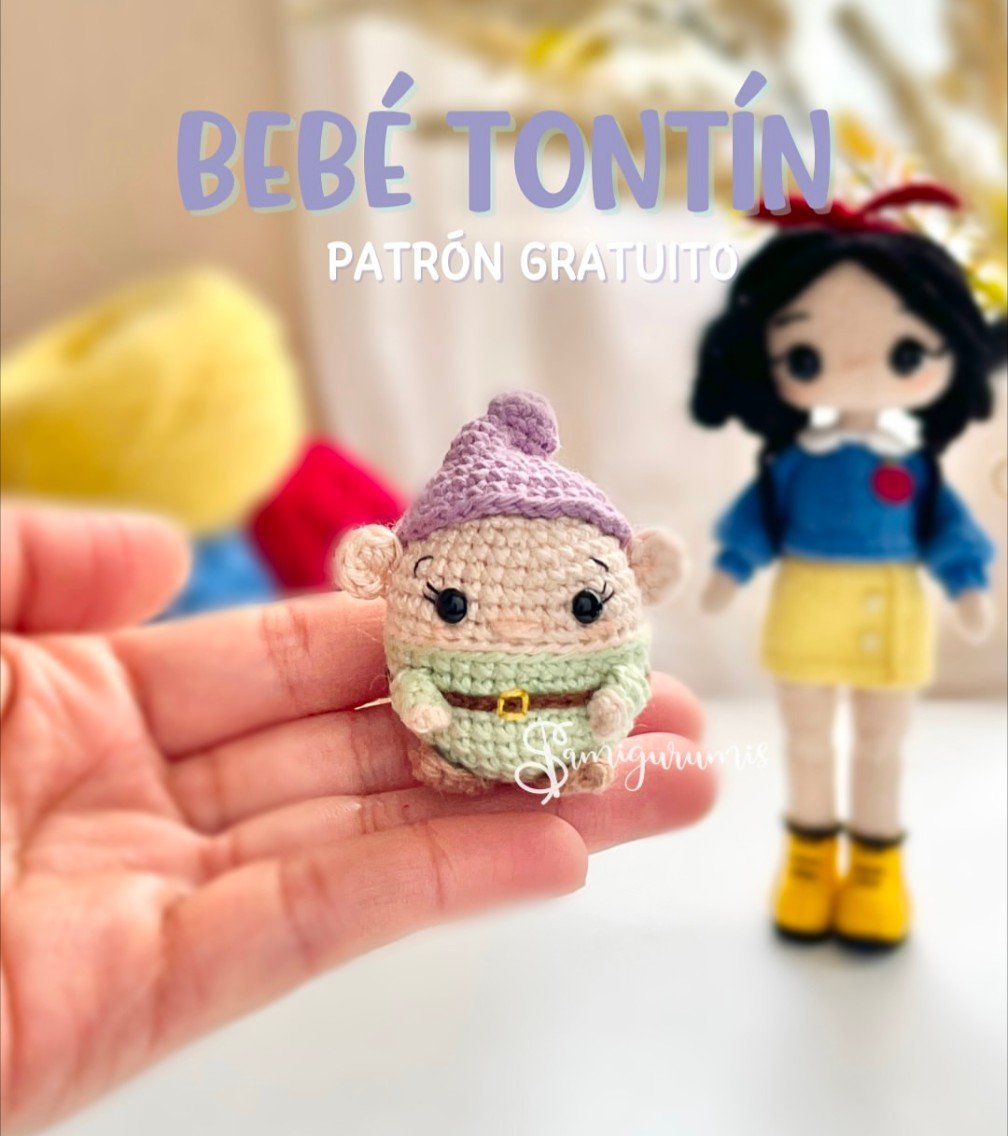
Looking for a quick, cute, and satisfying crochet project? This Mini Dwarf Baby amigurumi is the perfect addition to your collection. Whether you are looking to create a tiny companion for a larger doll or simply want a charming desk buddy, this little character is a delight to make. With its oversized hat and tiny boots, this pattern captures all the whimsy of a fairytale forest in a palm-sized plushie.
This project is designed to be beginner-friendly. We will be using basic amigurumi techniques like the magic ring, increasing, and decreasing. Because the finished toy is so small, it is a fantastic way to practice your tension and precision without committing to a massive project. Grab your hooks and some colorful yarn, and let’s get started on this magical little creature!
Materials & Abbreviations
To ensure your Mini Dwarf Baby turns out just right, you will need the following materials. Since this project is quite small, you only need a small amount of each yarn color—roughly 20 to 50 yards of each should be plenty.
Materials Needed
- Yarn: Fingering weight cotton yarn in the following colors:
- Nude (for the skin)
- Pastel Green (for the outfit)
- Lavender (for the hat)
- Beige (for the boots)
- Embroidery Floss: Small amounts of Black, Brown, and Yellow thread for detailing.
- Crochet Hooks: 1.75 mm and 2.0 mm hooks.
- Eyes: 4.5 mm safety eyes.
- Stuffing: Polyester fiberfill.
- Tools: A yarn needle for sewing and assembling, and a small amount of textile glue.
Abbreviations (US Terms)
- MR: Magic Ring
- ch: Chain
- sc: Single crochet
- sl st: Slip stitch
- hdc: Half double crochet
- inc: Increase (two single crochet in one stitch)
- dec: Decrease (crochet two stitches together)
- 3sc: Three single crochets in one stitch (cluster increase)
- BLO: Back loop only
- Rnd: Round
Step-by-Step Instructions
The Body
For the body, we will use the 2.0 mm hook and Pastel Green yarn to start. The body is worked in a continuous spiral, so we recommend using a stitch marker to keep track of your rounds.
- Rnd 1: MR with 6 sc (6)
- Rnd 2: 6 inc (12)
- Rnd 3: (1 sc, 1 inc) x 6 (18)
- Rnd 4: 1 sc, 1 inc, (2 sc, 1 inc) x 5, 1 sc (24)
- Rnd 5: (3 sc, 1 inc) x 6 (30)
- Rnd 6: (14 sc, 1 inc) x 2 (32)
- Rnd 7: 32 sc (32)
- Rnd 8: 7 sc, 1 inc, 16 sc, 1 inc, 7 hdc (34)
- Rnd 9-10: 34 sc for 2 rounds (34)
Now, switch to Nude yarn for the head and face.
- Rnd 11: BLO 34 sl st (34)
- Rnd 12: BLO 34 sc (34)
- Rnd 13-14: 34 sc for 2 rounds (34)
- Rnd 15: 7 sc, 1 dec, 16 sc, 1 dec, 7 hdc (32)
- Rnd 16: (6 sc, 1 dec) x 4 (28)
Adding the Eyes: Before moving further, place your 4.5 mm safety eyes between Rnd 13 and Rnd 14. Ensure they are spaced 6 sc apart for a cute, wide-eyed look.
- Rnd 17: (1 dec, 5 sc) x 4 (24)
- Rnd 18: (4 sc, 1 dec) x 4 (20)
- Rnd 19: (8 sc, 1 dec) x 2 (18)
Stuffing: Now is the time to fill the body and head firmly with polyester fiberfill. Make sure to distribute the stuffing evenly so your dwarf doesn’t lean to one side.
- Rnd 20: (1 dec, 1 sc) x 6 (12)
- Rnd 21: 6 dec (6)
Fasten off, weave the tail through the remaining 6 stitches to close the hole, and hide the yarn end inside the body.
The Arms (Make 2)
Use the 1.75 mm hook and Nude yarn.
- Rnd 1: MR with 5 sc (5)
Switch to Pastel Green yarn:
- Rnd 2: BLO 5 sl st (5)
- Rnd 3: BLO 5 sc (5)
Leave a long tail for sewing. These will be attached between Rnd 8 and Rnd 9 of the body.
The Feet (Make 2)
Use the 1.75 mm hook and Beige yarn. These are worked around a chain rather than in a ring.
Chain 4. Starting from the 3rd chain from the hook, work the following: 1 inc, 1 sc, 3 sc in the first chain (cluster increase), and 2 sc. Fasten off and leave a long tail for sewing. These attach between Rnd 3 and Rnd 5 of the body.
The Ears (Make 2)
Use the 1.75 mm hook and Nude yarn.
- Rnd 1: MR with 5 hdc (5)
Fasten off, leaving a long tail for sewing. Position these between Rnd 13 and Rnd 14, approximately 5 sc away from the eyes.
The Belt (Correa)
Using Brown embroidery thread and the 1.75 mm hook, chain 44. Fasten off and cut the thread. This piece is not sewn but rather glued around the waist of the dwarf between Rnd 8 and Rnd 9 using textile glue.
The Hat
Use the 1.75 mm hook and Lavender yarn.
- Rnd 1: MR with 6 sc (6)
- Rnd 2: 2 sc, 1 inc, 2 sc, 1 inc (8)
- Rnd 3: 8 sc (8)
- Rnd 4: 4 inc, 4 sc (12)
- Rnd 5: 12 sc (12)
- Rnd 6: (2 sc, 1 inc) x 4 (16)
- Rnd 7: 12 sc, 4 inc (20)
- Rnd 8: (4 sc, 1 inc) x 4 (24)
- Rnd 9: (3 sc, 1 inc) x 6 (30)
- Rnd 10: (4 sc, 1 inc) x 6 (36)
Finish with a slip stitch and fasten off, leaving a long tail for sewing.
Finishing & Assembly
Assembly is where your Mini Dwarf Baby truly comes to life! Follow these steps for a professional finish:
- The Hat: Sew the hat onto the head with a slight tilt for a whimsical look. The front edge of the hat should sit around Rnd 18, while the back edge should reach back to Rnd 11.
- The Ears: Sew the ears to the sides of the head, ensuring they are symmetrical.
- The Arms: Attach the arms to the sides of the body between Rnd 8 and Rnd 9.
- The Feet: Sew the boots to the bottom of the body between Rnd 3 and Rnd 5.
- The Belt: Apply a thin line of textile glue between Rnd 8 and Rnd 9 and wrap the brown chain around the waist.
- Final Details: Use your embroidery thread to add a tiny yellow dot for the belt buckle and small black stitches to add eyelashes or a tiny smile if desired.
Tips for Success
Tension is Key: Because this is a very small pattern, your tension matters. If your stitches are too loose, the fiberfill will peek through. If they are too tight, you may struggle to insert your hook. Try to maintain a consistent, firm tension throughout.
Working with Fingering Weight: If you find the 1.75 mm hook too small for your hands, you can move up to a 2.0 mm or 2.25 mm hook, but remember that this will increase the overall size of the baby and may require more stuffing.
Perfecting the Decreases: To avoid gaps in your work, I recommend using the “invisible decrease.” Instead of a standard decrease, insert your hook into the front loop of the first stitch and then the front loop of the second stitch, completing the sc. This keeps the surface smooth and professional.
Customizing Your Dwarf: Feel free to experiment with colors! A red hat and blue outfit can make a traditional garden gnome, or you can use sparkly yarn for a magical forest sprite.