Cute Low-Sew Crochet Cat Plush Pattern: A Beginner-Friendly Tutorial
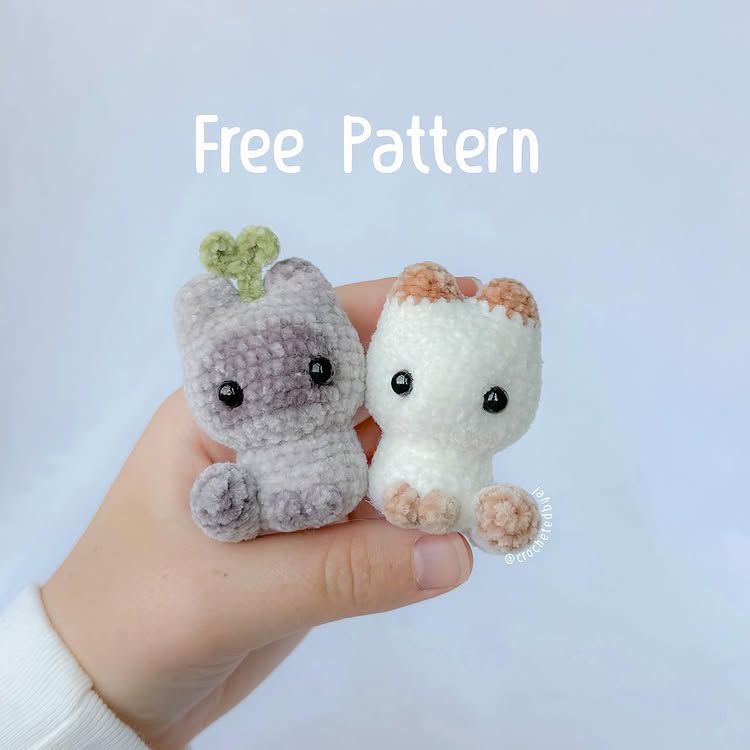
If you are looking for a quick, adorable, and satisfying crochet project, this mini low-sew cat plush is the perfect choice. For many amigurumi lovers, the most tedious part of the process is the assembly—spending hours sewing limbs and ears onto a body. That is why this pattern is a game-changer. By integrating the ears and the body into one continuous piece, we minimize the sewing and maximize the cuteness!
This little kitty is designed to be worked with plush velvet yarn, giving it a soft, huggable texture that makes it a wonderful gift or a cute desk companion. Whether you are a seasoned pro or a beginner looking for your first amigurumi project, this tutorial will guide you through every stitch. Let’s get started!
Materials & Abbreviations
Before you pick up your hook, gather all your supplies. Using the right materials is key to achieving that professional, “store-bought” look for your plushie.
Supplies Needed
- Yarn: Super fine (Size 1) velvet yarn in your favorite color. You will also need a small amount of green yarn if you wish to make the optional sprout.
- Crochet Hook: 2.25 mm hook (using a smaller hook than recommended for the yarn helps keep the stitches tight so the stuffing doesn’t peek through).
- Stuffing: High-quality poly-fil fiberfill.
- Eyes: Small plastic safety eyes.
- Tools: A tapestry needle for sewing, sharp scissors, and a row marker to keep track of your rounds.
US Crochet Terms & Abbreviations
This pattern is written using US terminology. If you are used to UK terms, please keep that in mind as you work!
- MC: Magic Circle
- SC: Single Crochet
- INC: Increase (two single crochets in one stitch)
- DEC: Decrease (invisible decrease is recommended for amigurumi)
- CH: Chain
- FO: Fasten Off
- BO: Bobble Stitch
- HDC: Half Double Crochet
- SL ST: Slip Stitch
Step-by-Step Instructions
Remember, this is a low-sew pattern, meaning we will start with the ears and work our way down the body in one piece. Do not slip stitch or chain 1 at the end of each round; instead, work in a continuous spiral.
Part 1: The Ears
You will need to make two ears in total.
Ear 1:
Round 1: Create a magic circle and work 6 SC into the loop. (6)
Round 2: (1 SC, 1 INC) repeat 3 times. (9)
Round 3: SC in each stitch around. (9)
Round 4: (2 SC, 1 INC) repeat 3 times. (12)
Fasten off the first ear.
Ear 2:
Repeat Rounds 1 through 4. However, do not fasten off the second ear. We will use the working yarn to join the two ears together.
Connecting the Ears:
Chain 1. Insert your hook into any stitch on the first ear and work 1 SC. This stitch now marks the beginning of the next row, and you are now working around both ears to form the top of the head.
Part 2: Head and Body
Now we will expand the circle to create the head and then narrow it down for the body.
Rounds 5-7: SC in each stitch around. (26)
Round 8: (4 SC, 1 INC) repeat 5 times, then 1 SC. (31)
Round 9: SC in each stitch around. (31)
Round 10: (3 SC, 1 INC) repeat 7 times, then 3 SC. (38)
Rounds 11-14: SC in each stitch around. (38)
Eye Placement: If you are placing your safety eyes now, insert them between Rounds 11 and 12, approximately 6 stitches apart. Alternatively, you can wait until the assembly stage to position them perfectly.
Round 15: (2 SC, 1 DEC) repeat 9 times, then 1 DEC. (28)
Round 16: (1 SC, 1 DEC) repeat 9 times, then 1 SC. (19)
Stop here to firmly stuff the ears and the head. Make sure the stuffing is evenly distributed so the head remains round.
Round 17: (2 SC, 1 DEC) repeat 4 times, 1 SC, then 1 DEC. (14)
Round 18: (1 SC, 1 INC) repeat 7 times. (21)
Rounds 19-20: SC in each stitch around. (21)
Round 21: (2 SC, 1 INC) repeat 7 times. (28)
Round 22: SC in each stitch around. (28)
The Paws (Bobble Stitches):
Round 23: Work 18 SC, then 1 BO (Bobble Stitch), 1 SC, 1 BO, then 7 SC. (28)
Tip: To make a bobble stitch, work an incomplete HDC (yarn over, insert hook, pull up a loop, yarn over, pull through two loops) into the stitch 3 times, then yarn over and pull through all loops on the hook.
Round 24: (1 SC, 1 DEC) repeat 9 times, then 1 SC. (19)
Firmly stuff the body.
Round 25: DEC 9 times, then 1 SC. (10)
Round 26: DEC 5 times. (5)
Fasten off and use your tapestry needle to sew the small hole closed.
Part 3: The Tail
Round 1: 5 SC in a magic circle. (5)
Round 2: INC around. (10)
Rounds 3-8: SC in each stitch around. (10)
Round 9: (1 SC, 1 DEC) repeat 3 times, then 1 SC. (7)
Rounds 10-11: SC in each stitch around. (7)
Fasten off, leaving a long yarn tail for sewing.
Part 4: The Optional Sprout
For an extra touch of whimsy, add a little leaf sprout to the top of the head using green yarn.
- Chain 7.
- In the second chain from the hook, work 4 HDC in the same stitch.
- Slip stitch (SL ST) into the next stitch. In that same stitch, chain 2.
- Working into the chain 2: in the second stitch from the hook, work 4 HDC, then SL ST into the following stitch.
- SL ST 3 times down the remaining chain.
Fasten off, leaving a long tail for sewing.
Finishing
Now it is time to bring your kitty to life! Assembly is minimal, which is the best part of this project.
Attaching the Tail: First, sew the opening of the tail closed. Sew the tail to the body between Rounds 21 and 23. Wrap the tail around the side of the body so that the first row of the tail is exactly one stitch away from the bobble stitch paw. Sew the remaining length of the tail securely to the body.
Final Details: If you haven’t already, insert your safety eyes between Rounds 11 and 12. You can add a drop of fabric glue to the back of the washers for extra security. For added cuteness, use a pink marker or a small bit of pink yarn to sew tiny blush marks just below the eyes.
The Sprout: Finally, sew your green sprout centrally between the cat’s ears. Fasten off and weave in all your ends.
Tips for Success
Working with velvet yarn can be a different experience than working with acrylic or cotton. Here are a few tips to ensure your cat plush turns out perfectly:
- Find Your Stitches: Velvet yarn can hide the stitches. Use your fingers to feel for the “V” of the stitch instead of relying solely on your eyes.
- Tight Tension: Because velvet yarn is stretchy, keep your tension firm. If you see gaps where stuffing is showing, try dropping down a hook size.
- Invisible Decreases: To keep the shape smooth, use the invisible decrease method (insert hook into the front loop of the first stitch, then the front loop of the second, and SC them together).
- Stuffing Strategy: Use a chopstick or a crochet hook to push stuffing into the ears and the bottom of the body to ensure no flat spots.