Adorable Crochet Christmas Elf Pattern: A Step-by-Step Amigurumi Tutorial
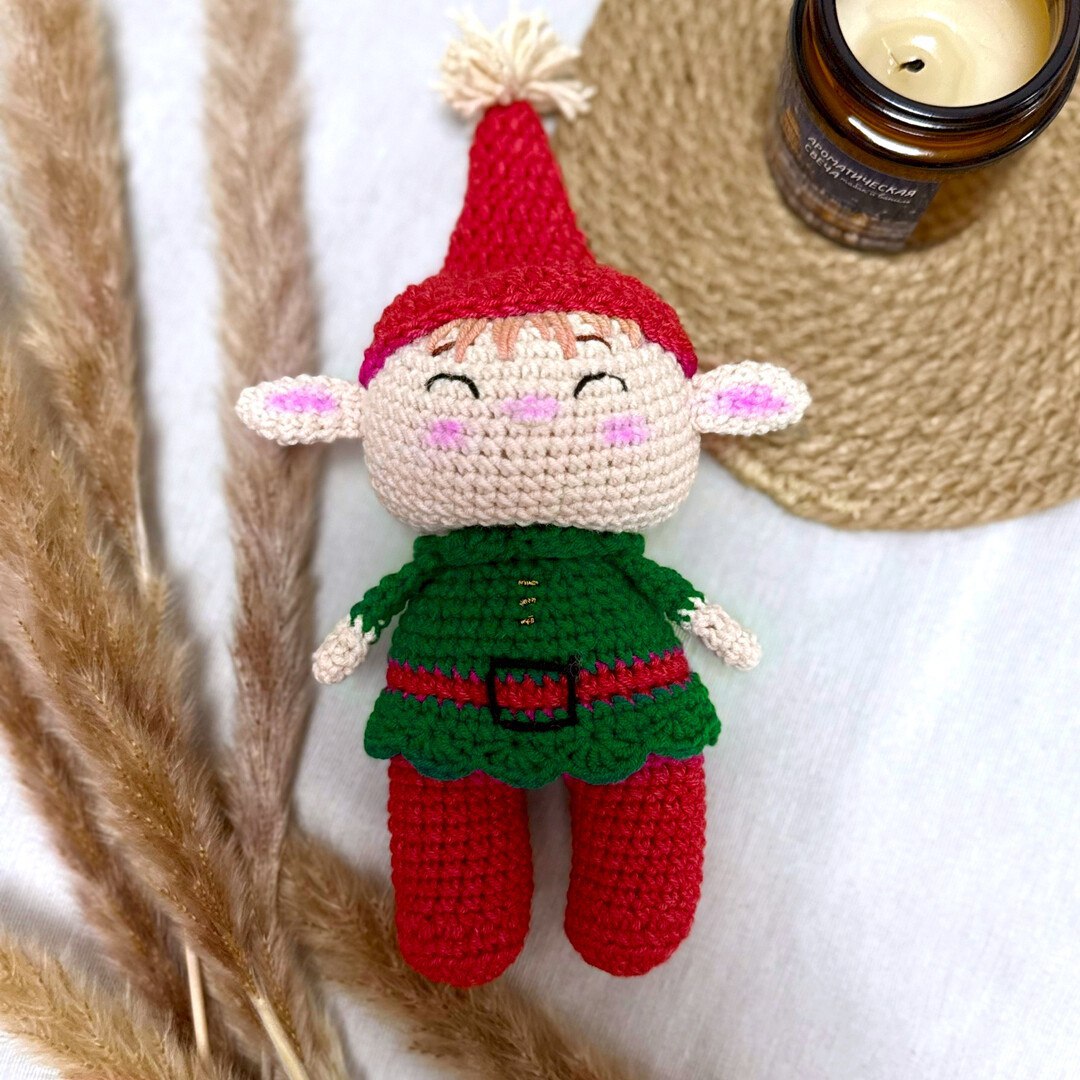
Get into the holiday spirit with this charming Crochet Christmas Elf! Whether you are looking to create a unique handmade gift, a festive ornament for your tree, or a whimsical companion for your holiday decor, this amigurumi elf is the perfect project. This pattern is designed to be beginner-friendly, focusing on basic stitches and simple shaping to create a professional-looking toy.
This little elf stands as a wonderful way to use up scrap yarn from your stash. With its oversized hat, tiny boots, and sweet expression, it is sure to bring a smile to anyone’s face. In this tutorial, we will walk you through every stitch, from the magic ring to the final assembly, ensuring you have everything you need to complete your festive friend.
Materials & Abbreviations
Before we begin, gather all your materials. We recommend using a sport-weight yarn for a tight, clean stitch that keeps the stuffing inside.
Materials Needed
- Yarn: Sport weight yarn (such as YarnArt Jeans) in three colors:
- Red (approx. 25 yards / 0.5 ball) for the hat and boots.
- Skin tone/Beige (approx. 25 yards / 0.5 ball) for the head, ears, and hands.
- Clothing color of your choice (approx. 15 yards / 0.25 ball) — green, orange, or blue work great!
- Crochet Hook: 2.5mm (or a size that ensures your stuffing doesn’t show through).
- Eyes: Black embroidery thread or small safety eyes.
- Stuffing: Polyester fiberfill.
- Tools: Yarn needle, scissors, and stitch markers.
- Optional: Acrylic pastels or eyeshadow for adding a rosy glow to the cheeks; gold metallic thread for clothing accents.
Abbreviations (US Terms)
- MR: Magic Ring
- sc: Single Crochet
- inc: Increase (2 sc in one stitch)
- dec: Decrease (invisible decrease recommended)
- ch: Chain
- sl st: Slip Stitch
- hdc: Half Double Crochet
- dc: Double Crochet
- BLO: Back Loop Only
- FLO: Front Loop Only
- st(s): Stitch(es)
Step-by-Step Instructions
The Head
Using your skin-tone yarn, work in continuous rounds.
- Round 1: 6 sc in MR (6)
- Round 2: 6 inc (12)
- Round 3: (1 sc, inc) repeat 6 times (18)
- Round 4: (2 sc, inc) repeat 6 times (24)
- Round 5: (3 sc, inc) repeat 6 times (30)
- Round 6: (4 sc, inc) repeat 6 times (36)
- Round 7: (5 sc, inc) repeat 6 times (42)
- Round 8: (6 sc, inc) repeat 6 times (48)
- Rounds 9-17: sc in each st around (48) for 9 rounds total.
- Round 18: (6 sc, dec) repeat 6 times (42)
- Round 19: (5 sc, dec) repeat 6 times (36)
- Round 20: (4 sc, dec) repeat 6 times (30)
- Round 21: (3 sc, dec) repeat 6 times (24)
Stuff the head firmly. Leave a long tail for sewing. Position the eyes between rounds 20 and 21, roughly 7 stitches apart.
The Ears (Make 2)
Using skin-tone yarn:
- Round 1: 6 sc in MR (6)
- Round 2: 6 sc (6)
- Round 3: (1 sc, inc) repeat 3 times (9)
- Rounds 4-5: 9 sc (9)
- Round 6: (1 sc, dec) repeat 3 times (6)
- Round 7: 3 sc through both loops.
Fasten off and leave a tail for sewing.
The Legs and Body
Using red yarn for the boots:
- Round 1: 6 sc in MR (6)
- Round 2: 6 inc (12)
- Round 3: (1 sc, inc) repeat 6 times (18)
- Round 4: (2 sc, inc) repeat 6 times (24)
- Round 5: 24 sc in BLO (24)
- Round 6: 6 dec, 12 sc (18)
- Rounds 7-12: 18 sc (18) for 6 rounds.
Fasten off the first leg. Do not fasten off the second leg; we will use it to join the body.
Joining and Torso
From the second leg, ch 3. Now work around the entire structure:
- Round 1: 18 sc around the first leg, 3 sc across the chain, 18 sc around the second leg, 3 sc in the chain space (42).
- Rounds 2-6: 42 sc (42) for 5 rounds.
- Round 7: 42 sc in BLO (42).
- Round 8: Switch to your chosen clothing color. 42 sc through both loops (unless making a dress, in which case work BLO).
- Round 9: (5 sc, dec) repeat 6 times (36)
- Round 10: 36 sc (36)
- Round 11: (4 sc, dec) repeat 6 times (30)
- Round 12: 30 sc (30)
- Round 13: (3 sc, dec) repeat 6 times (24)
- Round 14: 24 sc (24).
The Collar and Skirt
For the Collar: Go back to the FLO (front loops) of the body where you transitioned colors. In the second loop from the hook, skip one stitch, work 4 dc in the next stitch, sl st into the following. Repeat this shell pattern around the neck.
For the Skirt: Go back to the FLO of the pants/legs area.
- Round 1: 42 sc in the FLO (42).
- Round 2: 42 sc through both loops (42).
- Pattern: To create the ruffled edge, skip one stitch and work 4 dc into the next stitch, then sl st. Repeat around the entire skirt.
The Hat (Two Options)
Using red yarn, you can choose between a standard sc hat or a slightly taller hdc hat.
Option 1: Single Crochet Hat
- Round 1: 6 sc in MR (6)
- Rounds 2-3: 6 sc (6)
- Round 4: (1 sc, inc) x 3 (9)
- Rounds 5-7: 9 sc (9)
- Round 8: (2 sc, inc) x 3 (12)
- Rounds 9-11: 12 sc (12)
- Round 12: (3 sc, inc) x 3 (15)
- Rounds 13-15: 15 sc (15)
- Round 16: (4 sc, inc) x 3 (18)
- Rounds 17-18: 18 sc (18)
- Round 19: (5 sc, inc) x 3 (21)
- Round 20: 21 sc (21)
- Round 21: (6 sc, inc) x 3 (24)
- Round 22: (7 sc, inc) x 3 (27)
- Round 23: (8 sc, inc) x 3 (30)
- Round 24: (4 sc, inc) x 6 (36)
- Round 25: 36 sc (36)
- Round 26: (5 sc, inc) x 6 (42)
- Round 27: (6 sc, inc) x 6 (48)
- Round 28: (7 sc, inc) x 6 (54)
- Round 29: 54 sc (54).
Option 2: Half Double Crochet Hat
- Round 1: 6 sc in MR (6)
- Round 2: 6 hdc (6)
- Round 3: (1 hdc, inc) x 3 (9)
- Round 4: 9 hdc (9)
- Round 5: (2 hdc, inc) x 3 (12)
- Round 6: 12 hdc (12)
- Round 7: (3 hdc, inc) x 3 (15)
- Round 8: 15 hdc (15)
- Round 9: (4 hdc, inc) x 3 (18)
- Round 10: 18 hdc (18)
- Round 11: (2 hdc, inc) x 6 (24)
- Round 12: (3 hdc, inc) x 6 (30)
- Round 13: (4 hdc, inc) x 6 (36)
- Round 14: (5 hdc, inc) x 6 (42)
- Round 15: (6 hdc, inc) x 6 (48)
- Round 16: 48 hdc (48).
The Arms (Make 2)
Using skin-tone yarn:
- Round 1: 6 sc in MR (6)
- Rounds 2-4: 6 sc (6)
Switch to clothing color:
- Rounds 5-8: 6 sc (6)
- Round 9: 3 sc through both loops to close.
Finishing & Assembly
Now that all your pieces are complete, it is time to bring your elf to life!
- Head to Body: Sew the head onto the torso. For a seamless look, sew through the back loops (BLO) of the torso.
- Eye Detailing: Use your yarn needle to gently pull the yarn from the center of the head toward the back to create small indentations above the eyes, giving the elf a more expressive face.
- Hair: You can add a small tuft of yarn at the top of the hat or sew a few strands of yarn to the head for hair.
- Accessories: Sew the hat securely to the top of the head. Attach the ears to the sides of the head and sew the arms to the sides of the torso.
- Cheeks: Using a small brush, apply a tiny bit of pink acrylic powder or eyeshadow to the cheeks for a cute, blushed effect.
Tips for Success
- Consistent Tension: Amigurumi requires tight stitches. If you see gaps, try dropping down a hook size.
- The Invisible Decrease: To avoid bumps in your work, always use the invisible decrease method (working into the front loops of the next two stitches).
- Stuffing: Stuff your pieces as you go. It is much harder to stuff the body once the head and arms are attached.
- Customization: Feel free to experiment! Use glitter yarn for the hat or add a small crochet belt with a gold bead for a buckle.