Adorable Crochet Bunny Hugger Pattern: Free Step-by-Step Tutorial
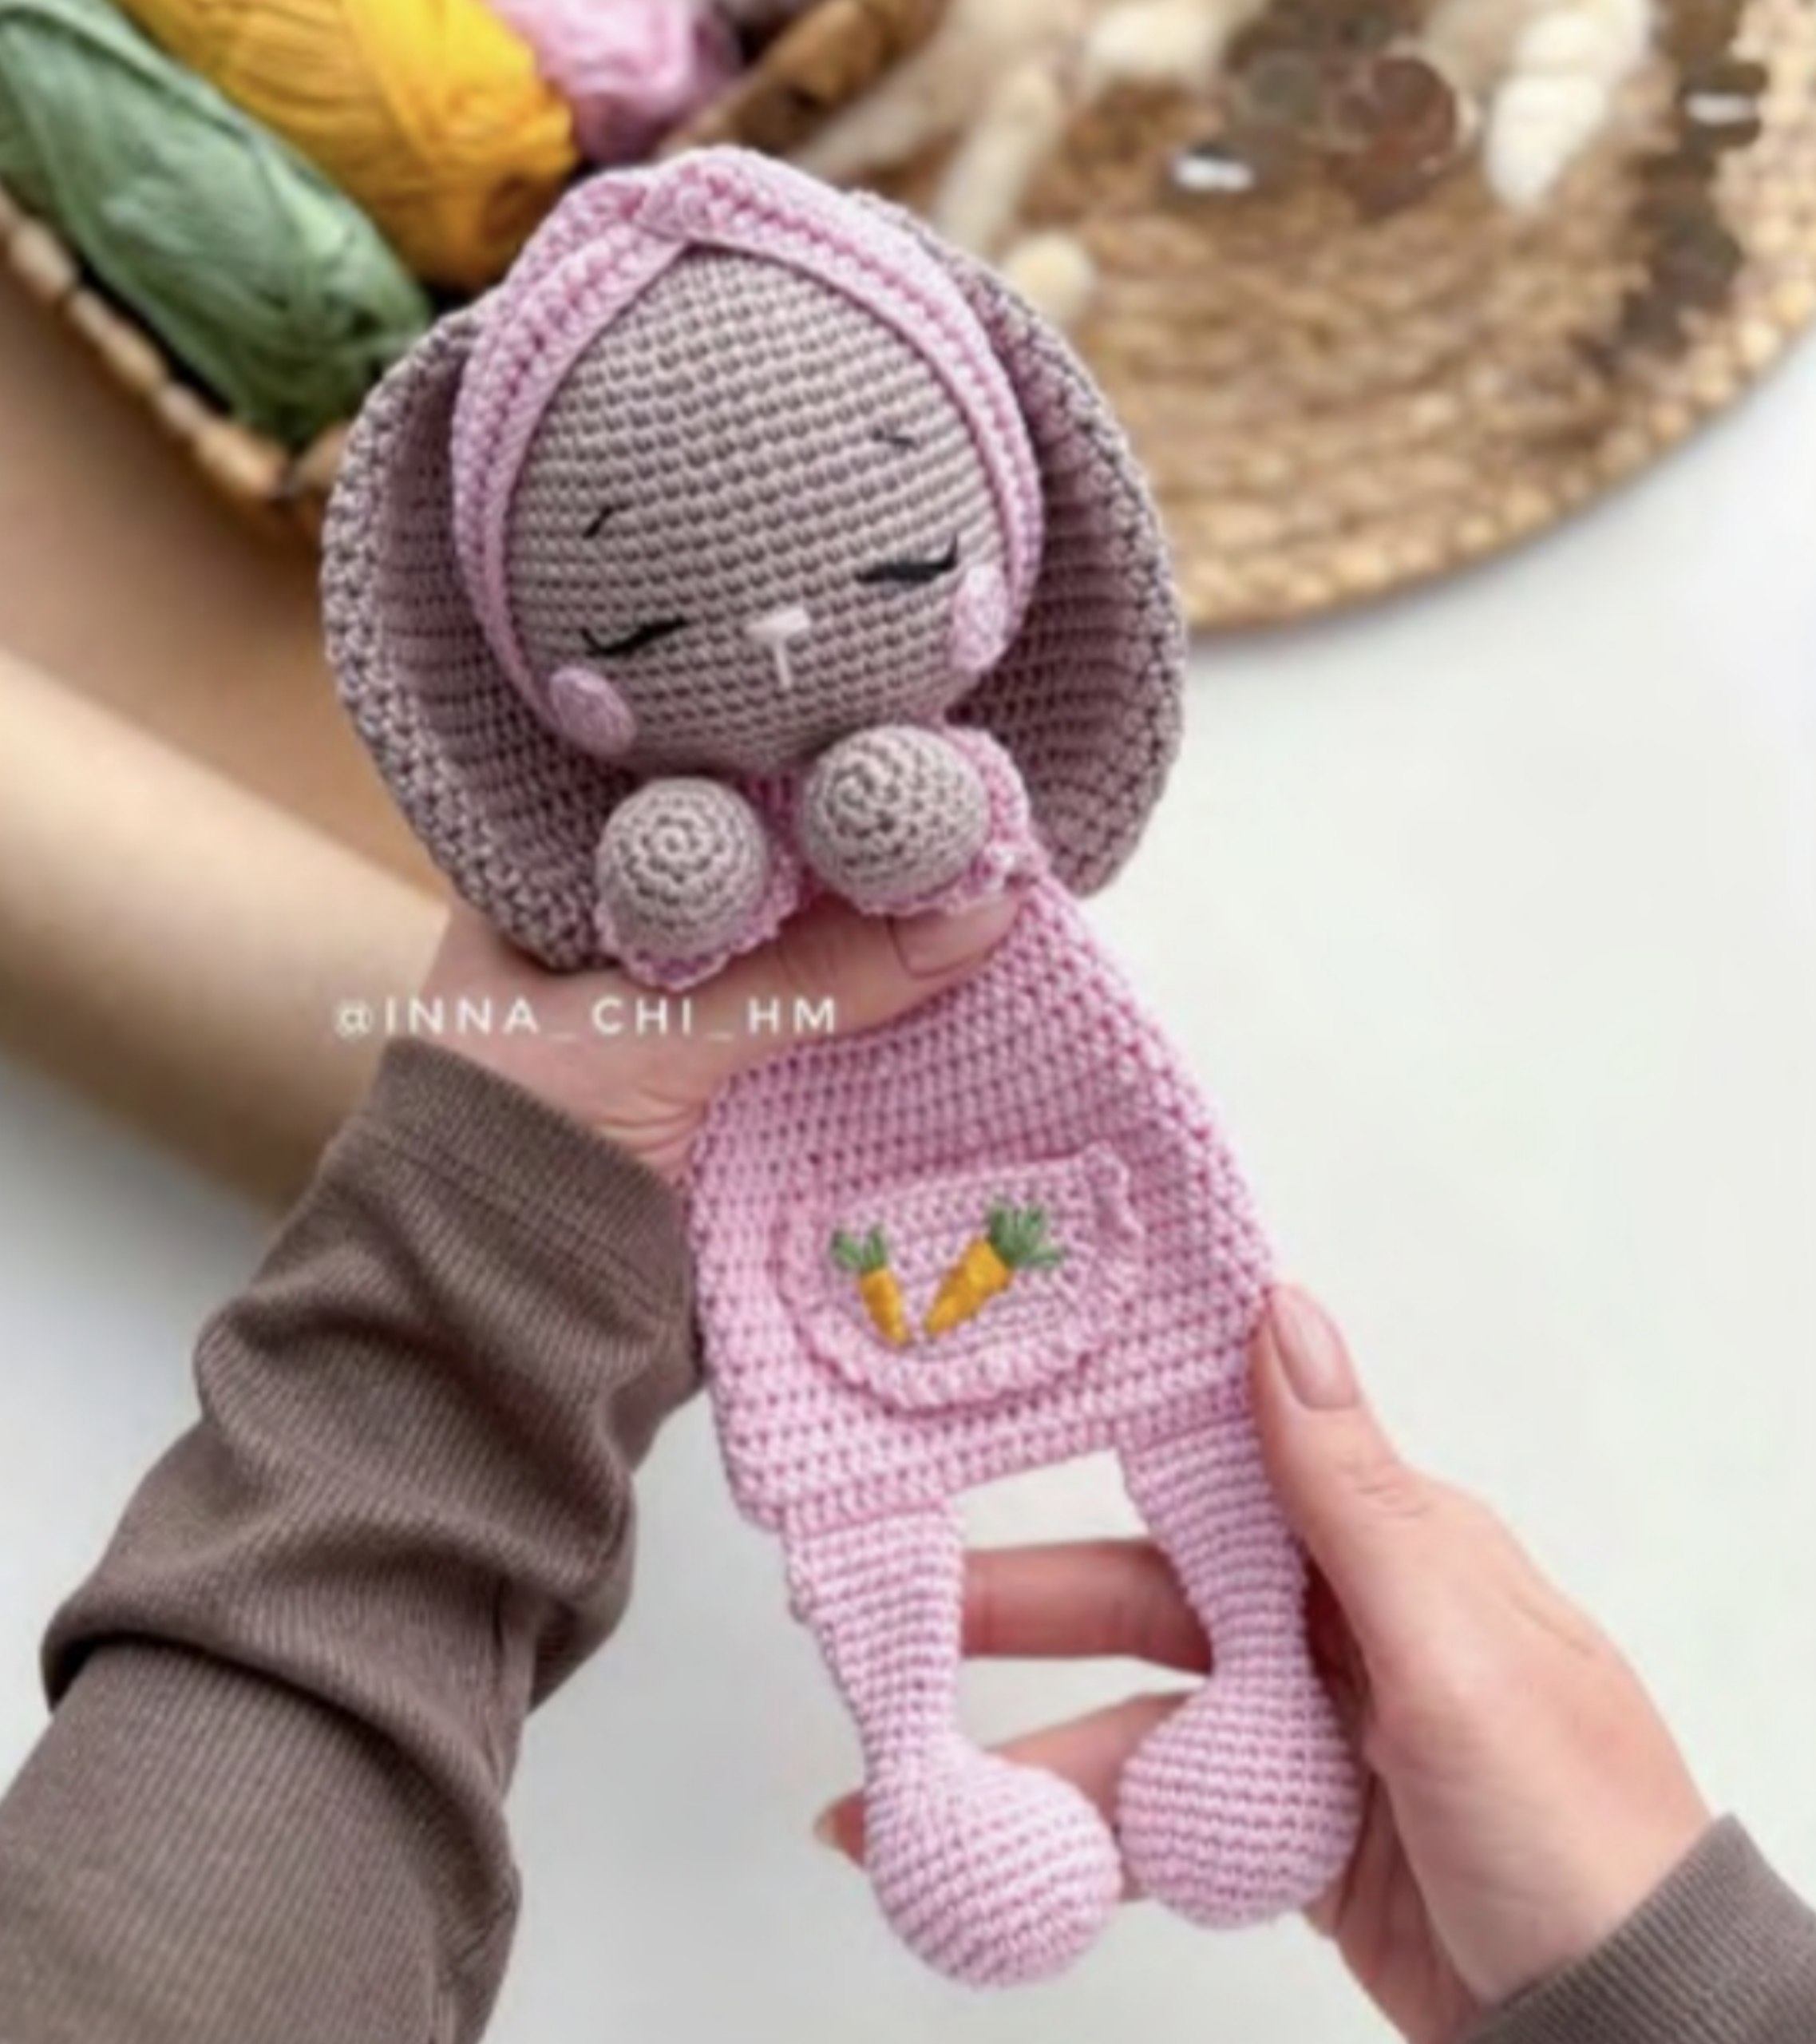
Looking for a cozy, cuddly project to add to your crochet collection? This sweet Bunny Hugger is the perfect companion for a newborn, a toddler, or anyone who loves a soft, handmade friend. With its floppy ears, cute little pocket, and sleepy expression, this bunny is designed to be a comforting “hugger” that feels like a warm embrace.
This pattern is written for beginners to intermediate crocheters. We will be using basic stitches and working in continuous spirals to create a seamless, professional look. Let’s dive in and create your own little bunny!
Materials & Abbreviations
Materials Needed
- Yarn: Sport weight (100% mercerized cotton recommended) in the following colors:
- Soft Beige (for head, ears, and tail)
- Tulip Pink (for body, arms, and headband)
- Powder Pink (for cheeks and nose embroidery)
- Saffron Yellow & Sage Green (small amounts for carrot embroidery)
- Crochet Hooks: 2.25mm (US Size B) and 2.5mm
- Stuffing: Polyester fiberfill
- Tools: Tapestry needle, scissors, sewing pins, and black embroidery thread
Abbreviations (US Terms)
- Rnd: Round
- Row: Row
- ch: Chain
- sc: Single crochet
- hdc: Half double crochet
- inc: Increase (two sc in one stitch)
- dec: Decrease (sc two stitches together)
- sl st: Slip stitch
- st: Stitch
- BLO: Back loop only
- MR: Magic ring
Note: This toy is worked in continuous spirals. Do not join rounds with a slip stitch unless specifically instructed. We recommend using a stitch marker or a piece of contrasting yarn to mark the beginning of each round.
Step-by-Step Instructions
The Head
Use a 2.25mm hook and Soft Beige yarn.
- Rnd 1: 6 sc in MR [6]
- Rnd 2: inc in each st around [12]
- Rnd 3: (1 sc, inc) * 6 [18]
- Rnd 4: 1 sc, inc, (2 sc, inc) * 5, 1 sc [24]
- Rnd 5: (3 sc, inc) * 6 [30]
- Rnd 6: 2 sc, inc, (4 sc, inc) * 5, 2 sc [36]
- Rnd 7: (5 sc, inc) * 6 [42]
- Rnd 8: 3 sc, inc, (6 sc, inc) * 5, 3 sc [48]
- Rnd 9: sc around [48]
- Rnd 10: (7 sc, inc) * 6 [54]
- Rnd 11: sc around [54]
- Rnd 12: 4 sc, inc, (8 sc, inc) * 5, 4 sc [60]
- Rnd 13: sc around [60]
- Rnd 14: (9 sc, inc) * 6 [66]
- Rnds 15-26: sc around [66] for 12 rounds
- Rnd 27: (9 sc, dec) * 6 [60]
- Rnd 28: (8 sc, dec) * 6 [54]
- Rnd 29: (7 sc, dec) * 6 [48]
- Rnd 30: (2 sc, dec) * 12 [36]
- Rnd 31: (4 sc, dec) * 6 [30]
Firmly stuff the head with fiberfill now.
- Rnd 32: (3 sc, dec) * 6 [24]
- Rnd 33: (2 sc, dec) * 6 [18]
- Rnd 34: (1 sc, dec) * 6 [12]
- Rnd 35: (1 sc, dec) * 4 [8]
Fasten off and weave in the end.
The Arms (Make 2)
Use a 2.25mm hook. Start with Soft Beige yarn.
- Rnd 1: 6 sc in MR [6]
- Rnd 2: inc in each st around [12]
- Rnd 3: (1 sc, inc) * 6 [18]
- Rnd 4: (5 sc, inc) * 3 [21]
- Rnds 5-7: sc around [21] (3 rounds)
- Rnd 8: (5 sc, dec) * 3 [18]
Switch to Tulip Pink yarn.
- Rnd 9: sc around [18]
- Rnd 10: BLO (4 sc, dec) * 3 [15]
- Rnd 11: sc around [15]
- Rnd 12: (3 sc, dec) * 3 [12]
- Rnds 13-16: sc around [12] (4 rounds)
Stuff the hand only halfway. Flatten the arm and sc 5 through both layers to close. Fasten off, leaving a long tail for sewing.
Arm Trim: Reattach Tulip Pink yarn to the first visible stitch of Rnd 10. Work (ch 3, sl st in next st) around the remaining visible loops to create a ruffled cuff. Fasten off.
The Ears (Make 2)
Use a 2.25mm hook and Soft Beige yarn.
- Rnd 1: 6 hdc in MR [6]
- Rnd 2: inc in each st around [12]
- Rnd 3: (1 hdc, inc) * 6 [18]
- Rnd 4: hdc around [18]
- Rnd 5: (2 hdc, inc) * 6 [24]
- Rnd 6: (3 hdc, inc) * 6 [30]
- Rnd 7: hdc around [30]
- Rnd 8: (4 hdc, inc) * 6 [36]
- Rnds 9-14: hdc around [36] (6 rounds)
- Rnd 15: (4 hdc, dec) * 6 [30]
- Rnds 16-17: hdc around [30] (2 rounds)
- Rnd 18: (3 hdc, dec) * 6 [24]
- Rnds 19-20: hdc around [24] (2 rounds)
- Rnd 21: (2 hdc, dec) * 6 [18]
- Rnds 22-23: hdc around [18] (2 rounds)
- Rnd 24: (4 hdc, dec) * 3 [15]
- Rnd 25: hdc around [15]
Important: Do not stuff the ears. Flatten the ear and sc 7 through both layers to close. Fasten off, leaving a long tail.
The Cheeks (Make 2)
Use a 2.25mm hook and Tulip Pink yarn.
- Rnd 1: 4 sc in MR [4]
- Rnd 2: inc in each st around [8]
Sl st into the next stitch. Fasten off, leaving a long tail.
The Legs (Make 2)
Use a 2.25mm hook and Tulip Pink yarn.
Right Leg
- Rnd 1: 6 sc in MR [6]
- Rnd 2: inc in each st around [12]
- Rnd 3: (1 sc, inc) * 6 [18]
- Rnd 4: (2 sc, inc) * 6 [24]
- Rnd 5: (3 sc, inc) * 6 [30]
- Rnds 6-9: sc around [30] (4 rounds)
- Rnd 10: 6 sc, (1 sc, dec) * 6, 6 sc [24]
- Rnd 11: sc around [24]
- Rnd 12: 6 sc, (dec) * 6, 6 sc [18]
- Rnd 13: sc around [18]
Stuff the foot halfway.
- Rnd 14: 3 sc, (dec) * 6, 3 sc [12]
- Rnds 15-17: sc around [12] (3 rounds)
- Rnd 18: (3 sc, inc) * 3 [15]
- Rnds 19-21: sc around [15] (3 rounds)
- Rnd 22: (4 sc, inc) * 3 [18]
- Rnds 23-25: sc around [18] (3 rounds)
- Rnd 26: 1 sc. Stop here.
Flatten the leg and sc 8 through both layers to close. Fasten off.
Left Leg
- Work exactly like the Right Leg until the end of Rnd 22.
- Rnds 23-24: sc around [18] (2 rounds)
- Rnd 25: 10 sc. Stop here.
Flatten the leg and sc 8 through both layers to close. Fasten off.
The Body
Use a 2.5mm hook and Tulip Pink yarn.
- Foundation: ch 27.
- Rnd 1: Starting from 2nd ch from hook: 25 sc, 3 sc in the last ch. Work along the opposite side of the chain: 24 sc, 2 sc in the last ch [54].
- Rnd 2: 1 hdc, attach the Right Leg by working 8 dc through both layers of the leg’s closing stitches, 8 hdc, attach the Left Leg by working 8 hdc through both layers of the leg’s closing stitches, 29 hdc [54].
- Rnds 3-11: hdc around [54] (9 rounds)
- Rnd 12: (7 hdc, dec) * 6 [48]
- Rnds 13-14: hdc around [48] (2 rounds)
- Rnd 15: 3 hdc, dec, (6 hdc, dec) * 5, 3 hdc [42]
- Rnds 16-17: hdc around [42] (2 rounds)
- Rnd 18: (5 hdc, dec) * 6 [36]
- Rnds 19-20: hdc around [36] (2 rounds)
- Rnd 21: 2 hdc, dec, (4 hdc, dec) * 5, 2 hdc [30]
- Rnd 22: hdc around [30]
- Rnd 23: (3 hdc, dec) * 6 [24]
- Rnd 24: hdc around [24]
- Rnd 25: 9 hdc. Stop here.
Flatten the top and sc 11 through both layers to close. Fasten off, leaving a long tail.
The Pocket
Use a 2.25mm hook and Tulip Pink yarn. This part is worked in rows.
- Row 1: ch 9. Starting in 2nd ch from hook: 8 sc, ch 1, turn [8].
- Row 2: inc, 6 sc, inc, ch 1, turn [10].
- Row 3: inc, 8 sc, inc, ch 1, turn [12].
- Rows 4-6: 12 sc, ch 1, turn [12] (3 rows).
- Row 7: 12 sc [12].
Do not fasten off! Sc evenly around the entire edge of the pocket. Then, work (ch 3, sl st in next st) around the top edge of the pocket to create a decorative trim. Fasten off, leaving a long tail for sewing.
Carrot Embroidery: Using Saffron Yellow and Sage Green yarn, embroider two tiny carrots onto the front of the pocket using simple straight stitches.
The Tail
Use a 2.25mm hook and Soft Beige yarn.
- Rnd 1: 7 sc in MR [7]
- Rnd 2: inc in each st around [14]
- Rnd 3: (1 sc, inc) * 7 [21]
- Rnds 4-5: sc around [21] (2 rounds)
- Rnd 6: (1 sc, dec) * 7 [14]
Stuff the tail lightly, fasten off and leave a long tail.
The Headband
Use a 2.25mm hook and Tulip Pink yarn.
- Foundation: ch 74.
- Row 1: Starting from 3rd ch from hook: 72 hdc, ch 2, turn [72].
- Rows 2-4: BLO 72 hdc, ch 2, turn [72] (3 rounds).
- Row 5: BLO 72 hdc [72].
Fasten off. Fold the ends of the headband in half and sew them together to form a loop. Turn the headband right-side out.
Finishing & Assembly
The Face
- Nose: Using Powder Pink yarn, embroider a small horizontal line between rounds 21 and 25 (counting from the top).
- Eyes: Use 6 strands of black embroidery thread to create sleepy, curved eyes on round 21.
- Brows: Use 3 strands of black thread to embroider small brows 4 rounds above the eyes.
- Cheeks: Sew the pink circles just below the eyes.
Putting it All Together
- Ears: Sew the ears to the back of the head between rounds 7 and 8.
- Pocket: Sew the pocket to the center of the body between rounds 4 and 9.
- Arms: Sew the arms diagonally to the body at round 6 (counting from the top).
- Head: Sew the head securely to the top of the body.
- Tail: Sew the tail to the center back of the body.
- Accessories: Place the headband on the bunny’s head for a final touch of cuteness!
Tips for Success
- Tension: Keep your stitches tight so the stuffing doesn’t show through. If you see gaps, try dropping down a hook size.
- Color Changes: When switching colors (like on the arms), complete the last stitch of the old color with the new color to ensure a seamless transition.
- Stuffing: Use a chopstick or a crochet hook to push stuffing into the small areas of the arms and legs for a smooth shape.
- Personalize: Feel free to change the yarn colors! A mint green or soft lemon yellow bunny would be just as adorable.