Adorable Crochet Giraffe Amigurumi Pattern: Step-by-Step Tutorial
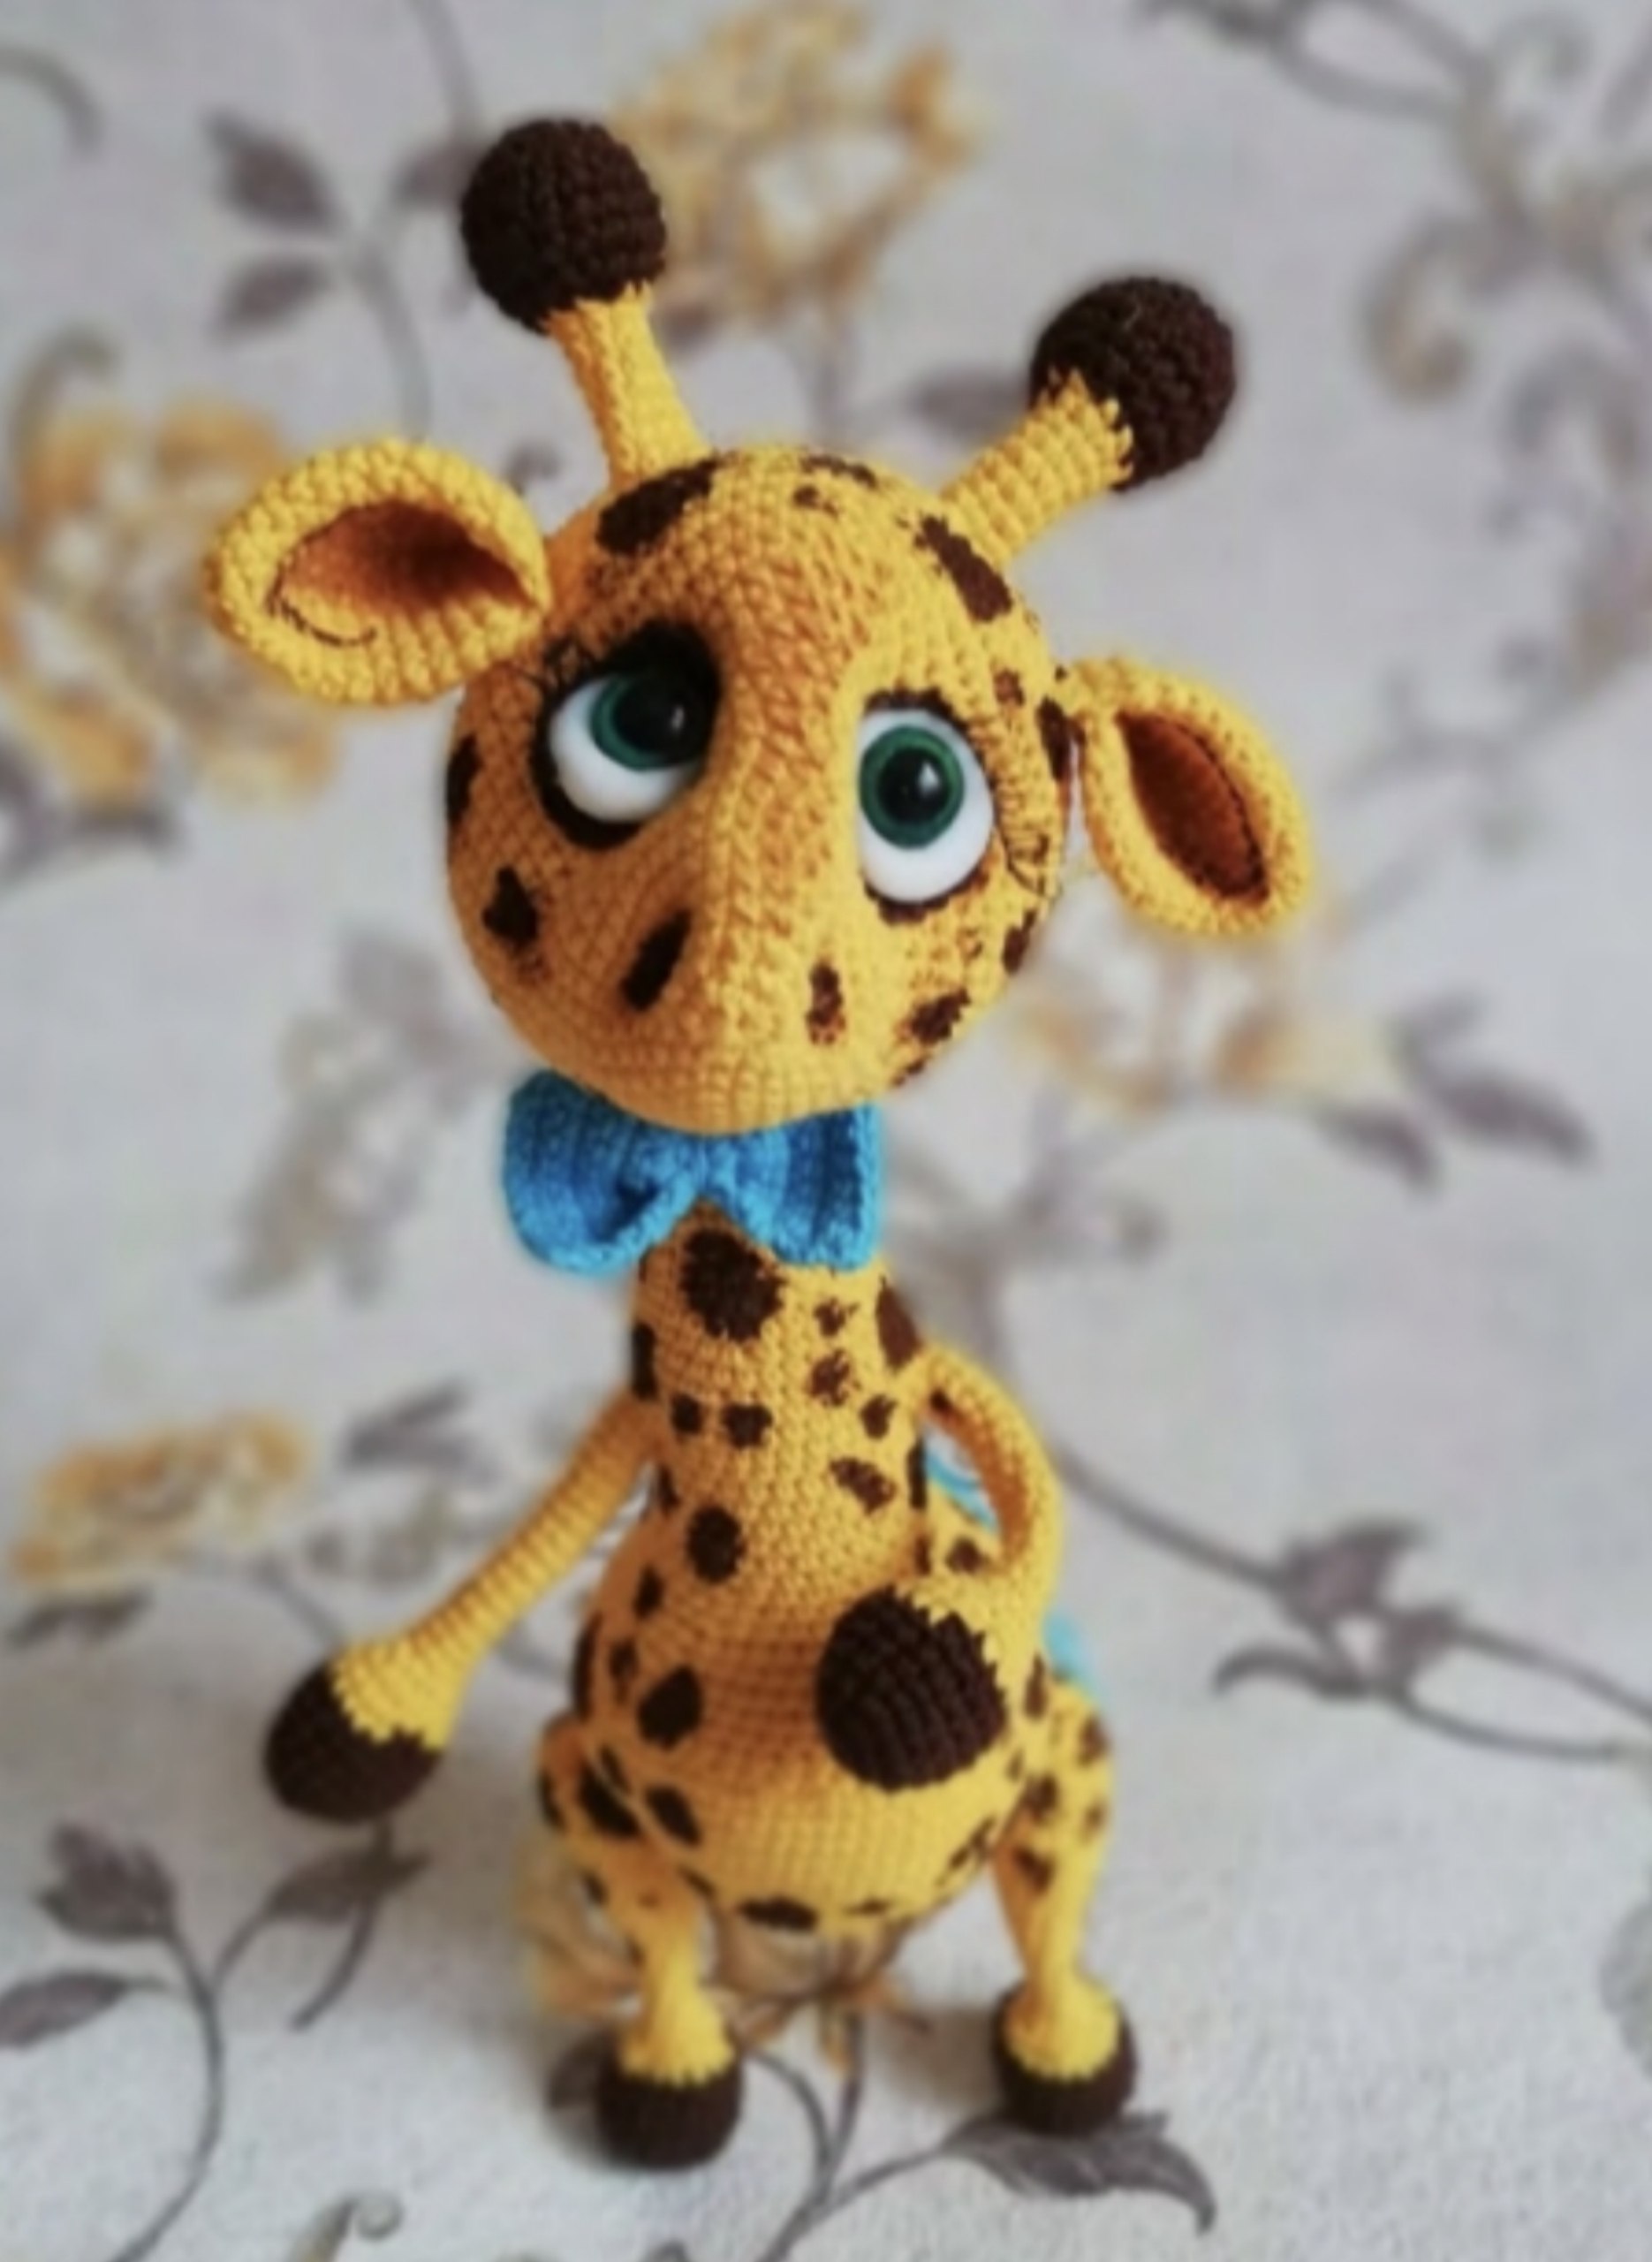
Looking for a project that is as rewarding as it is cute? This handmade crochet giraffe is the perfect addition to any nursery or toy collection. With its long neck, expressive eyes, and posable limbs, this little guy is sure to bring a smile to anyone’s face. While this pattern includes some advanced techniques like wire framing and facial sculpting, I have broken everything down into easy-to-follow steps so that intermediate beginners can tackle it with confidence.
This giraffe is designed to be a “poseable” amigurumi, meaning we will be using a simple wire frame to ensure he can stand, sit, and tilt his head just like a real giraffe. Let’s grab our hooks and get started!
Materials & Abbreviations
To create this giraffe, you will need the following materials. Ensure your yarn is a medium weight (worsted) for the best results.
Materials Needed
- Yarn: Medium weight yarn in Orange (main color) and Brown (for hooves and horns).
- Hook: A crochet hook size appropriate for your yarn (usually 2.5mm to 3.5mm for amigurumi).
- Stuffing: High-quality polyester fiberfill.
- Wire: Craft wire for the internal frame.
- Medical Tape: To wrap the wire joints for stability.
- Eyes: Small safety eyes or beads.
- Polymer Clay: White clay to create the eye whites.
- Acrylic Paint: Brown paint for the giraffe’s spots.
- Miscellaneous: Yarn needle, scissors, glue, and small faux eyelashes.
- Cardboard: A small piece of stiff cardboard for the feet.
US Crochet Abbreviations
- MR: Magic Ring
- ch: Chain
- sc: Single Crochet
- inc: Increase (2 sc in one stitch)
- dec: Decrease (sc 2 together)
- BLO: Back Loop Only
- st(s): Stitch(es)
- (…) x n: Repeat the instructions inside the parentheses “n” times.
- Shift Stitch: A technique used to adjust the lean of the spiral crochet.
Step-by-Step Instructions
The Left Leg
Start with brown yarn for the hoof.
- R1: 6 sc in MR (6)
- R2: 6 inc (12)
- R3: (1 sc, inc) x 6 (18)
Cut a small circle of stiff cardboard to fit inside the hoof to keep the foot flat.
- R4: 18 sc in BLO (18)
- R5-7: 18 sc (18)
Switch to orange yarn.
- R8: 18 sc in BLO (18)
Insert your wire frame now. Ensure the wire is centered and secured.
- R9: (1 sc, dec) x 6 (12)
Begin stuffing the hoof firmly.
- R10: (2 sc, dec) x 3 (9)
- R11-15: 9 sc (9)
- R16: 2 sc, inc, 6 sc (10)
- R17: 3 sc, inc, 6 sc (11)
- R18: 4 sc, inc, 6 sc (12)
- R19: 5 sc, inc, 6 sc (13)
- R20: 6 sc, inc, 6 sc (14)
- R21: 7 sc, inc, 6 sc (15)
- R22: 8 sc, inc, 6 sc (16)
- R23: 9 sc, inc, 6 sc (17)
- R24: 10 sc, inc, 6 sc (18)
Now, we switch to working in rows (turning at the end of each row) instead of a spiral.
- R25: ch 1, turn, 11 sc (11)
- R26: ch 1, turn, dec, 7 sc, dec (9)
- R27: ch 1, turn, dec, 5 sc, dec (7)
- R28: ch 1, turn, dec, 3 sc, dec (5)
- R29: ch 1, turn, dec, 1 sc, dec (3)
- R30: ch 1, turn, 5 dec along the side, place marker, 7 sc, place marker, 3 dec along the side (15).
Fasten off and weave in the ends.
The Right Leg
Follow the same instructions as the left leg up until Row 15. Starting at Row 16, we will mirror the increases:
- R16: 6 sc, inc, 2 sc (10)
- R17: 7 sc, inc, 2 sc (11)
- R18: 8 sc, inc, 2 sc (12)
- R19: 9 sc, inc, 2 sc (13)
- R20: 10 sc, inc, 2 sc (14)
- R21: 11 sc, inc, 2 sc (15)
- R22: 12 sc, inc, 2 sc (16)
- R23: 13 sc, inc, 2 sc (17)
- R24: 14 sc, inc, 2 sc (18)
Complete Rows 25-30 exactly as you did for the left leg.
The Arms (Make 2)
Start with brown yarn.
- R1: 6 sc in MR (6)
- R2: 6 inc (12)
- R3: (1 sc, inc) x 6 (18)
- R4-7: 18 sc (18)
Switch to orange yarn.
- R8: 18 sc in BLO (18)
- R9: (4 sc, dec) x 3 (15)
Insert the arm wire now. Leave the wire ends long so they can be connected to the neck and head later.
- R10: (3 sc, dec) x 3 (12)
Stuff the hand/wrist area. Do not stuff the rest of the arm too firmly to allow for movement.
- R11: (2 sc, dec) x 3 (9)
- R12-26: 9 sc (9)
Fasten off and weave in the ends.
The Body and Neck
Use orange yarn throughout.
- R1: 6 sc in MR (6)
- R2: 6 inc (12)
- R3: (1 sc, inc) x 6 (18)
- R4: (2 sc, inc) x 6 (24)
- R5: (3 sc, inc) x 6 (30)
- R6: (4 sc, inc) x 6 (36)
- R7: (5 sc, inc) x 6 (42)
- R8: (6 sc, inc) x 6 (48)
- R9: (7 sc, inc) x 6 (54)
- R10: (8 sc, inc) x 6 (60)
Joining the Legs
- R11: 10 sc on body, align left leg (face to face) and crochet 7 sc through both the leg marker and body, 26 sc on body, align right leg and crochet 7 sc through both the leg marker and body, 10 sc on body (60).
- R12: 10 sc on body, 8 sc on left leg, 26 sc on body, 8 sc on right leg, 10 sc on body (62).
- R13-17: 62 sc (62). (Use a shift stitch on R15 and R17 if needed).
Shaping the Body
- R18: 15 sc, dec, 27 sc, dec, 16 sc (60)
- R19: 17 sc, (dec, 1 sc) x 9, 16 sc (51)
- R20: 13 sc, dec, 22 sc, dec, 12 sc (49)
- R21: dec, 47 sc (48)
- R22: 7 sc, dec, (14 sc, dec) x 2, 7 sc (45)
- R23: (13 sc, dec) x 3 (42)
- R24: 6 sc, dec, (12 sc, dec) x 2, 6 sc (39)
- R25: (11 sc, dec) x 3 (36)
- R26: 5 sc, dec, (10 sc, dec) x 2, 5 sc (33)
- R27: (9 sc, dec) x 3 (30)
- R28-32: 30 sc (30)
Joining the Arms
- R33: 8 sc on body, align arm and crochet 3 sc together, 12 sc on body, align second arm and crochet 3 sc together, 4 sc on body (30).
- R34: 8 sc on body, 6 sc on arm, 12 sc on body, 6 sc on arm, 4 sc on body (36).
Now, twist the leg wires together with the arm wires and wrap the joint with medical tape to secure the core of the body.
The Neck
- R35: 36 sc (36)
- R36: (10 sc, dec) x 3 (33)
- R37: 33 sc (33)
- R38: (9 sc, dec) x 3 (30)
- R39: 30 sc (30)
- R40: (8 sc, dec) x 3 (27)
- R41: 27 sc (27)
- R42: (7 sc, dec) x 3 (24)
- R43: 24 sc (24)
- R44: (6 sc, dec) x 3 (21)
- R45: 21 sc (21)
- R46: (5 sc, dec) x 3 (18)
- R47: 18 sc (18)
- R48: (4 sc, dec) x 3 (15)
- R49-57: 15 sc (15)
Stuff the body and neck firmly. Fasten off, leaving a long tail for sewing.
The Head
- R1: 6 sc in MR (6)
- R2: 6 inc (12)
- R3: (1 sc, inc) x 6 (18)
- R4: (2 sc, inc) x 6 (24)
- R5: (3 sc, inc) x 6 (30)
- R6: (4 sc, inc) x 6 (36)
- R7-11: 36 sc (36)
- R12: inc, 7 sc, (inc, 1 sc) x 3, 8 sc, (1 sc, inc) x 3, 7 sc, inc (44)
- R13: 1 sc, inc, 8 sc, (inc, 2 sc) x 3, 7 sc, (2 sc, inc) x 3, 8 sc, inc (52)
- R14: 2 sc, inc, 9 sc, (inc, 3 sc) x 3, 6 sc, (3 sc, inc) x 3, 9 sc, inc (60)
- R15: inc, 58 sc, inc (62)
- R16: 1 sc, inc, 59 sc, inc (64)
- R17: 1 sc, inc, 60 sc, inc, 1 sc (66)
- R18-22: 66 sc (66)
The Wire Opening:
- R23: 30 sc, ch 3, skip 3 sc, 33 sc (66)
- R24: 30 sc, 3 sc in ch-3 loop, 33 sc (66)
- R25-27: 66 sc (66)
Now, decrease to close the head:
- R28: (9 sc, dec) x 6 (60)
- R29: (8 sc, dec) x 6 (54)
- R30: (7 sc, dec) x 6 (48)
- R31: (6 sc, dec) x 6 (42)
- R32: (5 sc, dec) x 6 (36)
- R33: (4 sc, dec) x 6 (30)
Insert the body wire into the ch-3 opening. Align the nose parallel to the belly and sew the head to the neck.
- R34: (3 sc, dec) x 6 (24)
Stuff the head firmly.
- R35: (2 sc, dec) x 6 (18)
- R36: (1 sc, dec) x 6 (12)
- R37: 6 dec (6)
Sew the hole closed and hide the yarn tail.
The Ears (Make 2)
Do not stuff the ears.
- R1: 6 sc in MR (6)
- R2: (inc, 1 sc) x 3 (9)
- R3: 1 sc, (inc, 2 sc) x 2, inc, 1 sc (12)
- R4: 2 sc, (inc, 3 sc) x 2, inc, 1 sc (15)
- R5: 3 sc, (inc, 4 sc) x 2, inc, 1 sc (18)
- R6: 4 sc, (inc, 5 sc) x 2, inc, 1 sc (21)
- R7: 5 sc, (inc, 6 sc) x 2, inc, 1 sc (24)
- R8: 24 sc (24)
- R9: (3 sc, inc) x 6 (30)
- R10-14: 30 sc (30)
- R15: Fold the ear in half and sc across both layers (15)
- R16: Fold in half again and sc across both layers (7)
Fasten off, leaving a tail for sewing.
The Ossicones/Horns (Make 2)
Start with brown yarn.
- R1: 6 sc in MR (6)
- R2: 6 inc (12)
- R3: (1 sc, inc) x 6 (18)
- R4-7: 18 sc (18)
- R8: (1 sc, dec) x 6 (12)
Stuff firmly and switch to orange yarn.
- R9: (2 sc, dec) x 3 (9)
- R10-17: 9 sc (9)
Stuff firmly, fasten off, and leave a tail for sewing.
The Tail
Chain 12. Starting from the second chain from the hook, work 11 slip stitches. Fasten off and add a small tassel to the end.
Finishing
Facial Sculpting
To give your giraffe a professional, expressive look, use the sculpting (cinching) technique. Use a long needle and strong thread.
- The Eyes: Count 10 rows from the start of the head (center of the face) and place a pin. From that pin, count 5 sc to the left and right, and 5 sc up. Create a diamond shape with pins and pull the thread through to cinch the fabric inward, creating eye sockets.
- The Nostrils: Count 5 sc from the start of the muzzle. Place a pin. Count 7 sc to the left and right, and 4 sc up. Cinch these areas similarly to the eyes to create the nostrils.
The Eyes & Details
- Creating Eye Whites: Roll two small balls of white polymer clay. Flatten them slightly. If using safety eyes, poke a hole in the clay first. Bake the clay according to package instructions and let cool.
- Final Touches: Glue the clay whites to the face, then add the safety eyes. Apply a tiny bit of glue and add the faux eyelashes.
- Painting: Use brown acrylic paint to paint a small outline around the eyes and create the giraffe’s signature spots across the body, neck, and head. Let dry completely.
Assembly
- Sew the ears to the sides of the head (approximately between rows 20 and 25).
- Sew the ossicones/horns to the top of the head.
- Sew the tail to the back of the body.
Tips for Success
- Tension is Key: Keep your stitches tight so that the stuffing doesn’t show through, especially in the neck.
- Wire Safety: Always make sure the ends of your wire are bent into a small loop or covered with tape so they don’t poke through the crochet fabric.
- Customization: Feel free to change the colors! A “blue” or “pink” fantasy giraffe is just as cute as a traditional orange one.
- Symmetry: When working on the right leg and right arm, always double-check that your increases are mirrored so your giraffe doesn’t lean to one side.