Adorable Plush Crochet Teddy Bear Pattern: Free Step-by-Step Guide
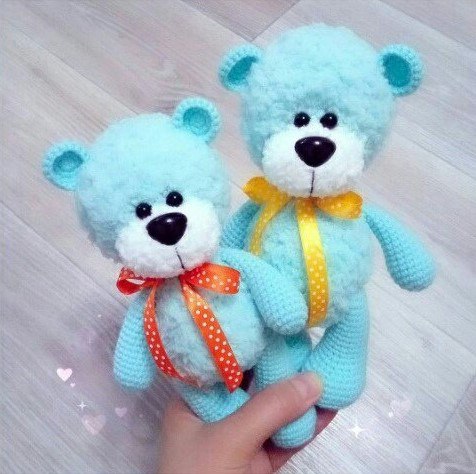
There is nothing quite as timeless as a soft, handmade teddy bear. Whether you are creating a nursery keepsake, a birthday surprise, or simply adding to your plushie collection, this free crochet teddy bear pattern is designed to bring warmth and joy. Combining a plush, fluffy body with smooth, detailed limbs, this mixed-texture amigurumi bear stands out with its unique tactile charm and sweet expression.
This tutorial uses standard US crochet terms and includes step-by-step guidance suitable for confident beginners and experienced crocheters alike. Grab your hooks, pick out your favorite pastel or neutral yarn, and let’s craft an adorable plush bear together!
Materials & Abbreviations
Required Supplies
- Fluffy Plush Yarn (Body & Head): Super Bulky plush yarn (Category 6, approximately 93 yards / 85 meters per 1.75 oz / 50 g ball) in light blue or your choice of color.
- Smooth Acrylic Yarn (Limbs & Ears): Fine or Sport weight yarn (Category 2, approximately 218 yards / 200 meters per 1.75 oz / 50 g ball) in a matching light blue shade.
- Crochet Hooks: Size US E-4 (3.5 mm) for plush yarn and Size US B-1 (2.0 mm) for smooth yarn.
- Safety Eyes & Nose: 1 pair of 0.4-inch (10 mm) black safety eyes and 1 oval safety nose (or embroidered alternative).
- Embroidery Floss: Black yarn or embroidery thread for facial details.
- Stuffing: Premium polyester fiberfill stuffing.
- Tools: Tapestry needle, stitch markers, and sharp scissors.
- Optional Decor: 0.5-inch wide satin ribbon (approx. 12 inches long) for a decorative neck bow.
Crochet Abbreviations (US Terms)
- MR: Magic Ring (Magic Circle)
- ch: chain
- sc: single crochet
- inc: increase (work 2 single crochets in the same stitch)
- dec: decrease (single crochet 2 stitches together / invisible decrease recommended)
- BLO: back loops only
- st(s): stitch(es)
- Rnd(s): round(s)
- [ ] x N: repeat instructions inside brackets N times
- (N): total stitch count at the end of the round
Step-by-Step Crochet Instructions
Head
Worked in continuous rounds using fluffy plush yarn and a US E-4 (3.5 mm) crochet hook. Stuff firmly as you go.
- Rnd 1: 6 sc in MR (6)
- Rnd 2: [inc] x 6 (12)
- Rnd 3: [1 sc, inc] x 6 (18)
- Rnd 4: [2 sc, inc] x 6 (24)
- Rnd 5: [3 sc, inc] x 6 (30)
- Rnd 6: [4 sc, inc] x 6 (36)
- Rnd 7: [5 sc, inc] x 6 (42)
- Rnds 8–11: sc in each st around (42 sts for 4 rounds)
- Rnd 12: [5 sc, dec] x 6 (36)
- Rnd 13: [4 sc, dec] x 6 (30)
- Rnd 14: [3 sc, dec] x 6 (24)
- Rnd 15: [2 sc, dec] x 6 (18)
- Rnd 16: [1 sc, dec] x 6 (12)
- Rnd 17: [dec] x 6 (6)
Fasten off, weave the tail through the remaining front loops, pull tight to close, and weave in your thread end.
Body
Worked in continuous rounds using fluffy plush yarn and a US E-4 (3.5 mm) crochet hook. Stuff firmly before closing.
- Rnd 1: 6 sc in MR (6)
- Rnd 2: [inc] x 6 (12)
- Rnd 3: [1 sc, inc] x 6 (18)
- Rnd 4: [2 sc, inc] x 6 (24)
- Rnd 5: [3 sc, inc] x 6 (30)
- Rnd 6: [4 sc, inc] x 6 (36)
- Rnds 7–10: sc in each st around (36 sts for 4 rounds)
- Rnd 11: [4 sc, dec] x 6 (30)
- Rnds 12–13: sc in each st around (30 sts for 2 rounds)
- Rnd 14: [3 sc, dec] x 6 (24)
- Rnd 15: sc in each st around (24)
- Rnd 16: [2 sc, dec] x 6 (18)
- Rnd 17: sc in each st around (18)
- Rnd 18: [1 sc, dec] x 6 (12)
- Rnds 19–20: sc in each st around (12 sts for 2 rounds)
Fasten off, leaving a long tail (approx. 12 inches) for sewing the body to the head.
Arms (Make 2)
Worked in continuous rounds using smooth acrylic yarn and a US B-1 (2.0 mm) crochet hook. Stuff the lower paw portion lightly; leave the top unstitched edge unstuffed.
- Rnd 1: 6 sc in MR (6)
- Rnd 2: [inc] x 6 (12)
- Rnd 3: [1 sc, inc] x 6 (18)
- Rnds 4–6: sc in each st around (18 sts for 3 rounds)
- Rnd 7: dec, 16 sc (17)
- Rnd 8: dec, 15 sc (16)
- Rnd 9: dec, 14 sc (15)
- Rnd 10: dec, 13 sc (14)
- Rnd 11: dec, 12 sc (13)
- Rnd 12: dec, 11 sc (12)
- Rnd 13: dec, 10 sc (11)
- Rnd 14: dec, 9 sc (10)
- Rnds 15–18: sc in each st around (10 sts for 4 rounds)
- Rnd 19: [dec] x 5 (5)
Fasten off, leaving a long tail for sewing.
Legs (Make 2)
Worked around a foundation chain to create an oval foot sole using smooth acrylic yarn and a US B-1 (2.0 mm) crochet hook. Stuff the foot firmly and the leg lightly.
- Foundation: Chain 6.
- Rnd 1: Starting in the 2nd ch from hook, work 4 sc, 3 sc in the last ch. Working along the opposite side of the chain: 3 sc, inc in the last loop (12)
- Rnd 2: inc, 3 sc, [inc] x 3, 3 sc, [inc] x 2 (18)
- Rnd 3: inc, 6 sc, [inc] x 2, 6 sc, inc, 2 sc (22)
- Rnd 4: 1 sc, inc, 6 sc, [inc] x 5, 6 sc, [inc] x 2, 1 sc (30)
- Rnd 5: Working in BLO, sc in each st around (30)
- Rnds 6–8: sc in each st around through both loops (30 sts for 3 rounds)
- Rnd 9: 9 sc, [dec, 1 sc] x 4, 9 sc (26)
- Rnd 10: 7 sc, [dec, 1 sc] x 4, 7 sc (22)
- Rnd 11: sc in each st around (22)
- Rnd 12: 8 sc, [dec, 1 sc] x 2, 8 sc (20)
- Rnd 13: 8 sc, [dec] x 2, 8 sc (18)
- Rnds 14–22: sc in each st around (18 sts for 9 rounds)
- Rnd 23: [dec, 1 sc] x 6 (12)
- Rnd 24: [dec] x 6 (6)
Fasten off, leaving a long yarn tail for attachment.
Ears (Make 2)
Worked in smooth acrylic yarn using a US B-1 (2.0 mm) crochet hook. Do not stuff.
- Rnd 1: 6 sc in MR (6)
- Rnd 2: [inc] x 6 (12)
- Rnd 3: [1 sc, inc] x 6 (18)
- Rnd 4: sc in each st around (18)
Fasten off, leaving a tail for sewing.
Muzzle
Worked in fluffy plush yarn using a US E-4 (3.5 mm) crochet hook. Stuff lightly during assembly.
- Rnd 1: 6 sc in MR (6)
- Rnd 2: [inc] x 6 (12)
- Rnd 3: [1 sc, inc] x 6 (18)
Fasten off, leaving a long tail for attachment.
Tail
Worked in fluffy plush yarn using a US E-4 (3.5 mm) crochet hook. Stuff lightly.
- Rnd 1: 6 sc in MR (6)
- Rnd 2: [inc] x 6 (12)
- Rnds 3–4: sc in each st around (12 sts for 2 rounds)
- Rnd 5: [dec] x 6 (6)
Fasten off, leaving a yarn tail for sewing.
Finishing & Assembly
Assembly brings your teddy bear’s personality to life! Follow these simple steps for a polished final look:
- Muzzle & Facial Details: Attach the safety nose to the center of the plush muzzle piece. Sew the muzzle onto the lower third of the head, adding a pinch of fiberfill before closing. Attach safety eyes (or embroider eyes) just above the muzzle, spaced approximately 4 to 5 stitches apart. Using black embroidery thread, stitch a small vertical line extending down from the nose onto the muzzle for a cute stitched snout.
- Attach Ears: Flatten the ears slightly and sew them securely onto the top sides of the head between Rnds 4 and 8.
- Connect Head & Body: Align the open neck of the body with the base of the head. Using the long tail from the body, stitch the neck stitches securely around the bottom of the head. Add extra stuffing to the neck area right before closing to prevent the head from drooping.
- Attach Limbs:
- Position the legs symmetrically on either side of the lower body (around Rnds 6–8 of the body) so the bear can sit upright comfortably.
- Sew the arms onto the upper body, approximately 1 to 2 rounds below the neck seam.
- Attach Tail: Centrally sew the tail on the lower back of the body to act as a balancing support when sitting.
- Final Touches: Tie a bright satin ribbon into a neat bow around your bear’s neck for an extra dose of charm!
Tips for Success
- Working with Plush Yarn: Fluffy chenille yarns can make it tricky to see your stitches. Use your fingers to feel for the stitch loops rather than relying solely on sight, and always place a stitch marker in the first stitch of every round.
- Maintaining Tension: Keep your gauge tight when working amigurumi so fiberfill stuffing doesn’t peek through the stitches.
- Safety Note: If making this plush bear for infants or toddlers under 3 years old, swap plastic safety eyes and noses for embroidered yarn features to eliminate choking hazards.
Congratulations! You’ve hand-crafted a beautiful, soft crochet teddy bear. Share your finished creation with friends or family, and enjoy crafting more colors of this classic stuffed companion!