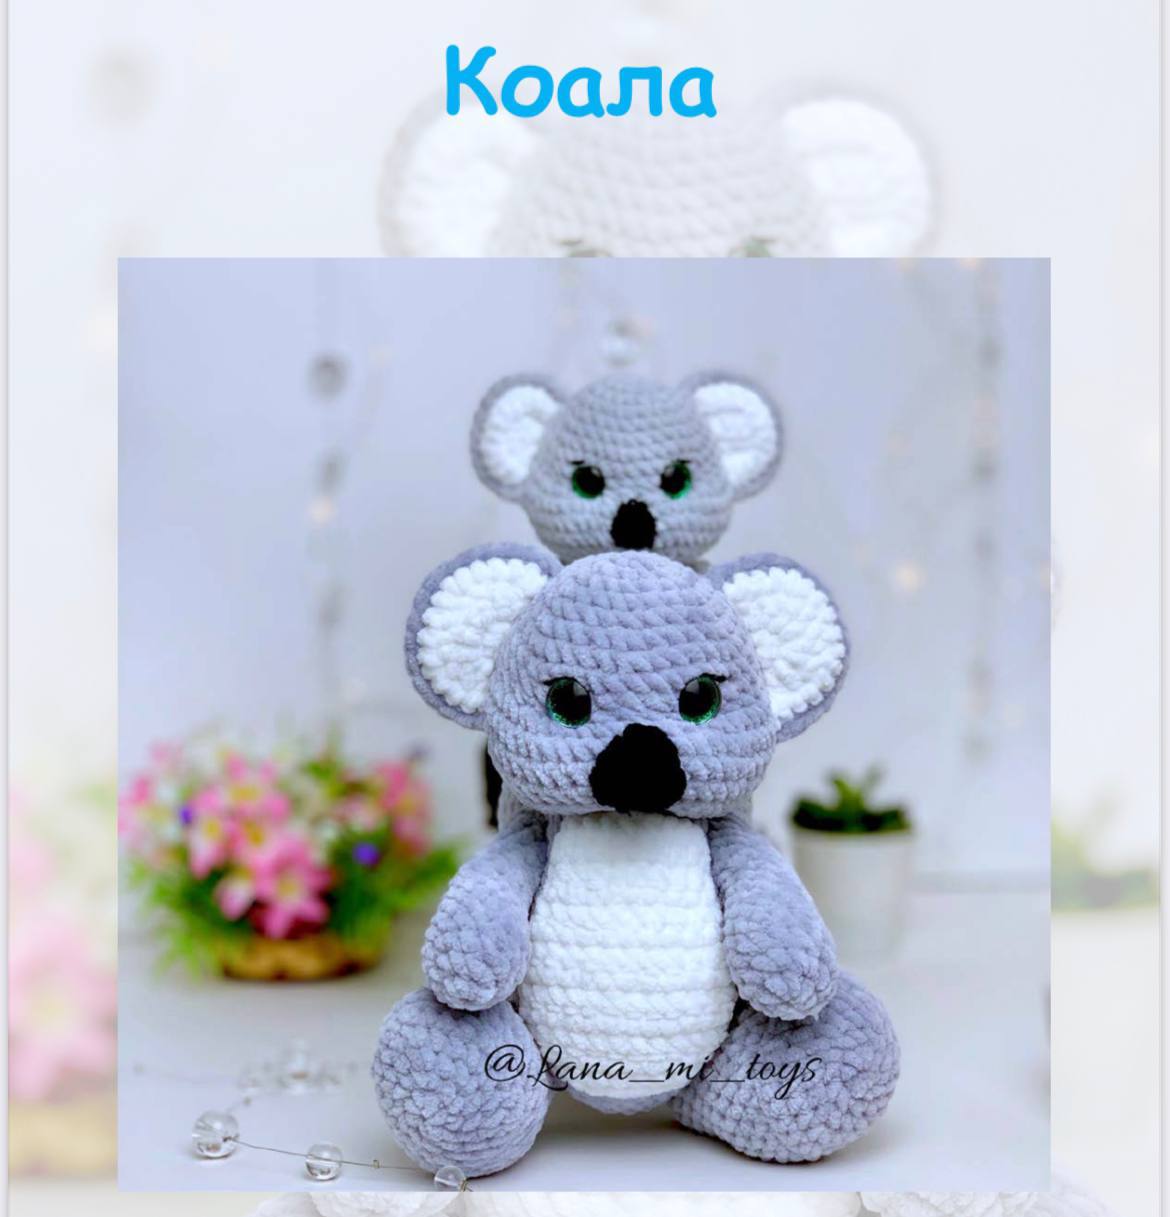
Adorable Plush Crochet Koala Pattern: A Step-by-Step Amigurumi Tutorial
Looking for your next cozy crochet project? There is nothing quite as charming as a fluffy koala! This amigurumi koala is designed to be incredibly soft, huggable, and cute, making it the perfect gift for children or a delightful addition to any nursery. Whether you are a seasoned pro or a beginner looking to practice your shaping skills, this tutorial will guide you through every stitch.
To achieve that signature “plushie” look, we will be using a chunky chenille-style yarn. This makes the project work up quickly and ensures your koala is extra squishy. Let’s dive into the details and start crafting your new fuzzy friend!
Materials & Abbreviations
To get started, gather the following materials. For this project, we recommend using a plush polyester yarn (such as chenille or velvet) for the body to give it that professional toy store feel.
Materials Needed:
- Yarn: Plush chenille yarn in Gray (main body), White (belly and inner ears), and Black (nose).
- Crochet Hook: 4.0mm (G) hook for the main body.
- Safety Eyes: 16mm black safety eyes.
- Stuffing: High-quality polyester fiberfill.
- Tools: A yarn needle for sewing, scissors, and stitch markers.
Abbreviations (US Terms):
- MR: Magic Ring
- sc: Single crochet
- inc: Increase (2 sc in one stitch)
- dec: Decrease (sc 2 together)
- ch: Chain
- BLO: Back loop only
- st: Stitch
Step-by-Step Instructions
The Head and Body
The head and body are worked as one continuous piece to minimize sewing. Start with the gray yarn.
- Round 1: 6 sc in MR (6)
- Round 2: 6 inc (12)
- Round 3: (1 sc, inc) x 6 (18)
- Round 4: (2 sc, inc) x 6 (24)
- Round 5: 24 sc (24)
- Round 6: (3 sc, inc) x 6 (30)
- Round 7: (4 sc, inc) x 6 (36)
- Rounds 8-10: 36 sc (3 rows). Place your safety eyes between rounds 9 and 10, leaving 7 stitches between them.
- Round 11: 8 sc, 6 inc, 8 sc, 6 inc, 8 sc (48)
- Rounds 12-14: 48 sc (3 rows)
- Round 15: (6 sc, dec) x 6 (42)
- Round 16: (5 sc, dec) x 6 (36)
- Round 17: (1 sc, dec) x 12 (24)
- Round 18: (2 sc, dec) x 6 (18)
- Round 19: (2 sc, inc) x 6 (24)
- Round 20: (3 sc, inc) x 6 (30)
- Rounds 21-23: 30 sc (3 rows)
- Round 24: (4 sc, inc) x 6 (36)
- Rounds 25-26: 36 sc (2 rows)
- Round 27: (5 sc, inc) x 6 (42)
- Rounds 28-33: 42 sc (6 rows)
- Round 34: (5 sc, dec) x 6 (36)
- Round 35: (4 sc, dec) x 6 (30)
- Round 36: (3 sc, dec) x 6 (24)
- Round 37: (2 sc, dec) x 6 (18)
- Round 38: (1 sc, dec) x 6 (12)
- Round 39: 6 dec.
Fasten off and weave in the ends. Stuff the head and body firmly with fiberfill.
The Ears
You will need to make four ear pieces in total: two in white and two in gray.
- Row 1: 6 sc in MR, ch 1, turn (6)
- Row 2: (1 sc, inc) x 3, ch 1, turn (9)
- Row 3: (2 sc, inc) x 3, ch 1, turn (12)
- Row 4: (3 sc, inc) x 3, ch 1, turn (15)
Assembly: To create the finished ear, place one white piece on top of one gray piece. Single crochet through both layers across the curved edge (15 sc) to join them. Repeat for the second ear.
The Arms
Using gray yarn, make two arms.
- Round 1: 6 sc in MR (6)
- Round 2: 6 inc (12)
- Round 3: (3 sc, inc) x 3 (15)
- Rounds 4-5: 15 sc (2 rows)
- Round 6: dec, 5 sc, dec, 6 sc (13)
- Round 7: dec, 4 sc, dec, 5 sc (11)
- Round 8: dec, 9 sc (10)
- Rounds 9-10: 10 sc (2 rows)
- Round 11: 2 dec, 2 sc, 2 inc, 2 sc (10)
- Rounds 12-16: 10 sc (5 rows)
- Round 17: 5 dec.
Stuff the arms firmly and fasten off.
The Legs
Using gray yarn, make two legs.
- Round 1: 6 sc in MR (6)
- Round 2: 6 inc (12)
- Round 3: (1 sc, inc) x 6 (18)
- Round 4: (2 sc, inc) x 6 (24)
- Round 5: (3 sc, inc) x 6 (30)
- Round 6: BLO 30 sc.
- Rounds 7-8: 30 sc (2 rows)
- Round 9: 9 sc, 6 dec, 9 sc (24)
- Round 10: dec, 6 sc, 4 dec, 6 sc, dec (18)
- Round 11: 6 sc, 3 dec, 6 sc (15)
- Rounds 12-15: 15 sc (4 rows)
- Round 16: (3 sc, dec) x 3 (12)
- Round 17: 12 sc
- Round 18: 6 dec.
Stuff and fasten off.
The Tail and Nose
Tail (Gray): 6 sc in MR, then 6 inc (12), then 12 sc. Fasten off.
Nose (Black):
- Ch 2, in 2nd ch from hook: inc, ch 1, turn.
- 2 inc, ch 1, turn (4)
- 4 sc, ch 1, turn (4)
- Sc around the entire edge of the piece, working 3 sc into the top tip to round it out.
The Belly Patch
Using white yarn, work in rows.
- Row 1: Ch 6, starting in 2nd ch from hook: inc, 3 sc, inc, ch 1, turn (7)
- Row 2: inc, 5 sc, inc, ch 1, turn (9)
- Row 3: inc, 7 sc, inc, ch 1, turn (11)
- Row 4: inc, 9 sc, inc, ch 1, turn (13)
- Rows 5-7: 13 sc, ch 1, turn (3 rows)
- Row 8: dec, 9 sc, dec, ch 1, turn (11)
- Row 9: 11 sc, ch 1, turn
- Row 10: dec, 7 sc, dec, ch 1, turn (9)
- Rows 11-14: 9 sc (4 rows).
Finishing & Assembly
Now comes the magic part where all your pieces become a koala!
Sculpting the Face
To give your koala a more defined look, we recommend “neck sculpting.” Using your yarn needle, insert the thread between rounds 17 and 18 at the center of the neck. Gently pull the thread to cinch the head slightly away from the body, creating a more natural transition. This helps the head sit upright.
Sewing the Details
- Head: Sew the ears to the top of the head and the black nose centered between the eyes.
- Arms: Attach the arms between rounds 23 and 24 of the body.
- Legs: Count 8 rows up from the bottom of the body; insert your needle between rounds 8 and 9 of the leg to attach them securely.
- Final Touches: Sew the white belly patch to the front of the body and the small tail to the back.
Tips for Success
- Tension Control: When working with plush yarn, it can be hard to see your stitches. Use a stitch marker at the start of every round to avoid losing your place.
- Avoid Gaps: To ensure the stuffing doesn’t peek through, keep your tension tight, especially during the decrease rounds.
- Stuffing: Stuff the body in small increments. Overstuffing can stretch the fabric, while understuffing may leave the koala looking floppy.
- The Perfect Nose: If the nose feels too flat, you can add a tiny bit of stuffing inside before sewing it to the head for a 3D effect.