Adorable Crochet Rooster Pattern: A Step-by-Step Amigurumi Tutorial
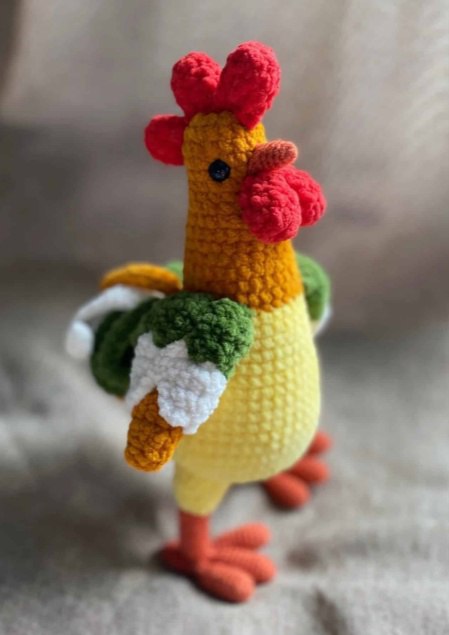
Bring a bit of farmyard charm into your home with this colorful and quirky crochet rooster! This amigurumi project is perfect for crafters who love working with vibrant colors and want to create a cute, freestanding animal. Whether you are looking for a unique gift or a fun weekend project, this rooster is a delight to make.
This pattern is designed to be beginner-friendly, but it does involve a few different components that you will sew together at the end. We will guide you through every step, from the plump yellow body to the bright red comb and the detailed little feet.
Materials & Abbreviations
To get started, gather the following materials. We recommend using a medium-weight (worsted) acrylic or cotton yarn for a sturdy shape.
Materials Needed
- Yarn: Medium weight (4) yarn in Yellow, Orange, Red, Green, and White.
- Crochet Hook: 3.0mm or 3.25mm (choose a size that prevents your stuffing from showing through).
- Safety Eyes: 6mm or 8mm black safety eyes.
- Stuffing: Polyester fiberfill.
- Tools: Yarn needle, scissors, and stitch markers.
Abbreviations (US Terms)
- ch: Chain
- sc: Single crochet
- inc: Increase (two single crochet stitches in the same stitch)
- dec: Decrease (single crochet two stitches together)
- mr: Magic ring
- st(s): Stitch(es)
- sl st: Slip stitch
Step-by-Step Instructions
The Body and Head
The body and head are worked as one continuous piece, starting from the base of the body and working upward toward the head. We will start with yellow yarn and transition to orange.
Using Yellow Yarn:
Round 1: 6 sc in mr (6)
Round 2: 6 inc (12)
Round 3: (1 sc, inc) * 6 (18)
Round 4: (2 sc, inc) * 6 (24)
Round 5: (3 sc, inc) * 6 (30)
Round 6: (4 sc, inc) * 6 (36)
Round 7: (5 sc, inc) * 6 (42)
Round 8: (6 sc, inc) * 6 (48)
Round 9: 6 inc, 42 sc (54)
Round 10: 54 sc
Round 11: 12 sc, (5 sc, dec) * 6 (48)
Rounds 12-16: 48 sc (5 rounds)
Round 17: 6 dec, 36 sc (42)
Round 18: 3 dec, 36 sc (39)
Round 19: 2 dec, 33 sc, 1 dec (36)
Round 20: (4 sc, dec) * 6 (30)
Stuff the body firmly here.
Change to Orange Yarn:
Rounds 21-26: 30 sc (6 rounds)
Round 27: (3 sc, dec) * 6 (24)
Rounds 28-30: 24 sc (3 rounds)
Round 31: (2 sc, dec) * 6 (18)
Rounds 32-37: 18 sc (6 rounds)
Important: Insert safety eyes between rounds 34 and 35, leaving 5 stitches between them. Continue stuffing the head firmly.
Round 38: (1 sc, dec) * 6 (12)
Round 39: 6 dec. Fasten off and weave in the end.
The Beak
Using orange yarn, we will create a small cone for the beak.
Round 1: 4 sc in mr (4)
Round 2: 4 sc
Round 3: (1 sc, inc) * 2 (6)
Round 4: 6 sc
Round 5: (2 sc, inc) * 2 (8)
Round 6: 8 sc
Round 7: (1 sc, inc) * 4 (12)
Round 8: (1 sc, inc) * 6 (18)
Round 9: 18 sc. Fasten off, leaving a long tail for sewing.
The Comb and Wattles
You will need to make 5 of these red pieces in total: one larger one for the top of the head (comb) and four smaller ones for the face and neck (wattles).
Using red yarn:
Round 1: 7 sc in mr (7)
Rounds 2-5: 7 sc (4 rounds)
Round 6: Sc through both loops for 3 stitches. Fasten off and leave a tail for sewing.
The Wings
The wings are made by creating several small “feather” pieces and sewing them together. You will need a total of 24 feathers to create 2 full wings (12 green, 8 white, and 4 orange).
For each feather:
Chain 5.
Row 1: Starting in the 2nd chain from the hook, sc in each ch across (4 sc).
Rows 2-3: 4 sc.
Row 4: 2 dec (2).
Row 5: 1 dec. Fasten off.
To assemble the wings, sew the feathers together in layers, starting with orange at the bottom, then white, then green on top. Make two of these composite wings.
The Tail Feathers
The tail consists of 12 long feathers (4 green, 4 orange, and 4 white).
Chain 20.
Row 1: Starting in the 2nd chain from the hook, sc in each ch across (19 sc). Fasten off.
The Legs and Feet
You will need to make two legs. Start with orange yarn.
Round 1: 6 sc in mr (6)
Round 2: 6 inc (12)
Rounds 3-12: 12 sc
Change to Yellow Yarn:
Round 13: (1 sc, inc) * 6 (18)
Round 14: 18 sc. Fasten off.
The Toes:
Make 3 toes per foot using orange yarn.
Round 1: 6 sc in mr (6)
Round 2: 6 inc (12)
Rounds 3-10: 12 sc (8 rounds). Stuff firmly.
Round 11: 6 dec (6).
Joining the Toes:
Round 12: Join the three toes together by working: 3 sc across the first toe, 3 sc across the second toe, 6 sc across the third (middle) toe, 3 sc across the second toe, and 3 sc across the first toe (18 total).
Round 13: (1 sc, dec) * 6 (12)
Rounds 14-20: 12 sc (7 rounds). Stuff firmly.
Round 21: 6 dec. Fasten off.
Finishing
Now it is time to bring your rooster to life! Use your yarn needle and the tails you left on each piece to assemble the bird.
- Beak: Sew the beak to the center of the head, just below the eyes.
- Comb and Wattles: Attach the largest red piece to the top of the head. Position the other four red pieces around the beak and under the chin.
- Wings: Sew the assembled wings to the sides of the yellow body.
- Tail: Bundle the 12 tail feathers together and sew them to the back of the body. Tuck the ends of the yarn inside the body for a clean look.
- Feet: Sew the completed feet to the bottom of the body. Make sure they are positioned evenly so the rooster can stand upright.
Tips for Success
- Tension is Key: Keep your stitches tight, especially when working with the body, to ensure the stuffing doesn’t peak through.
- Stitch Markers: Since this pattern is worked in continuous spirals, use a stitch marker at the start of each round to avoid losing your place.
- Stuffing: Stuff your pieces as you go. It is much harder to stuff the neck or the toes once they are already sewn to the body.
- Customization: Feel free to change the colors! You can make a white hen or a brown rooster simply by swapping the yarn colors.