Crochet Aviator Rhino Pattern: Step-by-Step Amigurumi Tutorial
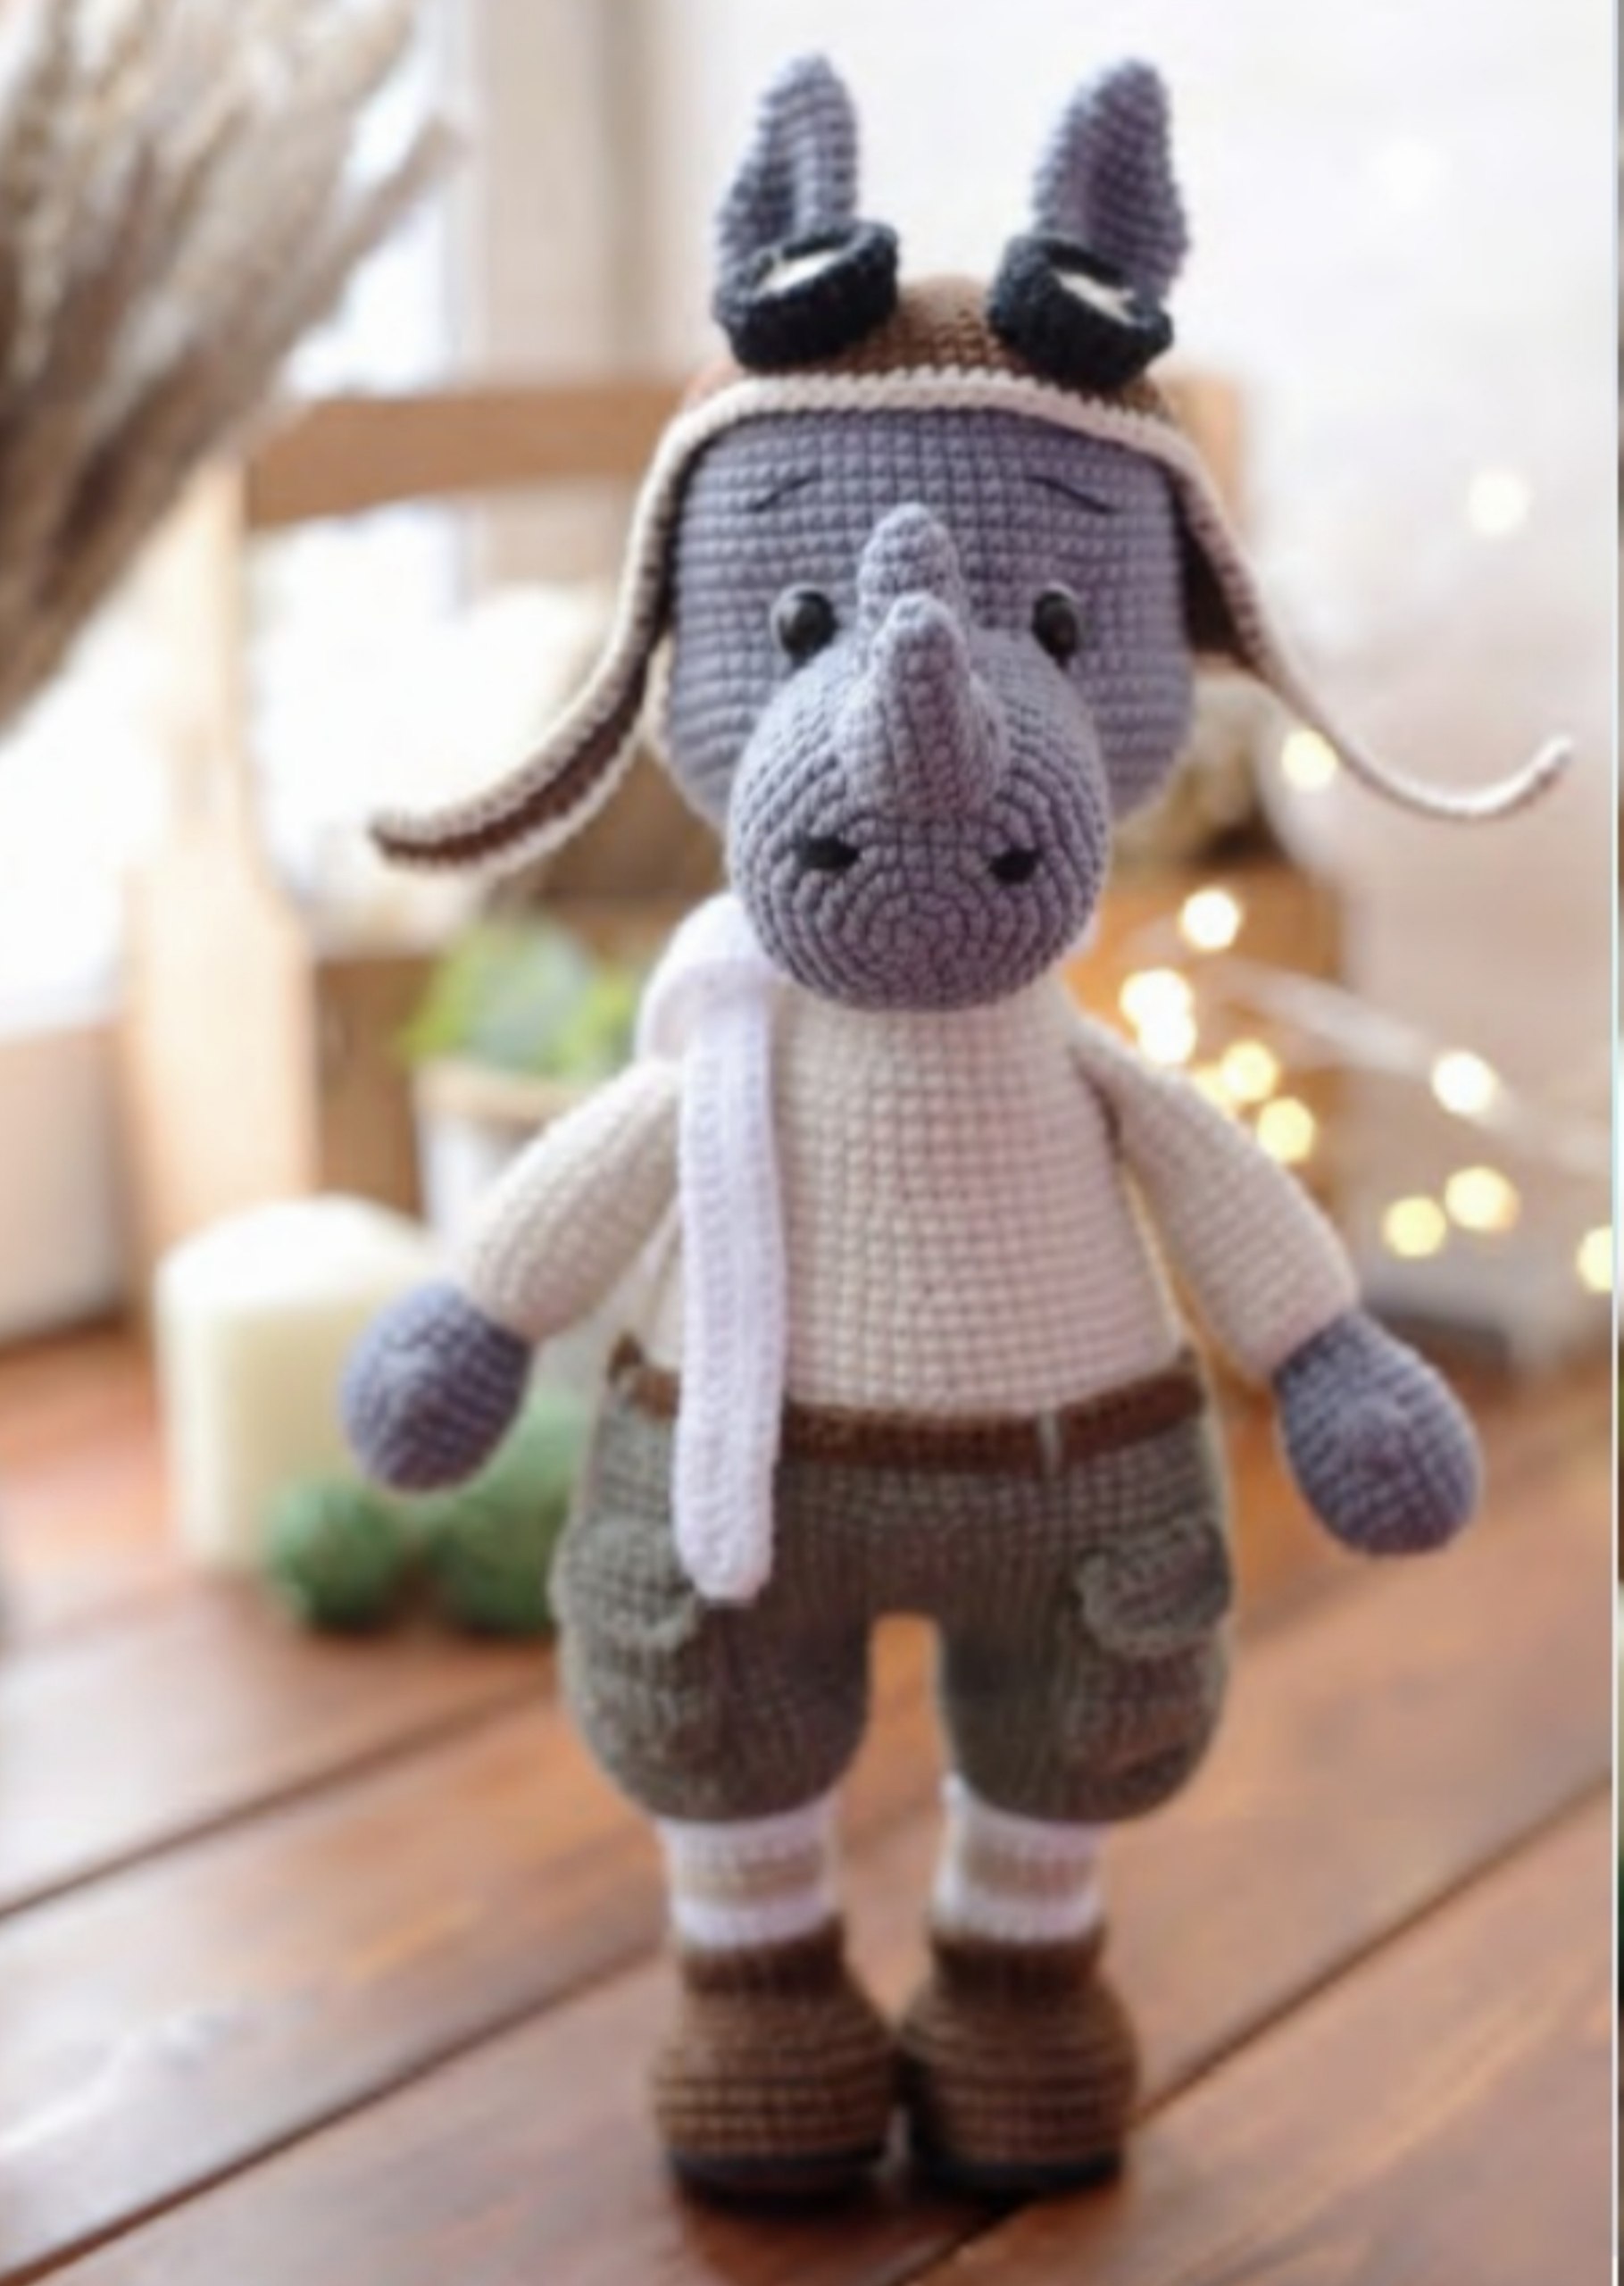
Get ready to take flight with this adorable Aviator Rhino crochet pattern! This charming little character is the perfect project for those who love amigurumi with a vintage twist. With his cozy flight hat, detailed boots, and tiny pockets on his khaki shorts, this rhino is sure to become a favorite in any toy collection. Whether you are looking for a unique gift or a fun weekend project, this detailed guide will walk you through every stitch.
The finished rhino stands approximately 11.5 inches tall. While this pattern is accessible to beginners, it incorporates several different techniques—including color changes and shaping—making it a great way to level up your crochet skills.
Materials & Abbreviations
Materials Needed
- Crochet Hook: 2.0mm (or a size that gives you tight stitches)
- Yarn (Cotton or Cotton Blend recommended):
- Grey (for the rhino’s skin)
- Khaki (for the shorts and pockets)
- White (for the scarf and sock stripes)
- Black (for accents and goggles)
- Light Beige (for the shirt and goggle lenses)
- Beige (for boot and hat details)
- Brown (for the flight hat, boots, and belt)
- Safety Eyes: 9-10mm
- Stuffing: High-quality polyester fiberfill
- Tools: Yarn needle, scissors, strong thread for sculpting/tightening, and plastic inserts for the shoe soles.
Abbreviations (US Terms)
- MR: Magic Ring
- sc: Single Crochet
- inc: Increase (2 sc in one stitch)
- dec: Decrease (sc 2 together)
- sl st: Slip Stitch
- ch: Chain
- hdc: Half Double Crochet
- dc: Double Crochet
- (…) * n: Repeat the sequence inside the parentheses “n” times
- Bobble: 4 dc in one stitch, worked together at the top
Step-by-Step Instructions
The Head
Use grey yarn. Stuff firmly as you work.
- Rnd 1: 6 sc in MR (6)
- Rnd 2: 6 inc (12)
- Rnd 3: (1 sc, inc) * 6 (18)
- Rnd 4: (2 sc, inc) * 6 (24)
- Rnd 5: (3 sc, inc) * 6 (30)
- Rnd 6: (4 sc, inc) * 6 (36)
- Rnd 7: (5 sc, inc) * 6 (42)
- Rnd 8: (6 sc, inc) * 6 (48)
- Rnd 9: (7 sc, inc) * 6 (54)
- Rnd 10: (8 sc, inc) * 6 (60)
- Rnd 11-20: sc in each st around (60)
- Rnd 21: 12 sc, 6 inc, 24 sc, 6 inc, 12 sc (72)
- Rnd 22-24: sc in each st around (72)
Note: Insert safety eyes between rounds 19 and 20, with 12 stitches between the eyes.
- Rnd 25: (10 sc, dec) * 6 (66)
- Rnd 26: (9 sc, dec) * 6 (60)
- Rnd 27: (8 sc, dec) * 6 (54)
- Rnd 28: (7 sc, dec) * 6 (48)
- Rnd 29: (6 sc, dec) * 6 (42)
- Rnd 30: (5 sc, dec) * 6 (36)
- Rnd 31: (4 sc, dec) * 6 (30)
- Rnd 32: (3 sc, dec) * 6 (24)
- Rnd 33: (2 sc, dec) * 6 (18)
- Rnd 34: (1 sc, dec) * 6 (12)
- Rnd 35: 6 dec (6)
Fasten off and weave in ends.
The Muzzle
Use grey yarn. Stuff firmly.
- Rnd 1: 6 sc in MR (6)
- Rnd 2: 6 inc (12)
- Rnd 3: (1 sc, inc) * 6 (18)
- Rnd 4: (2 sc, inc) * 6 (24)
- Rnd 5: (3 sc, inc) * 6 (30)
- Rnd 6: (4 sc, inc) * 6 (36)
- Rnd 7: (5 sc, inc) * 6 (42)
- Rnd 8-11: sc in each st around (42)
- Rnd 12: (5 sc, dec) * 6 (36)
- Rnd 13-16: sc in each st around (36)
Fasten off, leaving a long tail for sewing.
The Horns
Small Horn (Grey yarn, stuffed):
- Rnd 1: 6 sc in MR (6)
- Rnd 2: (1 sc, inc) * 3 (9)
- Rnd 3-4: sc in each st around (9)
- Rnd 5: 3 inc, 6 sc (12)
- Rnd 6: sc in each st around (12)
Fasten off, leaving a long tail.
Large Horn (Grey yarn, stuffed):
- Rnd 1: 6 sc in MR (6)
- Rnd 2: (1 sc, inc) * 3 (9)
- Rnd 3-4: sc in each st around (9)
- Rnd 5: 3 inc, 6 sc (12)
- Rnd 6: sc in each st around (12)
- Rnd 7: (1 sc, inc) * 3, 6 sc (15)
- Rnd 8: (2 sc, inc) * 3, 6 sc (18)
- Rnd 9: sc in each st around (18)
Fasten off, leaving a long tail.
The Ears (Make 2)
Use grey yarn. Do not stuff.
- Rnd 1: 6 sc in MR (6)
- Rnd 2: (1 sc, inc) * 3 (9)
- Rnd 3: (2 sc, inc) * 3 (12)
- Rnd 4: sc in each st around (12)
- Rnd 5: 5 sc, 2 inc, 5 sc (14)
- Rnd 6: 6 sc, 2 inc, 6 sc (16)
- Rnd 7: 7 sc, 2 inc, 7 sc (18)
- Rnd 8-11: sc in each st around (18)
- Rnd 12: (1 sc, dec) * 6 (12)
Fold the piece in half so the increases align on the side. sc across the bottom edge (6 sc) to close the ear. Fasten off, leaving a long tail.
The Legs & Boots (Make 2)
Use brown yarn. Stuff firmly.
- Foundation: Ch 7. Work around the chain.
- Rnd 1: inc, 4 sc, 4 sc in the last ch, work along the other side of the chain: 4 sc, inc (16)
- Rnd 2: 2 inc, 4 sc, 4 inc, 4 sc, 2 inc (24)
- Rnd 3: (3 sc, inc) * 6 (30)
- Rnd 4: (4 sc, inc) * 6 (36)
Cut a plastic circle for the sole and place it inside. Work the next round in the back loops only (BLO).
- Rnd 5: BLO sc in each st around (36)
- Rnd 6-8: sc in each st around (36)
- Rnd 9: 6 sc, (2 sc, dec) * 6, 6 sc (30)
- Rnd 10: 6 sc, (1 sc, dec) * 6, 6 sc (24)
- Rnd 11: 3 sc, (1 sc, dec) * 6, 3 sc (18)
- Rnd 12: sc in each st around (18)
Color Changes:
- Switch to Beige: Rnd 13 (BLO) and Rnd 14 (18 sc)
- Switch to White: Rnd 15-16 (18 sc)
- Switch to Beige: Rnd 17-18 (18 sc)
- Switch to White: Rnd 19 (18 sc)
- Switch to Grey: Rnd 20 (BLO) and Rnd 21-22 (18 sc)
- Rnd 23: (5 sc, inc) * 3 (21)
- Rnd 24-25: sc in each st around (21)
- Rnd 26: (6 sc, inc) * 3 (24)
- Rnd 27-28: sc in each st around (24)
Fasten off the first leg. Leave the yarn attached for the second leg to join to the body.
The Body
Start with the right leg.
- Find the center stitch on the inside of the thigh. Work sc until you reach this point.
- Ch 3, then join to the center stitch of the left leg’s inner thigh.
- Rnd 1: 24 sc around left leg, 3 inc in the ch-3 space, 24 sc around right leg, 3 inc in the ch-3 space (60)
- Rnd 2: (2 sc, inc) * 2, 12 sc, (2 sc, inc) * 6, 12 sc, (2 sc, inc) * 4 (72)
- Rnd 3-10: sc in each st around (72)
- Rnd 11: (10 sc, dec) * 6 (66)
- Rnd 12: sc in each st around (66)
- Rnd 13: (9 sc, dec) * 6 (60)
Switch to Light Beige (Shirt):
- Rnd 14-15: sc in each st around (60)
- Rnd 16: (8 sc, dec) * 6 (54)
- Rnd 17-19: sc in each st around (54)
- Rnd 20: (7 sc, dec) * 6 (48)
- Rnd 21-23: sc in each st around (48)
- Rnd 24: (6 sc, dec) * 6 (42)
- Rnd 25-29: sc in each st around (42)
- Rnd 30: (5 sc, dec) * 6 (36)
- Rnd 31-32: sc in each st around (36)
Switch to Grey (Neck):
- Rnd 33: BLO sc in each st around (36)
- Rnd 34: (4 sc, dec) * 6 (30)
- Rnd 35: (3 sc, dec) * 6 (24)
- Rnd 36-37: sc in each st around (24)
Fasten off, leaving a long tail for assembly.
Arms (Make 2)
Part 1 (Grey):
- Rnd 1: 6 sc in MR (6)
- Rnd 2: 6 inc (12)
- Rnd 3: (1 sc, inc) * 6 (18)
- Rnd 4: (5 sc, inc) * 3 (21)
- Rnd 5-7: sc in each st around (21)
- Rnd 8: 1 Bobble, 20 sc (21)
- Rnd 9: sc in each st around (21)
- Rnd 10: (5 sc, dec) * 3 (18)
- Rnd 11: (1 sc, dec) * 6 (12)
- Rnd 12-24: sc in each st around (12)
Part 2 (Light Beige Sleeve):
- Ch 15, join in a ring.
- Rnd 1: 15 sc (15)
- Rnd 2: (4 sc, inc) * 3 (18)
- Rnd 3-8: sc in each st around (18)
- Rnd 9: (1 sc, dec) * 6 (12)
- Rnd 10-13: sc in each st around (12)
Insert the grey hand into the beige sleeve. Rnd 14: 12 sc, working through both the sleeve and the hand together. Rnd 15-16: sc around. Flatten the top and sc across (6 sc) to close. Fasten off.
The Flight Hat & Goggles
Hat (Brown):
- Rnd 1: 6 sc in MR (6)
- Rnd 2: 6 inc (12)
- Rnd 3: (1 sc, inc) * 6 (18)
- Rnd 4: (2 sc, inc) * 6 (24)
- Rnd 5: (3 sc, inc) * 6 (30)
- Rnd 6: 4 sc, ch 8, skip 6 sts, 4 sc, inc, 4 sc, ch 8, skip 6 sts, 4 sc, inc (36)
- Rnd 7: (5 sc, inc) * 6 (42)
- Rnd 8: (6 sc, inc) * 6 (48)
- Rnd 9: (7 sc, inc) * 6 (54)
- Rnd 10: (8 sc, inc) * 6 (60)
- Rnd 11-12: sc in each st around (60)
The Hat Flap: Identify the center 26 stitches at the front. Work in rows (back and forth) for 8 rows: sc across (36 sts), ch 1, turn. Ensure the 8th row is a right-side row.
Ties: Ch 16, work back down the chain: 4 sc, 4 hdc, 7 dc. Sl st to the hat. Repeat for the other side.
Edging: Finish the hat by sc around the entire bottom edge with Light Beige yarn.
Goggles (Make 2): Use Light Beige for Rnd 1-3 (6 sc MR, 6 inc, (1 sc, inc)*6). Switch to Black: Rnd 4 (BLO) 18 sc, Rnd 5-6 (18 sc). Rnd 7: 18 sc, picking up the front loops from Rnd 3. Rnd 8: 18 sc, sl st. Sew to the hat.
The Clothing Details
Shorts (Khaki): Make two tubes (Ch 24, join in ring; Rnd 1: 24 sc; Rnd 2: (3 sc, inc)*6 (30); Rnd 3: (4 sc, inc)*6 (36); Rnd 4-7: 36 sc). Join the two tubes with a ch-3 bridge. Work 13 more rounds, decreasing as follows: Rnd 7 (11 sc, dec)*6, Rnd 11 (10 sc, dec)*6, Rnd 12 (9 sc, dec)*6. Add small rectangles of khaki yarn for the pockets.
Belt (Brown): Ch 60, join in ring. Work one round of hdc. Sew to the waist of the shorts.
Scarf (White): Ch 92. Work one long round of hdc around both sides of the chain, adding an increase at the end to keep it flat. Fasten off.
Finishing & Assembly
Putting it All Together
- Muzzle: Sew the muzzle to the head from rounds 20 to 29. Stuff the muzzle firmly as you sew.
- Horns: Sew the large horn from rounds 6 to 10 of the muzzle and the small horn from rounds 12 to 14.
- Ears: Sew the ears to the top of the head, leaving about 16 stitches between them.
- Face: Use black embroidery thread to stitch small nostrils and eyebrows. If desired, add tiny white stitches to the corners of the eyes for more expression.
- Head to Body: Sew the head to the body. Add extra stuffing to the neck area to ensure the head stays upright.
- Arms: Sew the arms to the sides of the body between rounds 29 and 30.
- Outfit: Slide the shorts onto the body and sew them in place. Add the belt and wrap the scarf around the neck. Finally, place the flight hat on the head.
Tips for Success
- Tension is Key: To prevent stuffing from showing through, keep your stitches tight. If you see gaps, try dropping down a hook size.
- Stitch Markers: Because this pattern uses spiral crochet, always use a stitch marker at the start of each round to avoid losing your place.
- Sculpting: Use the “needle sculpting” technique to pull the muzzle closer to the head or to define the chin for a more professional look.
- Color Changes: For the cleanest color transitions, change your yarn on the final pull-through of the previous stitch.