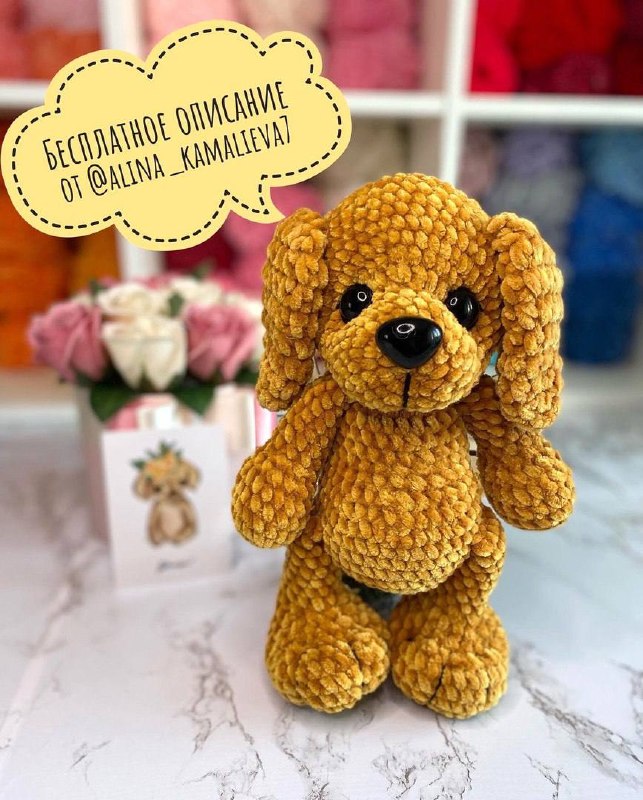
Crochet Your New Best Friend: Adorable Velvet Plush Puppy Pattern
“`html
Cute Plush Puppy Crochet Pattern: Step-by-Step Tutorial
Create your own adorable, huggable plush puppy with this detailed crochet guide. This pattern is designed for a soft, velvet-style finish, resulting in a toy approximately 10 inches (25-26 cm) tall.
Materials Needed
- Yarn: Plush velvet yarn (approximately 1.3 skeins)
- Hooks: 3.5mm crochet hook for the body and head; 5mm crochet hook for the ears
- Eyes: 18mm black safety eyes
- Nose: 25mm black safety nose
- Stuffing: Fiberfill or synthetic stuffing
- Tools: Large-eye yarn needle, scissors, stitch marker, and black embroidery thread for facial and paw details
Crochet Abbreviations (US Terms)
- ch: chain
- sc: single crochet
- inc: increase (two single crochets in one stitch)
- dec: decrease (two stitches crocheted together)
- sl st: slip stitch
- hdc: half double crochet
Step-by-Step Pattern
Lower Legs (Make 2)
Row 1: Ch 7. Starting from the 2nd chain from the hook, work 5 sc, 3 sc in the last stitch. Turn to work along the opposite side of the chain: 4 sc, inc (14)
Row 2: Inc, 4 sc, 3 inc, 4 sc, 2 inc (20)
Row 3: Sc, inc, 4 sc, (sc, inc) * 3, 4 sc, (sc, inc) * 2 (26)
Row 4: 7 sc, (2 sc, inc) * 3, 10 sc (29)
Rows 5-7: 29 sc
Row 8: 6 sc, dec, 2 sc, dec, 4 sc, dec, 2 sc, dec, 7 sc (25)
Row 9: 6 sc, dec, 1 sc, dec, 2 sc, dec, 1 sc, dec, 7 sc (21)
Row 10: 5 sc, 5 dec, 6 sc (16)
Row 11: 4 sc, 4 dec, 4 sc (12)
Rows 12-19: 12 sc (8 rows total)
Work an additional 3 sc to reach the middle of the leg. Fasten off and weave in the ends.
Upper Legs/Arms (Make 2)
Row 1: Ch 4. Starting from the 2nd chain from the hook, work 2 sc, 3 sc in the last stitch. Turn to work along the opposite side: 1 sc, inc (8)
Row 2: Inc, 1 sc, 3 inc, 1 sc, 2 inc (14)
Row 3: 3 sc, (sc, inc) * 3, 5 sc (17)
Rows 4-6: 17 sc
Row 7: 4 sc, (1 sc, dec) * 3, 4 sc (14)
Row 8: 4 sc, 3 dec, 2 sc, dec (10)
Rows 9-16: 10 sc (8 rows total)
Work an additional 2 sc to reach the middle of the leg. Fasten off and weave in the ends.
Body
Row 1: Ch 2, work 6 sc in the 2nd chain from hook (6)
Row 2: (inc) * 6 (12)
Row 3: (1 sc, inc) * 6 (18)
Row 4: (2 sc, inc) * 6 (24)
Row 5: (3 sc, inc) * 6 (30)
Row 6: 30 sc
Row 7: (4 sc, inc) * 6 (36)
Row 8: 36 sc
Row 9: Join lower legs in this row: 6 sc worked together with the leg, 12 sc, 6 sc worked together with the second leg, 12 sc (36)
Rows 10-11: 36 sc
Row 12: 7 sc, dec, 3 sc, dec, 3 sc, dec, 17 sc (33)
Row 13: 7 sc, dec, 2 sc, dec, 2 sc, dec, 16 sc (30)
Row 14: 6 sc, dec, 1 sc, dec, 1 sc, dec, 16 sc (27)
Row 15: 5 sc, 3 dec, 16 sc (24)
Rows 16-18: 24 sc (3 rows total)
Row 19: (2 sc, dec) * 6 (18)
Row 20: Join upper legs in this row: 5 sc worked together with the leg, 4 sc, 5 sc worked together with the second leg, 4 sc (18)
Row 21: 18 sc
Leave a long tail for sewing the head to the body.
Puppy Ears (Make 2)
Note: Use the 5mm hook for this section.
Row 1: Ch 2, work 6 sc in the 2nd chain from hook (6)
Row 2: (1 hdc, inc) * 3 (9)
Row 3: (2 hdc, inc) * 3 (12)
Row 4: (3 hdc, inc) * 3 (15)
Row 5: (4 hdc, inc) * 3 (18)
Row 6: (2 hdc, inc) * 6 (24)
Rows 7-8: 24 hdc
Row 9: (4 hdc, dec) * 4 (20)
Row 10: (3 hdc, dec) * 4 (16)
Leave a tail for sewing.
Puppy Tail
Row 1: Ch 2, work 6 sc in the 2nd chain from hook (6)
Row 2: 6 sc
Row 3: (2 sc, inc) * 2 (8)
Rows 4-9: 8 sc (6 rows total)
Row 10: (3 sc, inc) * 2 (10)
Rows 11-12: 10 sc
Row 13: (4 sc, inc) * 2 (12)
Rows 14-15: 12 sc
Leave a tail for sewing. The tail does not need to be stuffed, or can be stuffed very lightly. Sew the tail between the legs around rows 10-11 of the body.
Puppy Head
Row 1: Ch 2, work 6 sc in the 2nd chain from hook (6)
Row 2: (inc) * 6 (12)
Row 3: (1 sc, inc) * 6 (18)
Row 4: (2 sc, inc) * 6 (24)
Rows 5-7: 24 sc
Row 8: 8 sc, 8 inc, 8 sc (32)
Row 9: 6 sc, (2 sc, inc) * 6, 8 sc (38)
Row 10: 10 sc, inc, 4 sc, inc, 6 sc, inc, 4 sc, inc, 10 sc (42)
Rows 11-17: 42 sc (7 rows total)
Row 18: (5 sc, dec) * 6 (36)
Row 19: 36 sc
Row 20: (4 sc, dec) * 6 (30)
Row 21: (3 sc, dec) * 6 (24)
Row 22: (2 sc, dec) * 6 (18)
Row 23: (1 sc, dec) * 6 (12)
Row 24: 6 dec
Close the hole and weave in the end.
Facial Placement
- Eyes: Place safety eyes in Row 8. The first eye goes between the 1st and 2nd increase; the second eye goes between the 7th and 8th increase.
- Nose: Position the safety nose between Row 2 and Row 3.
Final Assembly
Stuff the head, body, and limbs firmly with fiberfill. Sew the head securely to the top of the body using the yarn tail left from the body section. Attach the ears to the top of the head and the tail to the rear of the body. Use the black embroidery thread to add small details to the muzzle and paws for a finished look.
“`